Logan Wolfram

Enjoying Life for Dessert

  • Home
  • About
    • Meet Logan
    • Meet My Family
  • Blog
  • Eat
  • Journey
  • Create
  • Connect

Jello Aquariums and Hot Dog Noodlers

September 2, 2011 by Logan 5 Comments

Once in a while, I get hit upside the head with an inspiration that gets me going on a roll to want to try a couple of new things. That happened to me yesterday when I was looking around on Pinterest.

Pinterest is one of my most favorite ways to veg and to be inspired these days. In fact, I like it so much that I honestly have to ration my time on it. In case you don’t know Pinterest…it’s an amazing way to basically keep virtual bulletin boards of ideas you like, pictures that inspire, recipes you’d like to try, décor you want, and anything else really (plus, it links to the original source of the picture you pin as well.) It is also another avenue of social networking so you can see what other people you know are pinning and interested in as well. It’s awesome. But you have to be invited to do it…so if you’re interested, email me at Logan dot Wolfram at gmail dot com, and I’ll send you an invitation. It’s so much fun.

Anyhow, I saw the cutest thing on Pinterest the other night and it was one of those “I am absolutely going to buy the stuff to make those TOMORROW!” Then I saw another thing, and before I knew it, my day was definitely going to have some kid crafty foodie goodness going on.

Check out these Jello Aquariums…so stinking cute!
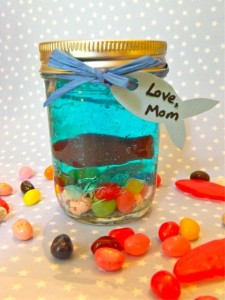
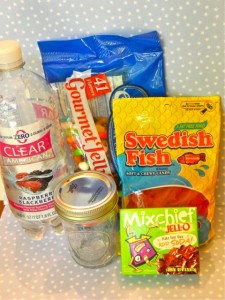
First order of business today was to make the jello aquariums since they’d need to set up in the fridge. To do these you’ll need:

  • Jello Mixchief Soda Jello
  • Some soda (I used a clear raspberry fizzy water so I could color the water as I wanted.)
  • Swedish Fish
  • Jelly Beans
  • ½ pint mason jars


I wanted to make about a dozen of these to last a few days, so I actually used 3 packages of the Mixchief soda jello, and 1 package of berry blue jello.  I followed the instructions on the boxes and then mixed them together (the mixchief with the regular jello) and poured the liquid into the mason jars to set up in the fridge. I got 11 full jars out of the 4 boxes. (Next time I think I’d just use blue food coloring to make the “water” though because I think that the regular jello reduced the fizz factor of the soda jello.)

Now, here’s a tip. When you make these, you really should assemble them exactly when you want to serve them. I made one for my kiddo to eat and then one to take pictures of for you. After a couple of hours the Swedish fish in the middle looked bloated and gross, and the jelly beans in the bottom look mushy and slimy from being in the jello. So… to look cute and fresh, I stored all the prepared jello in the jars (in the fridge) for later assembly.
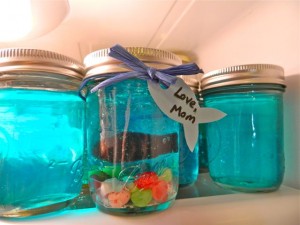
 

To assemble this tasty little aquarium, put a few jelly beans in the bottom of a clean jar (you could probably also use blueberries or something else round to imitate aquarium rocks.) Slide a knife around the edge of a full jar of jello to loosen it and pour it on top of the jelly beans in the fresh container. Then cut a slit in the top of the jello and shove your Swedish fish down in there to swim around. I’m thinking this would be ridiculously adorable in a fishbowl for a party to feed more people too. My son had an absolute fit over it. Loved it! I’m sending him one to school for snack tomorrow. It made him feel awesome. It’s the little things you know.

I, for one, think jelly beans and Swedish fish in jello sounds kinda nasty, but a 5 year old who also likes things like gummy bears and fruity pebbles and Nerds on ice cream will think this is fantastic. Trust me.

After I put the jello in the fridge to set, I got things ready to make our lunch…which incidentally also looks nasty to me, but my kids again thought it was pretty much the bee’s knees. They loved making it and both gobbled it up. I have to say, these things look hilarious to me. I don’t know why, but they do.

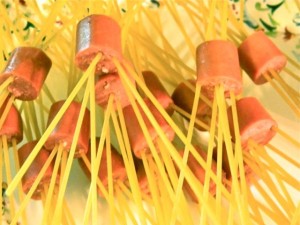
Before Cooking

After Cooking


To make these weird hot dog noodlers, cut a hot dog into a few slices. Shove dry spaghetti into the hot dog section…however many you want. I think we stayed between about 5-7 noodles per slice. Drop the not dog noodlers (yes…I made up that name…hot dog noodlers) into boiling water and cook for as long as your noodle package tells you to cook them. I used regular spaghetti noodles and it took about 11 minutes. Drain them as you normally would and add whatever your kids like on top. I dumped some Classico tomato and basil marinara on ours to achieve a massive kid-friendly food home-run.

I’ll say, I’m not a person who makes “kid food” and “adult food” too differently. I expect my kids to eat whatever I’m cooking, but when it comes to lunches, we have been known to have a little fun…and this was definitely fun. Not to mention ridiculously easy, and my kids thought it was sort of like doing a craft which of course scored even higher in the cool factor category.


I think that both of these treats will be making future appearances around here. I could hardly wait to share the fun with you all too!

AND, don’t think I forgot…The winner of the “Enjoy Your Life for Dessert” favorite things gift package goes to….

entry #32 Kelly Jowers

who said: “Enjoying my life for dessert this summer has included spending at least one day a week in PJs all day with my girls…sometimes you just need days with no real agenda!”  Ain’t that the truth Kelly!?!

Thanks so much to everyone who entered, and to all of you for participating and making my “new” blog debut giveaway week such fun. I’m seriously considering compiling all of the answers from this giveaway in particular into one massive post. I honestly LOVED reading through these comments about how you each enjoy your life for dessert. I appreciate you all sharing, and it was so refreshing to hear new ideas of how to enjoy life and to be reminded of just how many blessings we each have in our lives. So, thanks ya’ll! I loved reading every single comment…truly. Makes me wish I had that many comments all the time! (hint hint! 🙂 )

Hope you all have a fantastic Labor Day weekend friends!
Filed Under: Create, Eat, Journey

What’s for Dinner?! Bowtie Pasta with Eggplant, Caramelized Onions, and Pine Nuts

August 8, 2011 by Logan 1 Comment

I’ve had access to my fabulous neighbor’s vegetable garden this summer and because of that, I’ve had more occasions to try new recipes with uber-fresh ingredients just a short walk away.

I’ve never been someone who is bowled over by eggplant…I guess I’ve just never met the perfect way to cook it…until now.

I tried this recipe when my friend Susan came to visit a couple of weeks ago, and we both agreed that it’s a keeper for sure! I’ve made it again since then because it’s so good.  It’s easy, you can make it mostly all ahead, and it’s so so yummy!  Despite the fact that it doesn’t contain any meat either, it’s very filling, and even the most meat eating man would be satisfied with this one!

Once again, this recipe owes a shout out to one of my favorites, the Foster’s Market Cookbook.

You’ll need:

  • 1 lb bowtie pasta (I was out of that so I used Rotini)
  • 1/2 c. olive oil
  • 2 Vidalia or other sweet onions cut in half lengthwise and thinly sliced
  • 1/4 c. balsamic vinegar
  • 2 eggplants peeled, diced, and cut into 1/2 inch cubes
  • 4 garlic cloves, minced
  • 3 roasted red bell peppers, peeled, cored, seeded, and julienned (I cheated on this one and just bought roasted red peppers in a jar and julienned them myself)
  • 1/2 c. fresh parsley (fresh herbs are pretty crucial in this one ya’ll!)
  • 8-10 fresh basil leaves, cut into very fine strips (chiffonade)
  • 1/2 c. Italian vinaigrette (Wisk together 1/4 c. red wine vinegar, 3 cloves minced garlic, 1 tsp Dijon mustard, 2 tsp dried oregano, 3/4 c. extra virgin olive oil, salt and pepper to taste )
  • 1/2 c. pine nuts, toasted
  • salt and freshly ground pepper to taste
  • 1 c. crumbled goat cheese
  1. Preheat oven to 400 degrees.
  2. Cook the pasta in a large pot of boiling, salted water, stirring occasionally about 8-10 minutes or until al dente.  Drain and toss with 1 Tbsp olive oil and set aside.
  3. Heat 3 Tbsp olive oil in a medium skillet over med-low heat.  Add the onions and cook and stir about 10 minutes, until the onions are soft and translucent.  Add 2 Tbsp balsamic vinegar, reduce heat to low, and cook and stir 20-25 minutes longer, until the onions are soft, brown, and caramelized.  Set aside.
  4. Meanwhile, toss the remaining olive oil and remaining balsamic vinegar with the eggplant and garlic and mix to coat evenly.  Spread in a single layer in a baking pan and place in the oven to roast for 25-30 minutes.  Stir several times during the cooking process, until the eggplant is lightly brown and tender.  Remove from the oven and set aside to cool.
  5. Combine the pasta, onions, eggplant-garlic mixture, roasted red peppers, pine nuts, parsley, basil, and vinaigrette and toss lightly to mix.  Season with salt and pepper and add the goat cheese.  Toss gently to mix again.  Serve immediately or refrigerate until ready to serve.

Below I put a picture of how the onions should look once they are caramelized.  The left picture is of the eggplant on the baking sheet and the onions at the beginning.  On the right is how the onions look when they are done caramelizing.  Just thought I’d show you…I’ve been asked about caramelizing onions before and have a few recipes that call for them.

Bon Apettit!

Filed Under: Eat

What’s For Dinner?! Fig and Sausage Pizza OR Salad!

August 3, 2011 by Logan 3 Comments

I posted this recipe awhile back, but honestly til now it wasn’t the best time to make it.  Right now though, fresh figs are in season in the south and whether you have a neighbor like I do who’ll let you come pick them off of her tree, or you have to buy them at the store…get some and make the following.  It is so amazing that I crave it the rest of the year.

This is NOT hard.  I promise.  Don’t look at it and think it’s “too gourmet” for you either.  It’s not.  I really try to post things that are not complicated.  This recipe may sound different because most of us aren’t typically accustomed to cooking with an ingredient like figs, but I promise that it is amazing and a fun and easy way to try something new using fresh, in-season ingredients.  Lemme know what you think!

Here’s the really fun part.  Make salad one night from this and make the pizzas the next night for dinner.  So you get 2 amazing dinners from one time of real prep work…there’s a winner for the uninspired for sure!

Grilled Sausages with Figs and Mixed Greens

Ingredients
•6 fresh lamb sausages, spicy Italian sausages, or garlic sausages (i used mild Italian sausages that i crumbled and sauteed)
•4 1/2-inch-thick red onion slices
•10 tablespoons Pomegranate-Cumin Dressing, divided
•12 cups mixed greens ( i mixed spinach and arugula)
•3/4 cup crumbled soft fresh goat cheese
•6 fresh figs, halved
•1/4 cup (packed) sliced fresh mint leaves

Preparation
•There are 2 ways to do this.
Way 1) Prepare grill (medium-high heat). Brush sausages and onions with 3 tablespoons dressing; grill sausages until cooked, 15 minutes, and onions until charred, 10 minutes.
Way 2) Here’s where I did it differently.  The first time I made this I did it this way above that was suggested, but I honestly thought it harder and not as tasty.  The next time I made it and how I do it now, is to crumble and brown the sausage and caramelize the onions inside over the stove earlier in the day.  So by dinner time all I’m doing is rolling out the dough and assembling the pizza.  I think it tastes better this way too because it’s easier to bite and each bite is tastier with the crumbled sausage b/c it spreads around more easily.

Toss greens with remaining dressing; mound on plates. Slice 4 sausages (reserve 2 for pizza). Top greens with sausages, cheese, figs, and mint.

Dressing recipe

Pomegranate-Cumin Dressing
Makes about 1 cup 
Ingredients
•7 1/2 tablespoons extra-virgin olive oil
•4 1/2 tablespoons white balsamic vinegar
•3 tablespoons sliced fresh mint leaves
•1 1/2 tablespoons pomegranate molasses
•1 tablespoon ground cumin
•6 tablespoons minced shallots

•INGREDIENT INFO
If you can’t find pomegranate molasses at the supermarket or a Middle Eastern store, make your own by boiling 1 cup pomegranate juice until reduced to 3 tablespoons syrup, about 15 minutes. (this is what i did and it was really easy.) And I made extra and froze it in 2 Tbsp portions in a silicone ice cube tray so I’d have the pomegranate molasses any time I wanted it.

Preparation
•Whisk first 5 ingredients in bowl. Mix in shallots; season with salt and pepper.

Fig and Sausage Pizza

Ingredients
•1 pound purchased fresh pizza dough
•5 tablespoons Pomegranate-Cumin Dressing, divided
•1 cup coarsely grated Fontina cheese
•Fresh arugula
•2 italian sausages, I actually remove the casing and crumble and brown them on the stove…easier and then there is sausage in every bite.
•6 fresh figs, quartered
•2 thin red onion slices, rings separated – I also caramelize onions on the stove too
•1 cup crumbled soft fresh goat cheese
Preparation
•Prepare barbecue (medium-high heat). Halve dough; roll to 10-inch rounds. Brush tops with some of dressing.
•Grill pizzas, seasoned side down, until golden on bottom, about 4 minutes. Turn pizzas over. Top with Fontina, arugula, sausages, figs, and onions. Drizzle with more dressing. Cover; grill until Fontina melts and pizza is cooked through, about 4 minutes. Top with goat cheese. Grill until goat cheese softens, about 1 minute.

Ok…hope that whets some appetites out there.  Does mine for sure!

– Logan

Filed Under: Eat, Journey

What’s Cooking?! Play Dough Cookies….

August 2, 2011 by Logan Leave a Comment

You know sometimes you have certain childhood memories that just stick out in your mind?  Fun things you did that you look forward to doing with your kids when you grow up too?  I have a decent sized handful of things we did since my mom and her friends were super fun and creative.  We had cotton candy and lemonade stands,  we created a 1950’s diner and served up lunch and malts on a couple of occasions, we baked and created all the time, and I have really fun memories of playdough style sugar cookies too.
It’s been hot as all get out here lately in the South, and I decided that I needed to see if my mom could dig up that old recipe for playdough sugar cookies.  So that’s what we did the other day and it was a blast!  This dough is better for playing with than the amazing regular sugar cookies that I make and it can be baked in shaped up to about 3/4 inch thick.  Beware that you do need some flour all over the surface you’re working on to roll it out though.  What I’m really saying here is that it’s messy folks…even when you contain the messes on individual cookies sheet trays….you’re gonna have to vacuum immediately afterwards.  But it’s fun….and childhood should be fun, and on occasion even really messy.
So do it.  You will have fun.  Your kids will have fun….and make great memories.  And that my friends is most certainly how to enjoy your life for dessert!

Edible Playdough Cookies

1 cup margarine, softened

1 cup shortening
2 1/2 c sifted powdered sugar
6 hard cooked egg yolks, mashed
2 tsps. baking soda
2 tsps cream of tartar
1 Tbs. vanilla
5 cups flour
food coloring
Cream butter and shortening; gradually add sugar, beating til light and fluffy.  Add yolks, soda, cream of tartar and vanilla, beating well.  Gradually add flour, mixing well.  Wrap in plastic wrap after coloring.  (I made 4 different colors.)  Chill 1 hour.  Hand shape cookies, not more than 3/4 inch thick.  Bake at 350 for 10-15 minutes.  Thicker cookies take longer.  Cool on baking sheets 1-2 minutes before removing from pans.  Cool on wire racks.  Makes 5 1/2 dozen 2 1/2″ cookies.
Woo Hoo!  Fun had by all!  And I should warn you that if you have a lot of artificial food coloring to make your dough super fabulously colorful…your baby will have diapers for the next day that look like they came straight from the fanny of a leprechaun! WOAH!  That was a shock for sure!
Get out and do something fun today!

Filed Under: Create, Eat, Journey

Culinary Indecision….and a Key Lime Pie Recipe

July 19, 2011 by Logan 4 Comments

I’m having a couple of girlfriends over tonight for coffee and dessert.

You know in life sometimes when there are people that you think would be so much fun to get to know better?  Every time you see the person/people, you completely connect and walk away thinking… “I really wish my life wasn’t so crazy right now because I’d really like to get to know_____________ better.”  Well, that’s how I feel about these 3 girls I invited over tonight.  Every time we’re around one another we say “Let’s get together soon” and then we don’t do it.  But we all really mean it too…it’s completely genuine, it’s just a matter or schedule rearranging and prioritizing.  Anyhow, I just flat decided the other night it needed to happen…so it is.  Tonight.

There was a recipe that I found a few days ago for a Four Layer Blueberry Gingerbread Cake with Mocha Cream that looked interesting.  I thought it sounded like an odd combination… but might be one of those things that after eating it, I’d wonder to myself why I never thought of the genius pairing of blueberries, and gingerbread, and mocha cream?!  I decided to step outside of my own personal don’t-ever-make-something-for-company-that-you-haven’t-tested-before box and whipped it up today.  By the way, that is a link to the recipe above.  It’s from the Foster’s Market Cookbook that I adore.  Anywhooo…I made the cake, and I have to be honest and say that it’s a fantastic recipe, but I don’t really love it.  I will make the cake again and the cream again, but I won’t put them together.  I think the blueberry gingerbread cake needs a lemony vanilla cream, and the mocha cream…well, it just doesn’t need gingerbread in my opinion.  Feel free to try it and tell me what you think….you may think I’m insane, but you may agree.  Don’t get me wrong…it’s fine…I just won’t make it again as is.

Looks alright though huh?

Since I’m not unbelievably thrilled with this cake, I decided to make something that I DO know is good for my eagerly anticipated company….

Key Lime Pie

And this is a recipe that I like enough to bother typing out for you.  I’ve had key lime pie all over the place and this tart, creamy, classic is still my favorite.  I’ve tried variations with fancy additions, but honestly…some oldies but goodies are best when you leave well enough alone.

To make key lime pie you’ll need: 

a graham cracker crust (sometimes I buy them, sometimes I make them.)

  • Today I made it with 6 Tbsp melted butter, 3 Tbsp sugar, and 2 c. crushed grahams.  Mix together, press into a pan and bake at 350 for about 10-15 minutes.  Let cool before filling.)

For the filling:
1 – 14oz can sweetened condensed milk
3 egg yolks
1/2 c. key lime juice

Now you can get all fancy and buy key limes and squeeze and zest them if you want, but I’ll have my pie nice and easy thank you, so I just buy the juice in a bottle.

Mix the 3 highly technical ingredients in a bowl til creamy.  Pour into your prepared crust and bake at 350 for 15 minutes.  Then chill it…several hours (as in no less than 4)… til nice and fabulous.

That is it….and IT is amazing.  A lot of times I even put perhaps 2/3 c. key lime juice to make it extra tart….because that’s how I like it.  Oh yeah, my pie pan is super deep dish so I had to double the filling recipe to make a nice full pie.  If you use a standard shallow pie shell though, one recipe should do it.

I was on a roll today too I guess because when i had half a dozen egg whites remaining, I remembered a recipe I saw recently for macaroons and thought I’d just try them as well while I had a mess in the kitchen.  So Tid Bit helped me make a much bigger mess, and in about an hour or so once that mixture is nice and cool, we’re going to give them a shot too.

After tonight I’ll be farming out leftovers.  Heaven and my thighs know that I don’t need all this stuff here!

Now go forth friends and make Fish Tacos and Key Lime Pie….I just helped you rock your next dinner with very minimal effort!

You are welcome.

Filed Under: Eat, Journey

What’s for Dinner?! Coriander Crusted Salmon

July 15, 2011 by Logan 2 Comments

Salmon was the first seafood that I ever liked…followed by popcorn shrimp, and eventually tuna and other fish, scallops, etc. About the only seafood that I can’t find myself in a love affair with is oysters…and I’m ok with that.
For some reason though, I haven’t loved salmon so much over the past few years, or liked it really. I don’t remember if I had a bad piece or if the last few times I had it that it wasn’t done well, but since it’s not exactly cheap, I haven’t tried it again for awhile….even if it looks completely amazing in a restaurant. Guess the gamble hasn’t been worth the price tag to me when there’s inevitably always something else on a menu that makes my mouth water.
The other day though I had a taste of wild alaskan salmon and since it was on sale for $3 less per pound and I found a great recipe to try, I thought I’d give this wildly healthy and gorgeous piece of fish a shot.
And… I’m glad I did. Once you try this 15 minute beauty, you’re going to be glad that I did too.
Oh yeah, both of my kids absolutely pounded it too. ROCK ON!
So here you go, for your culinary pleasure….
Coriander Crusted Salmon with Chickpea Artichoke Salad
To make the fish you’ll need:
1 ½ lbs Salmon fillets (you could substitute tuna or swordfish as well)
3 Tbsp ground coriander
1 tsp kosher salt
1 tsp pepper
2 Tbsp Olive Oil
Preheat a large saute pan on medium-high for 2-3 minutes. Combine coriander, salt, and pepper and then coat both sides of the fish.
Place the oil in pan and let it get good and hot. Add the fish and cook 3-4 minutes on each side or until it reaches 145 degrees and the fish will flake easily. Serve over Chickpea Artichoke Salad
To make the salad:
1 bag baby arugula (4-5 oz)
½ c canned, quartered artichokes, chopped
¼ c. red onion, finely chopped
½ c. canned chickpeas (drained and rinsed)
3 Tbsp red wine vinegar
1/3 c. olive oil
¼ tsp salt
1/8 tsp pepper
Combine arugula, chickpeas, onion, and artichokes. Whisk vinegar, oil, salt and pepper until well blended and drizzle desired amount over salad. Toss and serve.
So easy, so delish!!! Enjoy!
And hey, do me a favor ya’ll?  Send this month’s Navy sailor some love?  They’re on a long haul at sea after a brief port, and it’ll be awhile til they see land again.  Letters, cards, and packages make the grind a whole lot more bearable!

Filed Under: Eat

What’s for Dinner?! Fish Tacos

July 11, 2011 by Logan 3 Comments

When I was at the beach last week, my aunt made the most delish fish tacos and I loved them so much that I made them as soon as I got home.  I have a great fish taco recipe that I made up, but I have to say, I loved these even better…and they’re easier.  Don’t you know I couldn’t hardly wait to share with you?!

You’ll have to cut me some slack on my pictures here lately too.  My nice camera kicked the bucket while we were in Montana, and every picture I take in my kitchen with this tweener camera comes out awfully yellow. 

So here’s the basic recipe:

* 1 1/2 pounds fish (I use tilapia because it’s reasonably priced and nice and flaky.)
* corn tortillas
* shredded cabbage (I used angel hair shredded cabbage pre-done in the salad section at the store)
* salsa (i made some homemade really fast in the tiny food processor with probably 2 c. grape tomatoes that I needed to use, 1/2 tsp cumin, 1/2 lime squeezed, about 1/4 cup fresh cilantro, and about 1/4 c. sliced jalapenos…from the jar.  Pulse it all til smooth…and voila!)
* some grated cheese

RUB:

1 tsp. cumin
1 tsp. ground coriander
1/2 tsp smoked paprika
1/4 tsp. ground red pepper
1/2 tsp garlic powder 
1/4 tsp salt   
Blend together and rub on fish.  Bake at 425 for 9 minutes.

Crema Sauce: (mix this all together)

1/4 c thinly sliced green onions
1/4 c fresh cilantro, chopped
2 cloves garlic, minced
3 Tbs. sour cream
3 Tbs mayo
2 tsp lime zest
1 Tbs lime juice
1/ tsp salt, pepper 
When the fish is done, sort of chunk it up in a bowl to make it easier to put on the tortillas.  Warm your tortillas and put some fish, the crema, salsa, a little cheese, and some of the cabbage.  That’s it.  It’s SOOO fresh and yummy tasting and super easy to make.  Make the crema earlier in the day and dinner is on the table in about 10 minutes.  It’s amazing if you serve it with the gazpacho that I just shared with you, or if you want something else, Mexican rice is also a great accompaniment.

Sorry for the yellow picture.  Promise it tastes even better than it looks here!
Happy cooking!  I’m trying a new recipe tonight from one of my favorite cookbooks.  My neighbor gave me some eggplant from her garden, so I’ll let you all know if it’s a recipe worth doing again and sharing!
 

Filed Under: Eat

What’s Cooking?! Real Spanish Gazpacho

July 9, 2011 by Logan Leave a Comment

I’m home now after what seemed like an eternally long time scrunched up in the backseat of my parents car with both of my kids yesterday.  We made it though safe and sound, and my own bed felt OHHH so good last night!

This morning we went out for bagels (which is a very common Saturday morning ritual for our family,) and then we went downtown to the market.  Greenville is a SUPER cool town and all summer and into the fall, there is a fabulous market on Main Street with local yumminess abounding.  I was super stoked to pick up some gorgeous tomatoes (some of them heirloom even) for $0.50/lb since I didn’t mind choosing from the “ugly” tomato box.  I’ll take an ugly tomato anyday for a full $0.80 less than a pretty one.  Same tomatoes, just not as pretty.  Nothing a good knife can’t take care of.  They’ll look ugly by the time I chew them up anyhow.

And to really give some love to my ugly tomatoes, I made Gazpacho this afternoon.  I have the MOST amazing recipe for Gazpacho that my grandmother got from a Spanish lady about a zillion years ago.  I’ve yet to find any recipe that can rival it, and I think it’s absolutely gorgeous as well.  It is the perfect thing to do with ugly tomatoes…or any especially delicious home grown ones.

And don’t you know since I’ve been a big fat slacker in the blogging department lately, I owe you a few stunners this week.  Not to worry…you’ll have them!

So here’s the recipe for the Real-Deal Spanish Gazpacho (which is a cold tomato soup for anyone who was wondering.  If you’ve never had it, do yourself a favor and make this immediately!)

2 3/4 lb super yummy tomatoes (peeled and cut into big chunks)
1/4 lb white bread without the crust
2 Tbsp Balsamic Vinegar
1 clove minced garlic
1/2 c. oil (i probably just use about 1/4 c. though…it really doesn’t need as much as it calls for.)
1/2 tsp salt
1/2 tsp pepper
1 tsp sugar

Ok, to easily peel a tomato, you need to boil some water and then pour it into a bowl when it’s good and screaming hot.  Drop your tomatoes in the hot water for about a minute or two until the skin basically just slides right off when you grab it.  Chop those babies up into giant chunks and put in your blender (yes…your blender…the kind you make smoothies with.)

Cut the crusts off of your bread (it’s about 4 slices you’ll use) and put the bread in a bowl with some water til it’s really gross and soggy…squeeze out as much of the water as you can and then toss that soggy mess into the blender with your tomato chunks.  (I always cut up the crusts into little pieces and toast them to use as croutons.  You’ll use croutons to garnish later, and the plain bread crusts make the perfect crunchy croutons that won’t rob your gazpacho of the amazing fresh tomato flavor.  Who wants a flavored crouton to steal the show when the tomatoes and fresh veggies are the real star here?!)

Add the garlic, vinegar, olive oil, salt and pepper, and sugar to the blender and blend until completely smooth.  Chill in the fridge…if you can wait that long.  This stuff is best served cold.

Now, chop up some amazing veggies to garnish.  I love to use green onions, cucumber, bell pepper (I like red better, so that’s what I use but you can use whatever ones you like), small tomatoes, hard boiled egg, and the croutons you made earlier.

Dive in and thank me later.  Or thank the Spanish people…they’re the ones who gave this to my Nanny.  Should’ve known it was Spanish…Spain is awesome.

Bon Apetit friends!!!

Glad to be back.  Vacation was awesome, but I did miss you all!

Filed Under: Eat

One of Those Days…and a Recipe for Cobbler!

June 29, 2011 by Logan 3 Comments

Today has been one of those days with my kiddos….well, with one of my kiddos.  Which is why I haven’t posted til this evening.  I’m feeling pretty emotionally raggedy after the past couple of days with my 5 year old.

I must confess that I have no idea how I ever could have thought that a strong willed mother and father could end up with a passive child.  Clearly I didn’t.  I got a boy version of myself as a child in many ways.  Strong willed he is for sure.  Laugh now Mom…I know you want to.

I know we’re in another phase right now and that this too shall pass, but good night people…I’m starting each day here lately with what feels like less and less in my “patience tank,” as a friend of mine put it today.

Today, Tid Bit spent a large portion of the day in his room for whining, complaining, willful disobedience, and then the real icing on the cake was the complete meltdown while I was at the post office mailing my Navy Sailor brother a carepackage for his birthday (which was yesterday.)  Embarrassed I was not, frustrated to almost tears I was indeed.  Especially since the past several days, really some large portion of every day since returning home from our Montana vacation, have been similar in his behavior.

I lost it yesterday.  And it wasn’t over anything major either.  Just about the 700th time he disobeyed again and I screamed “Go to your room” in a voice (and at a decibel) that honestly freaked me out too.  It was one of those completely un-awesome moments in mothering that I apologized for about 45 minutes later when he’d calmed down and I had too.

But today, it was more of the same on his part.  I handled it all a bit better, but when my husband came home tonight, I fell apart and did what any tired mother wants to do at the end of a hard day when her bathtub only holds 4 inches of water….I made a peach and blackberry cobbler.  Tis the season for both fruits, and twas the day to enjoy them for sure!

And since my longtime friend, Laura Parker, is featuring one of my favorite summer recipes on her blog tomorrow (Wednesday,) I thought I’d finish my day well and share a great recipe with you (and since it’s been a little bit since I’ve posted a recipe.)

So here you go…easiest cobbler recipe ever.  I have another, perhaps even more amazing, peach and blackberry cobbler recipe that I’ll share with you later, but this basic cobbler recipe is perfect with pretty much anything.  I almost always have these few simple ingredients on hand as well.  My favorite version of this is to use tart plums to make it…delish!

Ingredients:
3/4 stick butter
3 c. fruit (for peaches, plums, etc…peel and slice)
1 c. flour
1 c. sugar
1 tsp baking powder
1 c. milk

Preheat oven to 350.  Melt the butter in a baking dish (I usually do it in about a 9×13 because I like lots of the crunchy top parts) in the oven.  While the butter is melting mix together the flour, sugar, baking powder, and milk.  Once the butter is melted in the dish evenly pour fruit into the dish.  Then pour the mixture evenly over the fruit and do not mix up or anything.  Bake at 350 for about 30-45 minutes or til it’s nice and brown on the top.  Serve it warm with vanilla ice cream.  I promise, it’ll make a bad day so much better.

See….
Day made much better… in a bowl. 
And as Scarlett O’Hara said, “Tomorrow is another day!”
Jesus said it too…but better for sure.  No shock there.  “Therefore do not worry about tomorrow, for tomorrow will worry about itself. Each day has enough trouble of its own.” – Matt 6:34
Ain’t that the truth?!  And thank heavens for new days huh?!

Filed Under: Eat, Journey

What’s for Dinner?! Fall-off-the-Bone Baby Back Ribs…

May 29, 2011 by Logan 2 Comments

image source

I don’t know what it is about Memorial Day weekend that gets me in the mood to grill, but yesterday when I made my trip to Sam’s Club and saw Smithfield baby back ribs for $2.99/lb, I couldn’t resist.  It’s been a little while since I’ve given you a recipe anyhow, and I promise that this one won’t disappoint.  It’s from none other than one of my most favorite cookbooks, Fresh Everyday, by Sara Foster.  The woman just knows how to make good food!

I took a bunch of step by step pictures to demystify it all for you.  The whole process takes a few hours but it’s easy peasy!  I doubled it to take half to some friends who moved into a new house today, so just know that you won’t have the same size pile that I did if you follow this exactly.

The ribs can be baked (through step 3) up to a day in advance, but you’ll need to leave them on the grill a few minutes longer to make sure they heat all the way through.
 
Serves 4 to 6
2 slabs baby back ribs (about 3 1/2 pounds)
1 large onion, sliced
1 12-ounce bottle of beer
Sea salt and freshly ground pepper to taste
2 cups homemade barbecue sauce or your favorite bottled sauce

 1. Preheat the oven to 325ºF.

2. To remove the membrane from the back of the ribs take a small dull knife, like an oyster or table knife, and pry the tip of the knife between the membrane and bone at the edge of the ribs in the center of the slab. Lift to separate the membrane from the bone, then grab the membrane with your fingers and pull it off and discard.

3. Spread the onion slices evenly on a baking sheet with sides and place the ribs, bone-side down, on top.

Pour the beer over the ribs, season with salt and pepper, and cover tightly with foil. Bake undisturbed for 2 hours.

4. Prepare a fire in a charcoal grill and let the coals burn to a gray ash with a faint red glow, or until you can hold your hand 3 to 4 inches above the fire for no more than 6 seconds. (I have a gas grill and heated it to about 375-400 degrees to grill them.)

5. Brush both sides of the ribs with the barbecue sauce and place them, meat side down, over the coals. Grill the ribs for 10 to 15 minutes, or until charred, basting several times. Turn the ribs and baste the cooked side liberally. Close the lid of the grill and cook the ribs 10 to 15 minutes longer, basting often. Cut the slabs into individual ribs, pile them onto a large platter, and serve warm.  (I didn’t take pictures of this part…I figured it’s pretty easy to brush sauce on, put them on the grill, and then cut them apart.)  I did mine for about 13 minutes on each side, and here’s how they turned out!  They were SOO good.  Even Little Bit ate them til the bones were completely clean!

So Happy Memorial Day weekend!  Fire up your grills and get cooking!  If you’re not a ribs person, but more in the mood for burgers, then hop back over to the post I did awhile back for some mouthwatering Andouille Sausage Burgers that will knock your socks off!!!

Filed Under: Eat

  • « Previous Page
  • 1
  • 2
  • 3
  • 4
  • 5
  • 6
  • 7
  • Next Page »
  • 
  • 
  • 
  • 
  • 
  • 

Subscribe by Email

Oldies but Goodies

Copyright © 2025 · Logan Wolfram · Logo by Annie Barnett · Site by Design by Insight