Logan Wolfram

Enjoying Life for Dessert

  • Home
  • About
    • Meet Logan
    • Meet My Family
  • Blog
  • Eat
  • Journey
  • Create
  • Connect

Cracker Candy Recipe {What’s Cooking}

December 19, 2012 by Logan 2 Comments

Growing up, my mom always made this stuff we like to call Cracker Candy at Christmas time.  It’s sweet, it’s salty, crunchy and delish.  And…it is EASY to make!  One time I made it and someone asked how I made the flaky pastry that was inside.  I just said it was years of skillful practice.  (ok, not really…I told the truth that the “flaky pastry” is really just saltine crackers.)

My soul sister, Emily, and I have made cracker candy every year since I met her back in 2000.  We started out making half a dozen pans and dividing it up to give little boxes of the treats to neighbors and a few coworkers.  This year, after 12 years of friendship, weddings, babies, moves, and kids in school…we have a few more than just a small handful of people to give treats to for Christmas.  So today, since we’ve turned the art of making cracker candy into a study in efficiency and a science of perfect skills, we knocked out 25 pans worth in about 4 hours.  And you know what I’ve decided….I’m glad I didn’t become a baker afterall.  But once a year in a tradition of baking and good girl time, it sure is fun!

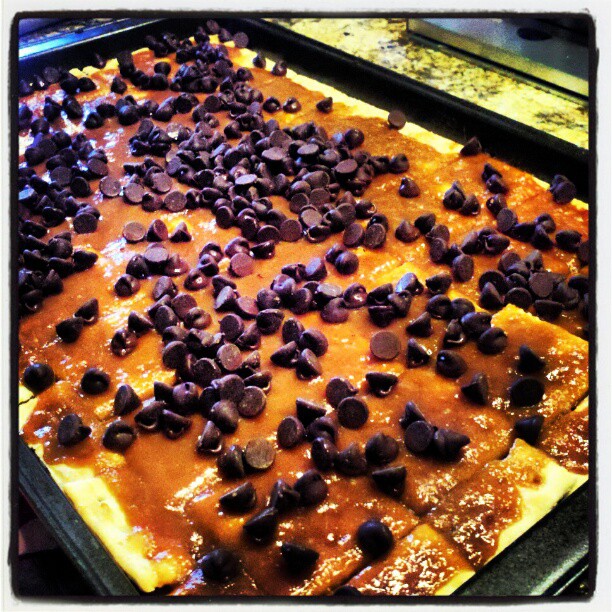
Check out the goods….

cracker candy

Here’s what you’ll need:

  • A cookie sheet lined with parchment paper (trust me…you’ll appreciate this step for cleanup later.)
  • Saltine Crackers (usually a pan takes about 1 1/2 sleeves of crackers)
  • 1 1/2 c chocolate chips
  • 1 c. brown sugar
  • 2 sticks butter

Preheat oven to 350.  Line a cookie sheet with parchment paper and cover with crackers. Melt butter and brown sugar over med-high heat.  Once boiling, boil while stirring constantly for 4 minutes.  Pour over crackers and spread out to evenly coat the crackers.  Then put in the oven to bake for 5 minutes.  As soon as it comes out of the oven, sprinkle the chocolate chips over the crackers and let them melt.  Once melted, spread the chocolate to evenly coat the crackers.  If you want to expedite the process, put the pan in the freezer to let the chocolate harden.  When it’s hardened, cut it up and try not to eat the whole pan!
Filed Under: Eat

Roasted Goat Cheese Appetizer {Recipe}

December 6, 2012 by Logan 8 Comments

So, I made my first vlog today all by myself!  Let’s hope it worked!

I made this yummy appetizer yesterday for some friends coming to dinner, and then I made it again for a girls’ night tonight, and I thought it might be more fun to try a vlog for ya’ll!

And for those of you who want a written version too, here you go!

  • 10 oz log of goat cheese
  • julienned sundried tomatoes
  • peeled and roasted garlic cloves (roasted at 400 degrees for about 20 minutes)
  • herb mix (herb de provence or italian, or whatever savory blend you feel like doing)

Roll goat cheese into balls, toss in herbs and put in baking dish. Surround with roasted garlic and sundried tomatoes and bake at 350ish for about 7-8 minutes. Serve on crostini, lavosh crackers, or any other yummy cracker.

Filed Under: Eat

Sisterhood of the Traveling Pan

November 30, 2012 by Logan 5 Comments

If I’ve said it once, I’m sure that I’ve said it 100 times…. I LOVE a good chick flick.  I have a group of dear friends here who all feel the same way.  So, once in a while when a good one comes out, rather than drag reluctant but acquiescent husbands to the movies for a laugh or cry, we put our kids to bed and catch a late show all together usually on a random Tuesday night when Regal Cinemas offers $1 popcorn.  It’s a beautiful thing…really it is.

One of my favorite chick flicks ever is the Sisterhood of the Traveling Pants.  Of course there’s the lovey dovey stuff that butterflies in your stomach are made of…young love and silly crushes.  But, when I think about this movie, the thing that I love the most is the bond of friendship that weathers heartache, and real life loss, excitement and adventure.  Friends who use something as inanimate and lifeless as a pair of killer jeans to transcend the space and time that comes between them for a summer.  Though they aren’t together in the flesh, their hearts are still knit and bonds continued as they pass a pair of pants from home to soccer camp to time with an estranged parent to a trip to Greece and share the stories they each experience in the pants along the way.  There’s the evidence of the pants, that even though they’re not together, that they still carry one another in their hearts.

Maybe sometimes, we just need to know that someone is thinking of us when we’re not expecting it.  That we matter beyond space and visibility.  It’s an unexpected card in the mail, or bringing a silly present to a friend hosting a random brunch, or a drop by during a week that’s been rough to drop off a Starbucks gift card, or a dinner in a pan ready for the oven that night.

A few weeks ago I was making dinner when I decided to myself, “you know what self, chicken divan is so yummy, and it’s easy peasy to double, so I’ll double it and when I drop off carpool today, I’m going to surprise Julie with a pan for dinner.”  So I did, and the random surprise of a dinner unexpected was such a fun surprise both to give and to receive!  I mean, when there’s a new baby, people bring meals.  Or when there’s loss…again, meals.  And I’m never more thankful not to have to cook or grocery shop or meal plan than when I’m overtired or grieving.  The gift of meals is honestly one of the best blessings ever if you ask me.  But I think too often we just don’t do the random ones enough.  Take that one extra thing off of a friend’s plate to keep her from tipping over the edge, or maybe…just maybe…surprising someone in a day with an afternoon free because dinner is taken care of.  Julie loved the surprise supper.

And yesterday, Julie returned my pan to me.

With this in it….

enchiladas

That would be a pan full of her homemade enchiladas in my oven.  She gave my pan back full and I wasn’t expecting it at all.  And can I tell you that on a day when I had a million phone calls to make, and emails to write, and appointments to keep, I couldn’t have been more excited to have dinner in my oven that I didn’t have to make!

So I propose a fun idea ya’ll.  Let’s start a trend…the Sisterhood of the Traveling Pans!  Grab that pan you’ve been meaning to give back to your gal pal for a while now, and put something tasty in it to return to her!  And keep it going!  I know for sure, Julie has another random meal surprise in her future!

Let’s love when we’re not expected to love, in ways that bless amongst the dailiness of life.  What do ya say?  Ya in?

Filed Under: Create, Eat, Journey

I’m Alive…I Promise! {And a Printable Recipe!}

October 23, 2012 by Logan 2 Comments

Friends,

Just so you know, I’m still here.  I just thought I’d let you know.

I’ve been working my fingers to the bone to get everything ready for the Allume Conference this coming weekend that I’m a part of putting on.  I’m in charge of all the decorations, food, some gift baskets, a man room, and a few other things.  In addition, on Saturday I’ll be speaking on “Using Your Blog for Real Life Discipleship.”  WOAH!  It’s a lot, but I’m so thankful and excited to be a part of it.

In addition, I’ve mostly finished the little boy’s room I shared with ya’ll awhile back.  A couple more finishing touches when I get back from Allume, and then I’ll share the real deal pictures with you all!  Have also been working on a Master Bath renovation as well as a dental office re-do.  All to say….I’ve been doing my best to keep it together as mommy and wife as I’ve been so insanely busy.  I’ve been a bad friend to my dear ones here over the past month, and clearly, I’ve been a horrible blogger too.  SOMETHING had to give though.  I do hope you won’t think me the worse for it!

So….I just wanted to check in with ya!  And….for fun, because I created it for something I’m doing at Allume….I figured I’d share with you the printable recipe card that I created with my all-time favorite sugar cookie recipe!  I made 2 of them with different backgrounds!  So….print for your files and now, you have something fun to add to your Christmas Cookie collection!

I’ll be back next week!  And in the meantime, I sure would LOVE your prayers for me as I’m working the conference this weekend.  I’m asking the Lord for supernatural efficiency and rest while I’m there.  I’m also praying that my words will be straight from the Father as I share in the session on Saturday morning!  Calm nerves too!  I’ve never done this before!

And if you’ll be at Allume….well then, come give me a giant hug!  Can’t wait to see you!

Filed Under: Create, Eat

Slow Roasted Pork Recipe – 1 Roast, 3 ways

September 28, 2012 by Logan 2 Comments

This post will be painfully without pictures since I already made this recipe earlier this week (and am now using up the rest for a different dinner tonight).  SO Sorry for that!  Just trust me that these slow-roasted pork tacos are the bomb!
After we lost Fisher in March, my friend Laura brought us these tacos for dinner one night.  They were so delicious and fresh tasting that they’ve made it into our consistent menu round-up. It’s become a total comfort food around here. I love that this uses one huge roast, and so by the time it’s done, I use it for multiple dinners.  One night (or 2 because they’re so good,) I use them for the pork tacos with Mexican rice.  One night I’ll make BBQ sandwiches and sweet potato fries, broccoli, and whatnot.  And tonight, I’m tossing the rest of the pork into my favorite recipe for Brunswick Stew. We’ve gotten 3 dinners out of this one incredible roast!  It’s so ridiculously easy and incredibly flavorful.
Try it with the tacos first!  I always top them with sour cream, angel hair shredded cabbage (adds yummy crunch,) cheese, and homemade pico (i make a bunch using 2 diced fresh tomatoes, 2 diced fresh avocados, 1 diced red onion, about 1/2 bunch fresh cilantro chopped, and 1 lime squeezed.)  Oh ya’ll….SO SO GOOD!
Here you go!

Slow Roasted Pork

Ingredients

  • 1 tablespoon chili powder
  • 1 tablespoon ground paprika
  • 1 tablespoon sea salt
  • 1 tablespoon freshly ground pepper
  • 1 (6-pound) or 2 (3-pound) pieces Boston butt or pork shoulder
  • 1 cup apple cider or unfiltered apple juice
  • 20 to 24 corn tortillas, grilled
  • Toppings: lime slices, grated cheese, fresh cilantro, sliced avocado, sour cream, Garden Tomato Salsa

Preparation

  1. 1. Preheat oven to 325°. Combine first 4 ingredients in a small bowl; rub spice mixture all over pork. Place pork, fatty side up, in a large Dutch oven. Pour cider and 1/2 cup water around pork. Cover with a lid or aluminum foil, and roast at 325° for 5 hours or until fork-tender. Uncover and cook another 30 to 40 minutes or until skin is crispy and pork breaks apart easily with a fork.
  2. 2. Remove from oven, and let stand 10 to 15 minutes before shredding into chunks with 2 forks. Skim fat from cooking liquid, and add liquid to pork before serving. Serve warm with grilled tortillas and desired toppings.

Bon Appetit!


Filed Under: Eat

Not Yo Granny’s BLT {Amazing BLT Sandwich}

July 27, 2012 by Logan 1 Comment

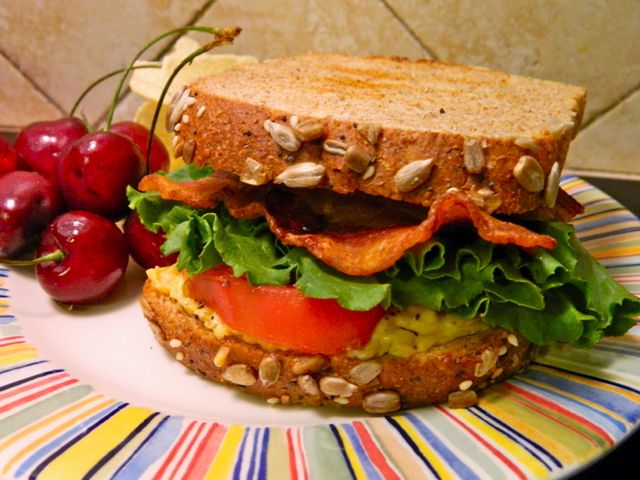
This may look like a standard issue BLT to some, but trust me….it’s not.  I have created a sandwich so completely incredible, I’m fairly certain that it’s served in heaven.  It’s so good it kinda makes your eyes roll back in your head….THAT level of goodness…but simple goodness too, just kinda amped up.

So, to make this amazing sandwich which I’m dubbing…

Not Yo Granny’s BLT

You will need:

  • Incredible bread  – I’m into hearty, grainy, seedy, whole grain varieties….but pick your fav.  No Wonderbread for this one, it will disintegrate.  It can’t handle the truth, and this sandwich is the truth!
  • Homegrown tomatoes  – And if you can get homegrown heirloom tomatoes, then consider your sandwich “next-level-ified”
  • Palmetto Pimento Cheese with Jalapenos  – If you don’t live in the south or your grocery store doesn’t carry it, then you’re missing out, but you can always make THIS recipe for pimento cheese and use it.  It’s pretty stellar albeit more labor intensive than opening up a tub of other-person-homemade creamy goodness.
  • Fresh lettuce  –  Had I any arugula though, that would have taken it over the top even more.
  • Extra crispy bacon – Applewood Smoked is the bomb, I also love Smithfield Peppered Bacon, just make sure whatever you choose, it’s cooked to crispety crunchety perfection (My new fav bacon cooking method is on a foil lined cookie sheet in the oven…about 375 for 20-30 minutes…just til it’s perfect.  In My book, the cleanup is way better than a splattery mess too!)
  • Avocado  – I like the Florida Slimcado, but whatever kind you have will be great as long as it’s ripe
  • Fresh Ground Pepper – Crack some of that goodness right on top of your tomatoes.
  • Drizzles of Truffle Oil and Thick, Super-Aged Balsamic Vinegar –  These additions may have just put this thing into a whole new category for me.  My favorite balsamic vinegar is a fig balsamic, so it has a little more thickness and sweetness….killer on this sandwich.  And truffle oil….seriously…if you don’t know it, then get to know it…YUM!  Oh sweet happiness….do this.  It’s incredible.

Friends, I’m telling you…this might even be better than the Fried Green Tomato BLT with Fresh Goat Cheese that I had a couple of years ago on our trip to Blowing Rock, NC.  I love me some fried green tomatoes, but you just can’t beat a killer homegrown heirloom.  Lord, have mercy on my metabolism….I’m gonna be eating these things every day until the vines are no longer yielding!


Filed Under: Eat

Peach Muffins with Streusal Topping {Peach Muffin Recipe}

July 20, 2012 by Logan 7 Comments

We’re smack in the midst of our luscious peach season here in South Carolina.  It’s bliss.  What’s not to love about peaches?!

On Tuesday this week, I took my children to a local dairy farm for a tour.  It was hot as crap outside….and since it was a dairy farm, it smelled like crap too…literally.  It was so hot that it was one of those days that the whole day feels like someone is standing in your face breathing hot breath on you.  I hate that….hot breath in your face.  Makes me feel like I might suffocate.

Anywhooo…the dairy farm had a little store that sold other local yummies, and I cannot walk past a basket of fresh peaches when there are none on my counter ripening at home.  So I bought the biggest basket they had and feel happy just looking at my counter covered in juicy sweetness ripening! Mmmmmm!

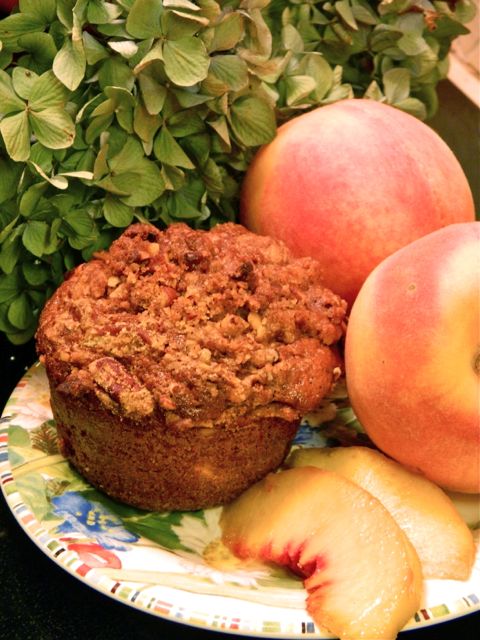
Today my super fun friend Laura was coming over to hang out with her kiddos, and I thought I should put some of those peaches to good use.  One of my all-time favorite cookbooks practically flew off the shelf into my hand as soon as I was thinking “peachy goodness.”  Fosters Market never disappoints…and neither did these fabulous muffins!

Feast your eyes on this…and then make them and stuff your face!  I’m calling it like it is though…these aren’t for breakfast so much as for dessert!  I love whomever the person was that invented a tiny cake and decided to call it a muffin.  MUAH to you!  Dessert for breakfast by another name!

peach muffin recipe

Sweet Peach Muffins w/ Brown Sugar- Walnut Streusel

Yield: 12 large muffins

Prep Time: 25 min

Cook Time: 30 min

Ingredients:

MUFFIN BATTER:
2 cups all-purpose flour
1 cup granulated white sugar
1 teaspoon baking powder
1/2 teaspoon baking soda
2 teaspoons ground cinnamon
1/2 teaspoon ground allspice
1/2 teaspoon salt
3 large eggs
3 Tablespoons unsalted butter, melted
1 1/2 cups sour cream
1 Tablespoon pure vanilla extract
1 1/2 cups peeled, pitted, chopped fresh peaches

STREUSEL TOPPING:
1 1/2 cups coarsely chopped walnuts (or pecans)
1/3 cup all-purpose flour
1/3 cup firmly packed light brown sugar
1/2 teaspoon ground cinnamon
3 Tablespoons unsalted butter, softened

Directions:

1. Preheat oven to 375°F. Line a (12-cup) muffin pans with paper liners and spray the top part of the pan lightly with nonstick spray. Or simply spray the whole muffin pan with nonstick spray.

2. Sift together flour, sugar, baking powder, baking soda, cinnamon, allspice, and salt in a large bowl and set aside.

3. Whisk eggs, butter, sour cream and vanilla in a separate bowl until well-blended. Fold in the peaches.

4. Add wet mixture to flour mixture and stir just until blended (don’t over mix).

5. Scoop batter into the prepared muffin cups with a large ice cream scoop. The batter should come to the top of the paper liner. Mix streusel ingredients in a small bowl until crumbly. Sprinkle muffin cups with the streusel topping and lightly press it into the muffin batter.

6. Bake 20 to 25 minutes, or until the tops of the muffins spring back when pressed lightly and a toothpick inserted in the center of a muffin comes out clean.

7. Remove from the oven and cool for 5 minutes before attempting to remove them from the pan. Serve warm or at room temperature.

Filed Under: Create, Eat

Celebrating! {National Sugar Cookie Day}

July 9, 2012 by Logan Leave a Comment

I woke up this morning, and remembered that there were just a couple of cookies left in the tin…goes great with coffee….kinda like a biscotti, right?  And then, I learned from my friend that today, of all days, is the perfect reason to have a cookie with my coffee….especially a sugar cookie!

Today, my friends, is National Sugar Cookie Day!

Who knew?!  Really, who knew?!

“It’s National Sugar Cookie Day! Today, we honor a cookie that is simple and straightforward, but totally delicious. Traditional sugar cookie recipes call for just six ingredients: sugar, flour, butter, eggs, vanilla, and baking powder.

Although sugar cookies by themselves can be quite plain, they are incredibly versatile. Use cookie cutters to create shaped sugar cookies, and top them with frosting or sprinkles. You can also make cookie sandwiches with two sugar cookies and fillings like marshmallow, melted chocolate, ice cream, or jam.

To celebrate National Sugar Cookie Day, make a batch of homemade sugar cookies to share with friends and coworkers. Provide a variety of interesting decorations and let everyone personalize their bite-sized dessert!” – from www.punchbowl.com

We made 4th of July sugar cookies last week….stars decorated with red, white, and blue…and I’m still eating them for breakfast.  Still awesome too!  So i figured I’d break out my most favorite sugar cookie recipe for you again in case you are in need of random holiday celebration reasons, here you go!

These cookies are amazing!  Flaky like shortbread, hold their shape when cut with cookie cutters, and amazing whether you like them thin and crispy, or thick and soft.  Hands down, the best recipe I’ve found.  So good in fact, that my own mother has abandoned her life-long sugar cookie recipe in favor of this one.

Amazing Sugar Cookies
yield: about 75 medium cookies

  • 24 ounces butter (softened)
  • 20 ounces powdered sugar (sifted)
  • 3 whole eggs, plus
  • 1 egg yolk
  • 1/2 ounce vanilla extract
  • 1/4 ounce almond extract
  • 6 1/2 cups flour
Directions:
  1. With paddle attachment, mix butter for 30 seconds. Add a 1/3 of the powdered sugar, mix on first speed for 1 minute. Add another 1/3 of the powdered sugar, mix another minute. Finally, add the last 1/3 of sugar, mix 1 minute.
  2. Combine eggs, vanilla, and almond extract together, add to butter/sugar mixture. Mix for 30 seconds.
  3. Add a 1/3 of the flour, mix 1 minute.
  4. Scrape.
  5. Add the next 1/3 of the flour, mix 2 minutes.
  6. Scrape.
  7. Add the final 1/3 of the flour, mix 3 minutes.
  8. Refrigerate until able to be rolled out and cut into desired shapes. (if you’re using the dairy free version i told above,  I’d refrigerate it AT LEAST 24 hrs before rolling out to make sure it really sets up.) Bake at 350 for 9-15 minutes depending on the size you cut them!)

Photo Source – I didn’t use our own cookie pictures, because I failed to take pictures since my kids decorated the entire batch, and red, white, and blue oft turned purple and less patriotic looking.  You get the idea…


Filed Under: Create, Eat, Journey

Plum Cobbler {Fruit Cobbler Recipe}

June 25, 2012 by Logan 3 Comments

I was at Haven last week in Atlanta and had a blast meeting loads of talented and fun women!  My roommates and I got deliriously silly one night and made a vlog that I’ll share with you soon.  I still can’t believe I did it, but I did!  And it is most definitely ridiculous!  So…more to come on that!

Today though, before my baby had to have his tooth pulled, I took my kiddos to our neighbor’s garden to pick green beans, squash and plums.  As we speak, my countertop is covered in gorgeous sweet and tart plums that are just begging to be sliced up and tossed into a cobbler.  I just had to share!

So here you go…easiest cobbler recipe ever. You can use this same basic recipe with lots of different kinds of fruit.  The last time I made it, I used peaches and blackberries, but my MOST favorite version of this is to use tart plums to make it…delish!

Ingredients:
3/4 stick butter
3 c. fruit (for peaches, plums, etc…peel and slice)
1 c. flour
1 c. sugar
1 tsp baking powder
1 c. milk

Preheat oven to 350. Melt the butter in a baking dish (I usually do it in about a 9×13 because I like lots of the crunchy top parts) in the oven. While the butter is melting mix together the flour, sugar, baking powder, and milk. Once the butter is melted in the dish evenly pour fruit into the dish. Then pour the mixture evenly over the fruit and do not mix up or anything. Bake at 350 for about 30-45 minutes or til it’s nice and brown on the top. Serve it warm with vanilla ice cream.

See….
Fruit Cobbler recipe
Day made much better… in a bowl.


Filed Under: Eat

What’s Cooking?! Pad Thai Salad

June 6, 2012 by Logan 3 Comments

In an effort to keep things different in my fridge around here without starving while I’m on the Daniel Fast, I’m trying out some different salads here lately.  This pad thai salad that I made for the first time today is from one of my favorite cookbooks, Fresh Everyday by Sara Foster.

I’ll make it again.  It is really yummy!  And instead of chopping cabbage, I used a bag of shredded cabbage (that I had leftover from making the most amazing fish tacos last week.) I think I’d do it again that way too.

So here you go friends!  (Daniel fast friendly even if you use brown rice pad thai noodles and leave out the sugar in the dressing!)

Pad Thai Salad

pad thai


Serves 4 to 6

1/2 pound flat rice noodles
1/4 pound snow peas or sugar snap peas, stem ends and strings removed and blanched
1 2-inch piece fresh ginger, peeled and julienned (about 2 tablespoons)
1/4 small head of Savoy or Napa cabbage, cored and thinly sliced (about 2 cups)
2 scallions, minced (white and green parts)
2 tablespoons chopped fresh cilantro leaves
2 tablespoons chopped fresh chives
1 cup unsalted peanuts, roasted and finely chopped
2 ounces bean sprouts or pea shoots (about 1 cup)
1/2 teaspoon crushed red pepper flakes
Salt and freshly ground black pepper to taste
Pad Thai Dressing (recipe follows)

1. Bring 4 cups of water to a boil in a medium saucepan over high heat. Remove the pan from the heat and immerse the noodles in the hot water. Let the noodles stand in the hot water for 7 to 10 minutes, stirring occasionally until they are tender, but still firm. Drain in a colander, rinse under cold water, and drain well. Turn the drained noodles into a large bowl.

2. Julienne the snow peas and toss them into the bowl with the noodles. Add the ginger, cabbage, scallions, cilantro, chives, half of the ground peanuts, half of the sprouts, the red pepper flakes, salt, and pepper. Drizzle with the Pad Thai dressing and toss gently, taking care not to break the noodles. Serve immediately, garnished with the remaining peanuts and sprouts.

Note: If you want to make this salad in advance, cover and refrigerate and garnish just before serving. You may also need to toss the noodles with a little more dressing because they tend to absorb the dressing.

Pad Thai Vinaigrette

This recipe makes twice what you need for the Pad Thai Salad. There are so many ways to use the leftovers: as dressing for a sandwich, salad, sliced tomatoes, or avocado slices.

Makes about 1 cup

2 tablespoons rice wine vinegar
2 tablespoons Thai fish sauce (nam pla)
2 tablespoons tamarind paste
2 tablespoons light soy sauce or tamari
2 tablespoon extra virgin olive oil
1 tablespoon ketchup
1 tablespoon sugar
1 tablespoon grated fresh ginger (1-inch piece)
2 cloves garlic, minced
Grated zest and juice of 1 orange
Grated zest and juice of 1 lemon
1 teaspoon crushed red pepper or chili paste

Whisk the vinegar, fish sauce, tamarind paste, soy sauce, olive oil, ketchup, sugar, ginger, garlic, orange zest and juice, lemon zest and juice, and crushed red pepper or chili paste in a small bowl. Use immediately or refrigerate in an airtight container for up to 1 week.

Photo Credit: Foster’s Market Fresh Everyday

Filed Under: Eat

  • « Previous Page
  • 1
  • 2
  • 3
  • 4
  • …
  • 7
  • Next Page »
  • 
  • 
  • 
  • 
  • 
  • 

Subscribe by Email

Oldies but Goodies

Copyright © 2025 · Logan Wolfram · Logo by Annie Barnett · Site by Design by Insight