Logan Wolfram

Enjoying Life for Dessert

  • Home
  • About
    • Meet Logan
    • Meet My Family
  • Blog
  • Eat
  • Journey
  • Create
  • Connect

Instant Party Pizazz

August 10, 2011 by Logan 1 Comment

I just have to share with you one of my new favorite things.  My friend Tonia found them for her wedding that I just styled, and now I think I want them in every color.  They are awesome.

Paper Straws
 
They come in loads of colors and patterns.  I’m thinking I need to have them on hand…you never know when you might need a little extra pizazz in a drink.  And they do add that extra fun factor for sure!  Plus, there are loads of crafts you can do with them too…think little flags, make a sunburst looking mirror or wreath with them for some extra whimsy, use them as sticks for chocolate dipped marshmallows…who knows what else. Get creative…they’re so cute!
Source

Just thought I’d share.

Happy hump day!

PS.  HERE is a link to a blog that I found yesterday that has some suggestions about great places to pick these beauties up without breaking the bank!

Filed Under: Create, Journey Tagged With: products, reviews

Oh Goody Goody….almost!

August 9, 2011 by Logan 7 Comments

Remember when I wrote about my most favorite slippers ever a LONG time ago?

Goody Goody Bon Bons
 
Well, my friend Lindsey sent me a link the other day to a PDF pattern for some slippers and said, “I think you should make these.”

Cute huh?

I’ve never made slippers though, but what’s the worst that will happen?  About the worst case scenario I could come up with was to spend $6 on a pattern and make a disaster of them …and that’s not so bad.  So I ordered the pattern pretty much immediately.  HERE is the link to the pattern if you love them too.
And now, I might not need to spend $40 on slippers anymore because I adore these!  But you know I can’t leave well enough alone, so I had to do more to them than just the basic pattern.
Here’s a picture of the first pair I made for myself.  Well, one of them anyways.

I love them, but made some changes in the second pair to improve them.  I added elastic in the back (about 2 inches of it perhaps) to help pull them in on the heel, and I also made an insert with a 2 inch piece of foam sewed inside to make them super cushy.  The other thing that would make them better I think would be to put a piece of suede or something on the bottom to wear better.  That’s probably not gonna happen til my 3rd pair though.

Here’s the second pair that I made to give to a friend at a baby shower this week.  It’s her second little girl….time to give Mommy something too I think.

These I really love.

I’m not going to bother showing you the steps because should you decide to order the pattern from THIS LINK, then you’ll have the directions with all the steps printed out for you to reference.   There were great pictures to follow for the more timid seamstress out there.  It wasn’t hard though.  Really.  If you can use a pair of scissors, read directions, and sew a straight line on a sewing machine, then I think you should give them a shot.  It was fun, and the embellishing part is really fun.  I’m thinking I have a great new gift on my list of things I can make myself!

I learned how to make those great fabric flowers on both pairs from a cute blog I like to read called Jones Design Company.  HERE is where she has a fabulous group of tutorials you can check out for more fabric flowers and other crafty goodness.  Plus…she seems like she’d be nice in person…and I really like nice people.

Thought I’d share.  I do love a good project.

PS. If you’re here visiting from HomesStoriesAtoZ’s Tips and Tutorials  Tuesday Post, you might want to check out THIS giveaway (ends this Friday, Sept 2nd at 6am) where you can win a pair of those very same slippers that I made along with some other extra fun goodies!!
Also, It took me about an hour and a half to make the first pair of these.  I probably spent as long making and deciding on embellishments for the second pair as it took me to make them.  And just so you don’t think I’m ultra efficient or anything, it took me about 3 different times sitting down at my sewing machine to actually finish them for all the real life I had to tend to in between.  Oh yeah….I also ignored some housework to get them done.  Priorities people….priorities.

Filed Under: Create, Journey Tagged With: products, reviews

Rustic Chic Wedding….Finally Have Pictures!!!

August 4, 2011 by Logan 4 Comments

Oh my words….GIDDY as I write this!

You know the wedding I told you about, that I did the flowers and decor for a couple of weeks ago?  The one I told you I was so busy working on that I didn’t get to take a single picture of any of the arrangements or staging that I’d done?  The one I’d have been sick to my stomach over not documenting myself had my good friend Kim Deloach not been the photographer?  Yeah…that wedding?

I’m sure you get sick of me droning on and on about Kim’s talent….but seriously ya’ll….she’s talented.  Like….UH-Mazing.  And while I felt pretty good about all that I personally accomplished to help our friends Tonia and Rick to make their wedding day extra special….well, Kim made that all look even better.

Check out these few pictures…and then don’t stop here.  I’m posting a link to Kim’s blog so you can all check out the full amazingness of this Rustic-Chic wedding at an old church and reception at a farmhouse that’s chocked with old town charm and fun!  Seriously…I’m just giving you a taste here…head over to Kim’s blog to really feast your eyes on some serious visual candy!  (And pay extra special attention to things like the flowers and staging….those were the things I did!)

I present you my friends….Rick and Tonia Hawkinson!

Before I move on here….I have to tell you how much I LOVED making her bouquet!  After I finished and stepped back to look at it, I honestly cried.  It was really special to be able to make something for them that I knew she’d love…and she did.  Her words to me before they left their reception at the end of the evening were “You saw my vision and made it even more amazing than I’d imagined.”

That my friends, is the best compliment I could have ever received! Ok ok….more eye candy!

Cool church huh?  And that little fella just to the right of the bride and groom…the tallest of the little ones, he’s mine!  He did such a great job carrying a sign that read “Here comes the bride” right before Tonia processed into the church.  You can see them all below a bit more.  That precious little girl in the top right is Tonia’s daughter McKenna.  She is absolutely adorable!

Our friends who own the farmhouse just happened to have this truck and crate of old bottles lying around. (They actually have a real old timey town recreated on the property.  Seriously…there’s a general store, a barber shop, an old post office, and more.  And it’s all chocked full of authentic period stuff….it’s so much fun!)

There was a real deal pig pickin’ (as in, you can get it right off the pit, you can see it below) and bluegrass music too.  It was nothing short of perfect.

Recognize that bench in the top right corner of this photo collage above?  Yep, that’s the one I made.  Remember it from awhile back?  And, Tonia found those red and white striped paper straws that we put in all the drinks online…aren’t they awesome?  I might just have to make sure to always have some of those around from now on…they add instant old fashioned cool factor!

And thanks to another friend who happens to be in the fireworks biz….Rick and Tonia ended the evening with a bang!

Ok…now, head over to Kim’s blog to really see the good stuff!  You’ll get a lot more pictures of the awesome little town on the property too….it’s so so neat!  You. Will. LOVE!

Filed Under: Create, Journey Tagged With: good times

What’s Cooking?! Play Dough Cookies….

August 2, 2011 by Logan Leave a Comment

You know sometimes you have certain childhood memories that just stick out in your mind?  Fun things you did that you look forward to doing with your kids when you grow up too?  I have a decent sized handful of things we did since my mom and her friends were super fun and creative.  We had cotton candy and lemonade stands,  we created a 1950’s diner and served up lunch and malts on a couple of occasions, we baked and created all the time, and I have really fun memories of playdough style sugar cookies too.
It’s been hot as all get out here lately in the South, and I decided that I needed to see if my mom could dig up that old recipe for playdough sugar cookies.  So that’s what we did the other day and it was a blast!  This dough is better for playing with than the amazing regular sugar cookies that I make and it can be baked in shaped up to about 3/4 inch thick.  Beware that you do need some flour all over the surface you’re working on to roll it out though.  What I’m really saying here is that it’s messy folks…even when you contain the messes on individual cookies sheet trays….you’re gonna have to vacuum immediately afterwards.  But it’s fun….and childhood should be fun, and on occasion even really messy.
So do it.  You will have fun.  Your kids will have fun….and make great memories.  And that my friends is most certainly how to enjoy your life for dessert!

Edible Playdough Cookies

1 cup margarine, softened

1 cup shortening
2 1/2 c sifted powdered sugar
6 hard cooked egg yolks, mashed
2 tsps. baking soda
2 tsps cream of tartar
1 Tbs. vanilla
5 cups flour
food coloring
Cream butter and shortening; gradually add sugar, beating til light and fluffy.  Add yolks, soda, cream of tartar and vanilla, beating well.  Gradually add flour, mixing well.  Wrap in plastic wrap after coloring.  (I made 4 different colors.)  Chill 1 hour.  Hand shape cookies, not more than 3/4 inch thick.  Bake at 350 for 10-15 minutes.  Thicker cookies take longer.  Cool on baking sheets 1-2 minutes before removing from pans.  Cool on wire racks.  Makes 5 1/2 dozen 2 1/2″ cookies.
Woo Hoo!  Fun had by all!  And I should warn you that if you have a lot of artificial food coloring to make your dough super fabulously colorful…your baby will have diapers for the next day that look like they came straight from the fanny of a leprechaun! WOAH!  That was a shock for sure!
Get out and do something fun today!

Filed Under: Create, Eat, Journey

Wedding Weekend Success!

July 25, 2011 by Logan Leave a Comment

Well, the weekend wedding is over and I’m still trying to recover!  I didn’t write for a few days because literally I haven’t even had time to breathe normally.  The wedding was gorgeous, the couple amazing, and of course I thought the flowers and decor were stunning….other people did too.  Yeah…that’s a pat on my back…blatant.

I am slightly mortified with myself though because I didn’t take a SINGLE picture of anything.  It wasn’t that I didn’t want to, but I honestly didn’t have time to even grab my camera and snap a few shots.  This is not an exaggeration.  Every spare second was used up, and since I knew that my amazing photographer friend, Kim Deloach, was shooting the wedding, I didn’t stress over it.  My flowers and decorating efforts will be chronicled much more fabulously than I could ever even attempt to do.  Once she has had a chance to edit the pics, I’ll beg her for a few to show you.  She will make my floral efforts look like a real professional! 🙂

I love a good wedding….and this one was great.  Our friend has been waiting for his “one” for longer than most of us, and when he finally found her, he slipped a ring on that finger and set a date fast!  She is amazing and it has been such fun getting to know her the past few months as well!  We look forward to years of fun all together!

But I have to be honest and say that I’m sure glad the wedding part is done now!  It was a blast doing the flowers and decor, but I’m glad that it’s off my plate too!  I have to tell you though, every second of hard work was completely worth it when the bride told me “You saw my vision and made it even better than I’d imagined.”  Yeah….about the best compliment I could have received!  I have to give a massive shout out here too to our friend KC who busted her tail coordinating the wedding and helping me set up.  There is NO WAY I’d have finished styling it all had I been by myself!  Didn’t hurt either that the venue was our friends’ amazing old farmhouse which is a stunner in itself.  I’ll have to round up some pictures and post them soon to share with you…because while I’m sure I could come up with 1000 more words to describe it all….1 picture is worth all of that!  I’ll see what I can find!

Oh…and the secret for this great illusionist this weekend was dirty hair!  I arranged wildflowers all afternoon on Friday and had to bust it to get to the rehearsal dinner in time.  My biggest fear the whole night was having some critter crawl out of my hair!  There were SO MANY BUGS on those flowers when I was arranging them….I thought I was going to show up with itchy, bumpy, red arms from all the bites…and since I was so rushed I didn’t have time to wash my hair!  I was SO sure something had made it all the way north and was hibernating til just the right moment.  I hate bugs!

Then Saturday, I was rushing around all day and again…dirty hair at the end of it….no time for anything greater than an updo!  They say dirty hair is easier to style great anyhow…so while it was a filthy head weekend for me…it was a great hair styling one!

Filed Under: Create, Journey

Flower Power

July 20, 2011 by Logan Leave a Comment

I’m doing the flowers for a wedding this weekend.  And by “doing,”  I mean arranging…all of them.  From all the bridal bouquets to the centerpieces for the 250 person reception…I’m their flower gal.

And you know I’m excited about it!  A little overwhelmed, but not by the flowers, it’s by the other parts…like that my husband and son are in the wedding, which means that I’ll be arranging and staging between things like the rehearsal and rehearsal dinner…and having to get myself and my family ready in time for the actual wedding.  That, and driving the flowers out to the church and reception, and placing them all to make sure that everything looks unbelievable for our friends.  It’s going to be awesome…a lot of work, but awesome.

I’m excited too because the flowers are going to all be cut from a master gardener’s garden…mixtures of fabulously wilder looking things.  Envision with me for a minute…hand tied bouquets…mason jar drinks…old fashioned red/white striped paper straws…burlap and jute….old chippy paint doors and frames….you know, the kind of stuff that’s right up my alley.

And just to give you a taste of what I think some of this weekend’s flowers might feel like, I thought I’d post a few pictures of the flowers that I did for the bride’s lingerie shower a couple of weeks ago.

I love flowers.

 Don’t you?

Went to my neighbor’s garden today…I’m feeling culinarily inspired.  Hope that feeling holds through the weekend since I won’t have much time for cooking the next few days.  Guess what I picked though today?  Figs….oh sweet heaven on a tree!  Yummy goodness coming up for you soon!


Filed Under: Create

A 24 Hour Bathroom Re-Do!

July 18, 2011 by Logan 2 Comments

Do you remember a couple of weeks ago when I said that I had an itch to re-do my kids’ bathroom?  Well, last night the Hubs had a meeting, so I got to work with a can of paint and a brush and went to town on that bathroom.  And now, less than 24 hours later, the bathroom mini renovation is done!  Well done enough that the itch is over and I can mess with it more as I like.

Remember what it looked like before?  Curious George swinging in, and while cute, he never really stole my heart.

And remember the inspiration I found while in Montana?

These….

and this…
sign from the Polebridge Mercantile
Yesterday, we went and had some paint mixed and I am LOVING the result.  I’m still in debate about painting the base cabinets though.  I bought some blue/grayish paint but am thinking I might leave the cabinets as they are and see how I feel once I live with it a little while.  Never a bad idea before committing further to something.
As I was painting last night, I noticed that the paint looked grayer than I’d thought, but figured it may have been the nighttime lighting.   Just this very second as I pulled out the deck to find out the name of the colors for you did I realize the guy mixed the wrong color.  It’s not way off, but the one I’d liked better had a bit more khaki in the gray.  I’d been looking at them both and I guess he mixed the wrong one.  Oh well…I’m still happy in the end.
So what I’d wanted was this…                                                   but what I got was this…..
Benjamin Moore Thunder AF-685
Benjamin Moore Metropolitan AF-690
I’m particular about these things, but now that it’s done and it’s close enough, I”m fine with it.  You can tell the difference though right?
I was also pretty excited when I found a pre-fab window valance at Lowes for $13 that I thought would be super cute.  I can sew something, but honestly, for $13 when this is the look I was going for anyways….it’s a no brainer.  And, it’s my kids’ bathroom.  Let’s be realistic about things here…this does not need to be the freaking Taj Mahal.
I’ve been looking all over for a shower curtain too and have no interest in spending more than about $30 on it…again, remember….Kids’ bathroom.  So today when I was buying frames at Walmart for the pictures, I found something I thought would work for $18.  And I’m pleased with it.  I switched the hooks from my bathroom which were more oil rubbed bronze and I think it’ll do just fine.  I even was able to keep the aqua bath mats that I already had to add in another pop of fun color from the artwork.
So here’s what we have now…
My $13 valance and $18 shower curtain…pretty good huh?!

We’d bought a package of some vintage post cards which I just popped into a $12 frame.  I think on 4 frames I spent maybe $50 max.

I had 2 prints like this one of the mountain goat which were an odd size…maybe like 10×16 or something.  I didn’t want to have to have custom mats cut because that gets more expensive, so I bought 2 of these glass floating frames for $10 a piece.  I like the result with the wall showing through too…doesn’t look as bulky as if they had full mats either.

And just because I want you to see the true humanity of a 20 hour room makeover with just one person doing the work, I thought I’d let you in on a little tip I used this time.

I like to call it “the half-ass.”

And here’s what I mean….

 See.  I had to move the towel rings lower.  They were always too high and I’d never messed with them before.  There were MASSIVE holes in the wall which will take a few days to repair for the putty and everything to dry properly, so what do you think I did?  Yep…covered them up.

Out of sight, out of mind!
I’ll get to it eventually… but for now, I’m pleased with the *mostly* finished result!
Ps. I’ve got another sailor in the works to send a letter from sea, but I have to be honest and tell you that our first sailor has yet to receive any love from anyone other than his family!  Support our servicemen and women?  The address for this month’s sailor is below!

Filed Under: Create

Potty Talk…Bathroom Inspiration

June 27, 2011 by Logan 1 Comment

I don’t know about you all, but sometimes there are certain rooms in my house that completely elude me when it comes to how to decorate them.  Bathrooms are generally harder for me than other rooms..mostly because there are the same certain elements that you have to deal with and unless you’re overhauling and re-doing tile and cabinetry, you’re kinda working with what you’ve got.

I love wallpaper in a bathroom but it’s more money than I generally want to spend.  Painting designs is a great idea too, but typically I don’t want to spend that much time.  Thank heavens for fabric you can put on a window treatment and shower curtain, but still, you have to be careful that you don’t divide the room even more with a heavy looking shower curtain.  All to say…I think they get tricky.

My boys’ bathroom has been on my list of “make it so I like it” things for awhile now.  It’s painted a nice yellow (which, though yellow is a pretty color it is not my favorite) and has a super cute Curious George swinging on a vine that I painted on the wall.  I started painting a bird on a sign near the toilet about a year ago and never have finished it.  

I just can’t get into the whole cartoon character themed room thing.  I’ve never done it…I’m just not a fan.  Tid Bit said he wanted that… and ONLY because Curious George is old and super cute did I agree.  No offense intended if your kid’s room is all tricked out with Dora or Diego or Backyardigans or something…it’s just not my thing.  Even George was a serious stretch for me….which is pretty much why the room has never been finished.

As of late, I’ve been really thinking about what I could do to make the room feel more “us.”  I’ve thought about some stylized camo, military looking something or another, but haven’t settled there because if we ever have a girl that’s just not the direction that I’d want to go.  Finally the idea hit me when I saw a really cool print at a gift shop when we were in Glacier National Park in Montana.

Vintage-style National Park Signage

Above here is the first print and some super cool stickers that I found.  See where I’m going with this?  Then I found a copy of the road sign for the Going-to-the-Sun Road, that sadly we couldn’t go all the way over during the trip since they were still clearing feet upon feet of snow from it through the higher elevations.
Throughout the rest of the trip I found a few other great prints and some vintage looking postcards as well, and now I’m super excited.  There are these awesome red car-style buses that tour visitors around and we saw them all over.  They are sort of iconic…called the Red Jammers, and I just adore them.  I think that’ll be a fun way to get some bursts of color into the room.  I’m thinking the walls may go sort of taupe and I’m considering painting the base cabinets a nice bluish gray color. I’ll load the walls with all of my great finds as well as some family photographs from this trip. 
So, here is sort of a grouping of everything that I’ve picked up so far.  I think the ultimate goal would be to begin collecting this style of art from other family trips and see the bathroom evolve over time into a nod to fun family adventures.

I don’t know exactly if and how I’ll use each thing in the room til I get a chance to mess around with it all, but for now, I’m super inspired and very excited to get going on it! Stay tuned for this project to come!  You know how I get excited about a new idea and can’t wait to get started.  At least this time I have “Before” pictures!

– Logan


Filed Under: Create, Journey

For the LOVE….

June 22, 2011 by Logan 1 Comment

of a dress….

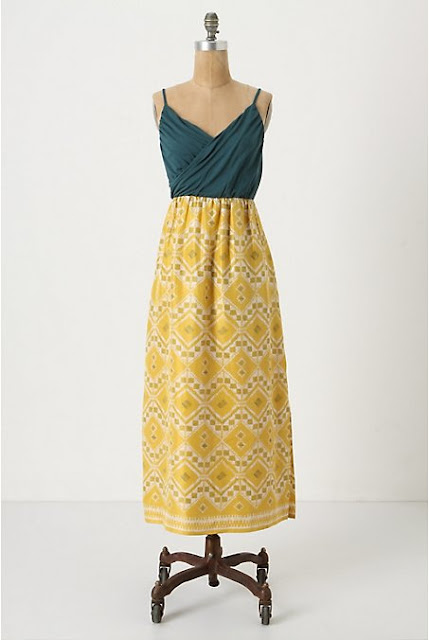
This dress.
Cuernavaca Maxi

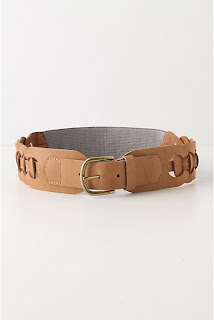
I really want this Anthropologie dress.  And this belt below to go with the dress.

Channeled Belt
I think in fact that I need it.  I don’t have the dinero for it right now, so I’m on the hunt for some work to get it!  It would be perfect to wear to a wedding that I’m doing the flowers for towards the end of July.  I’m on a mission people.  You will see me in pictures of this dress at a wedding in July.  Now, how to make it happen…hmmmm….
And to the kind few of you who have suggested that I could make this dress….who really wants to find out if I could or not?  Not me…

Filed Under: Create

Fire for Father’s Day…and more….

June 16, 2011 by Logan Leave a Comment

Since I’m out here in the Wild West doing things like hiking, trekking, wild animal sighting, building fires, and roasting marshmallows, I thought I’d share this super cute craft that I came across a couple of weeks ago from crafts.kaboose.com to do with my kids.  It’s a fun way to show a little love to the great outdoors in case you’re maybe not one who really wants to build an actual fire.  Or…if you are a pyromaniac, then this is probably still right up your alley because it looks like fire.

What you’ll need:

  • Old CD
  • Rocks – about the size of a quarter
  • Sticks
  • A handful of soil, dirt or sand
  • White craft glue
  • Small scraps of red, orange and yellow tissue paper
  • Toothpick

How to make it:

  1. Cover CD with glue  and use a paintbrush or your finger to spread the glue out for an even coat. 
  2. Cover glue area with dirt or sand and tap off excess. 
  3. Use your finger to push back a little of the dirt from the edges, all the way around the CD, to make room for the rocks.
  4. Squeeze out a generous amount of white glue onto the cleared edge of the CD. Press a rock into the glue. Repeat until entire rim of the CD is covered in rocks.
  5. If necessary, break sticks into approximately 4 inch pieces. Using white craft clue, build a “fire” with the sticks by laying them down in a teepee formation, gluing as you go. Let everything dry for 2 hours (will not be completely dry, but won’t slide around).
  6. Tear tissue paper into small pieces, approximately 1″ or 2″ squares.
  7. Place tip of toothpick into the center (don’t poke through) of a piece of red tissue paper. Wrap the tissue paper around the toothpick.
  8. Dab some glue on the tip and dip it into the sticks, removing the toothpick once inserted. Repeat around the top of the sticks with several red pieces, and then add a few orange toward the middle, and lastly one or two yellow pieces at the top of the stick mound.
  9. Let project dry completely overnight.

I think it’d be a cute way to do an invitation for an outdoor party or campout as well.  Way more fun to open this than just your standard card invitation. 

Or, just make it for fun…because it’s cute and your kids will appreciate you doing a craft with them.  OR…I just had an even better idea!  Make these this week and invite Dad to a family backyard firepit party for Father’s Day.  Men like fire…Dad would appreciate the gesture, and to really make the gift awesome why don’t you make a special package with the following other items….


S’mores Kit


Leatherman Tool

What Dad wouldn’t love a Leatherman tool, a campfire, and s’mores?!  Or at least be able to appreciate the gesture of it?  Oh yeah, and fix meat and potatoes for dinner.  Try out this recipe for Flank Steak and Roasted Potatoes.  I just made Father’s Day easy for you…and in case you didn’t realize, it’s this coming Sunday the 19th!


Happy crafting, cooking out, and now you have a recipe for happy Dads to boot!
– Logan

Don’t forget to check out yesterday’s post about the Polebridge Mercantile and enter to win the fun prize pack donated by the Mercantile!  Giveaway ends 12noon EST on Friday 6/17!


Filed Under: Create, Journey

  • « Previous Page
  • 1
  • …
  • 6
  • 7
  • 8
  • 9
  • 10
  • …
  • 13
  • Next Page »
  • 
  • 
  • 
  • 
  • 
  • 

Subscribe by Email

Oldies but Goodies

Copyright © 2025 · Logan Wolfram · Logo by Annie Barnett · Site by Design by Insight