Logan Wolfram

Enjoying Life for Dessert

  • Home
  • About
    • Meet Logan
    • Meet My Family
  • Blog
  • Eat
  • Journey
  • Create
  • Connect

Trash to Treasure….Antique headboard bench!

February 28, 2011 by Logan 21 Comments

I’m writing this on Sunday night.  I’m so excited that I just have to post this for you to read first thing on Monday morning!  I have a meeting at 9am, and this couldn’t wait til afternoon!!!

The Hubs had a meeting tonight so I put the kiddos to bed and just finished sewing a pillow a little bit ago.  I’m now happily perched on my bed with jammies on, 27 Dresses on the TV (fab-o movie if you need a great chick flick), a handful of Cabury chocolate eggs (the little ones with the crunchy shells), and my computer chocked full of pictures of my latest project just for you!!

It’s time to reveal the antique headboard I converted into a bench!  Just have to warn you…there are ALOT of pictures.  I documented how we did it to show you in case you happen to score a cool headboard and need to do something with it other than attach it to the end of a mattress!

<—–This is the before on the left.  Had been in someone’s barn for ages and then in our garage for probably 6 months…filthy, but full of potential!

Below is my big helper and me.  We sanded the headboard down a little to reveal some of the layers of paint, and then we cleaned it off really well.

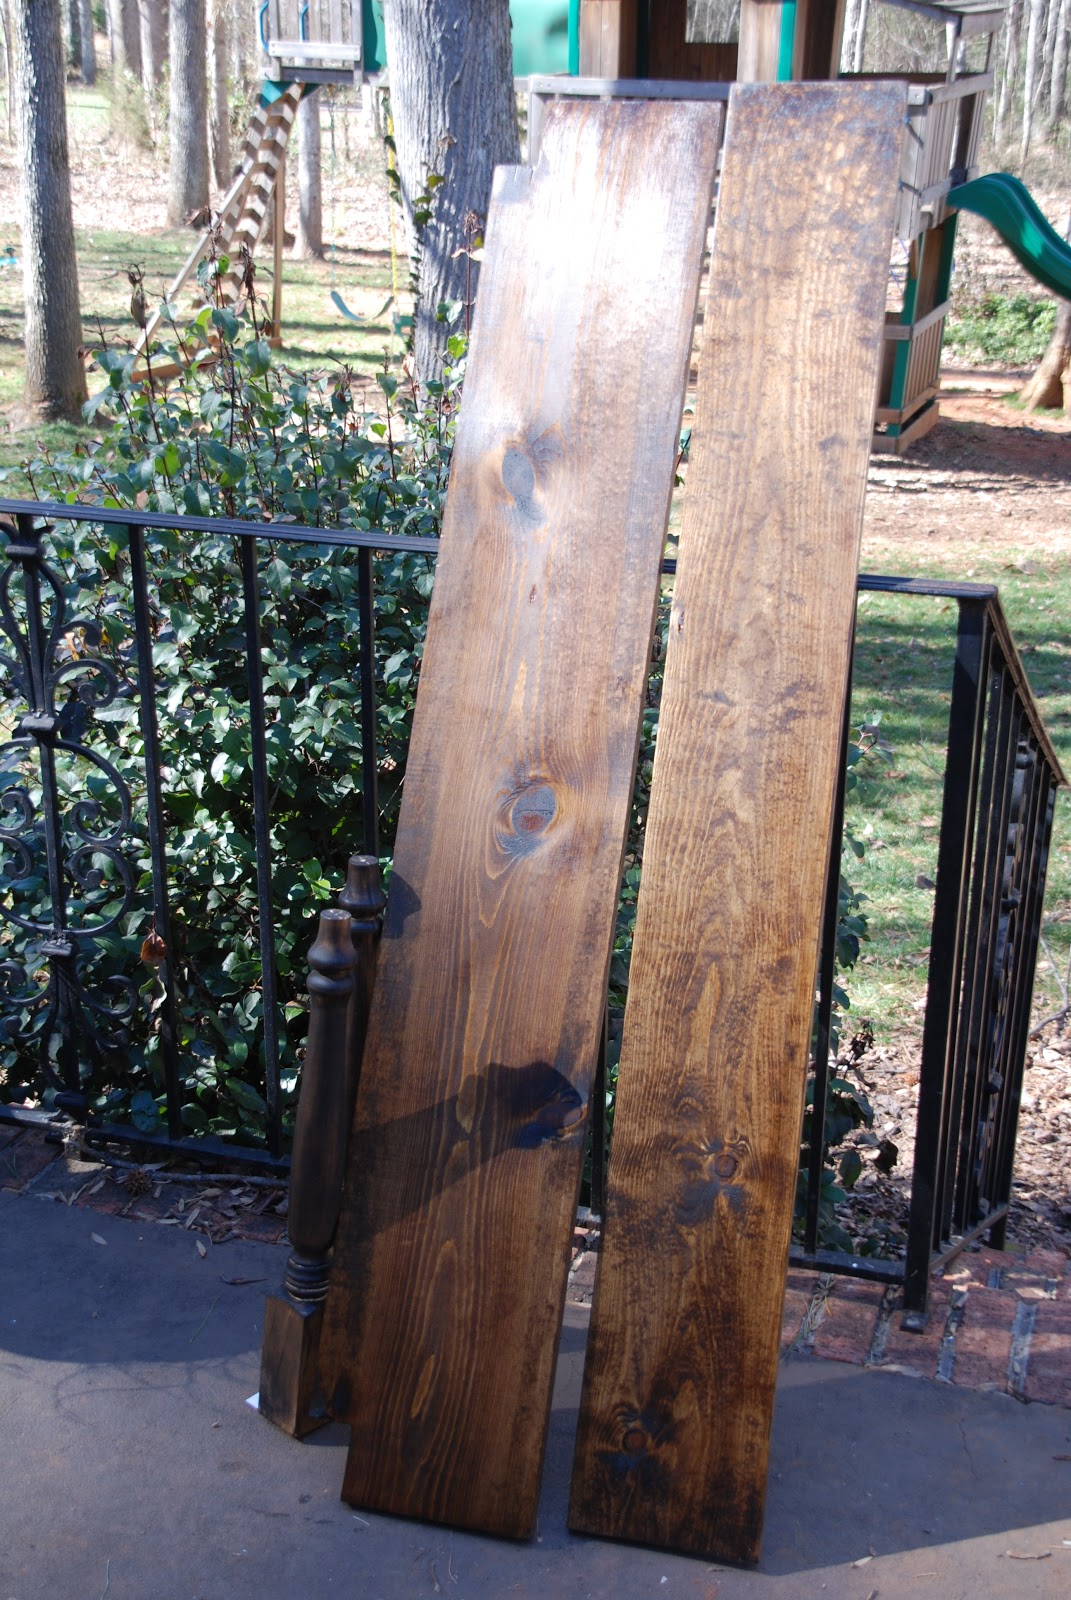
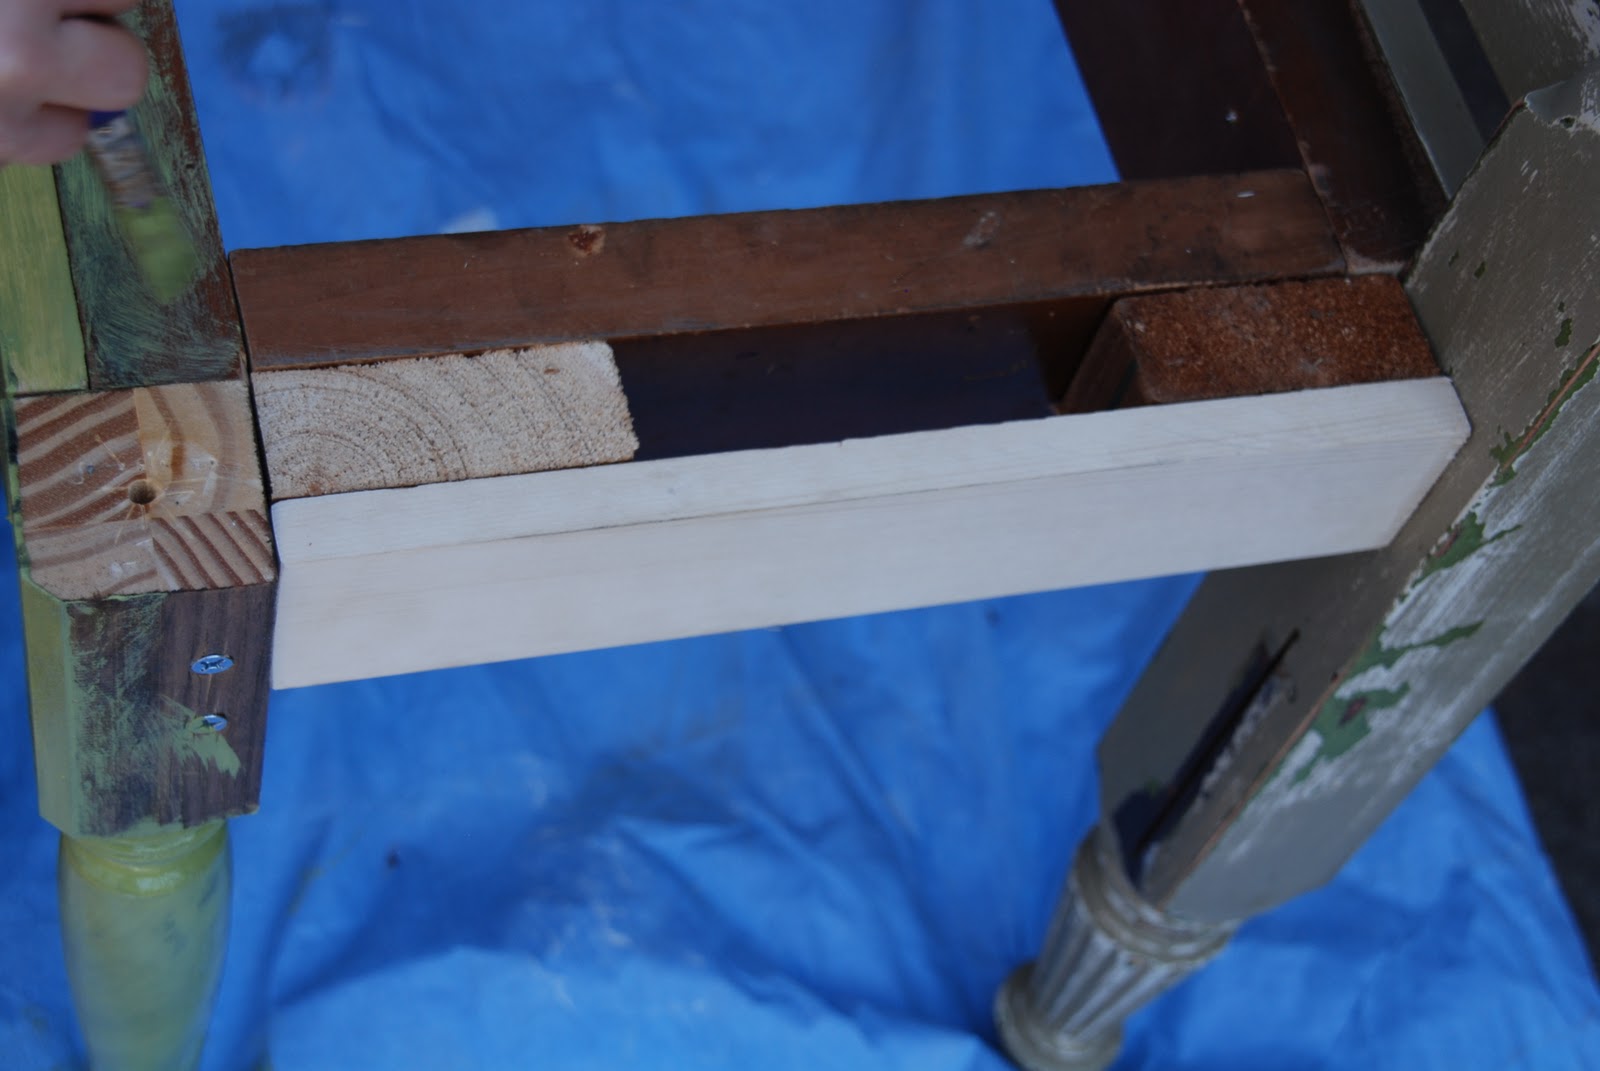
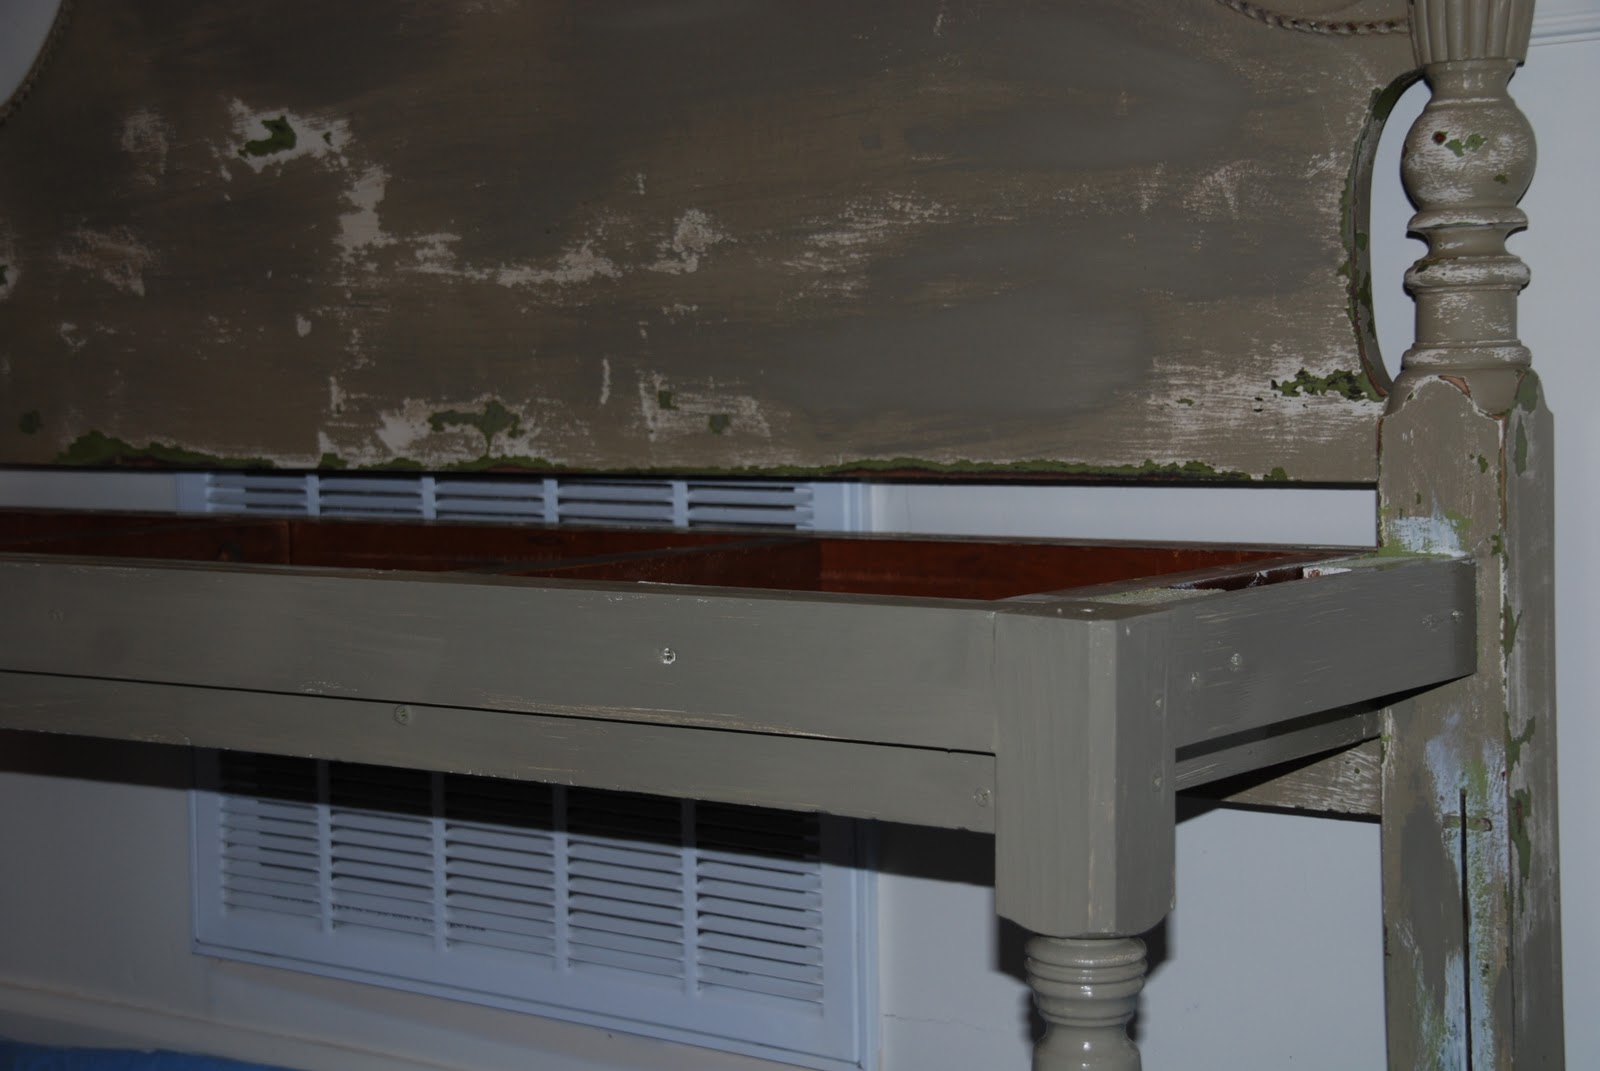
Above on the right, are the 2 pieces of wood (1×8, and 1×10) for the seat that I stained using MinWax walnut stain.  Below is the frame that I made for the seat.  The Hubs cut the first piece that fit along the back between the posts, and then I measured, cut, and screwed the rest of the inner part of the frame together.  Then I pre-drilled holes into the legs and attached them to the outside of the frame.  We put a piece of 1×3 along the front to give a bit more stability and make the legs look flush along the front.

Because of how I had to attach the legs on the outside of the frame, The Hubs cut a couple of little blocks to mount the 1×3 along the outside and make the leg look flush with the side again.

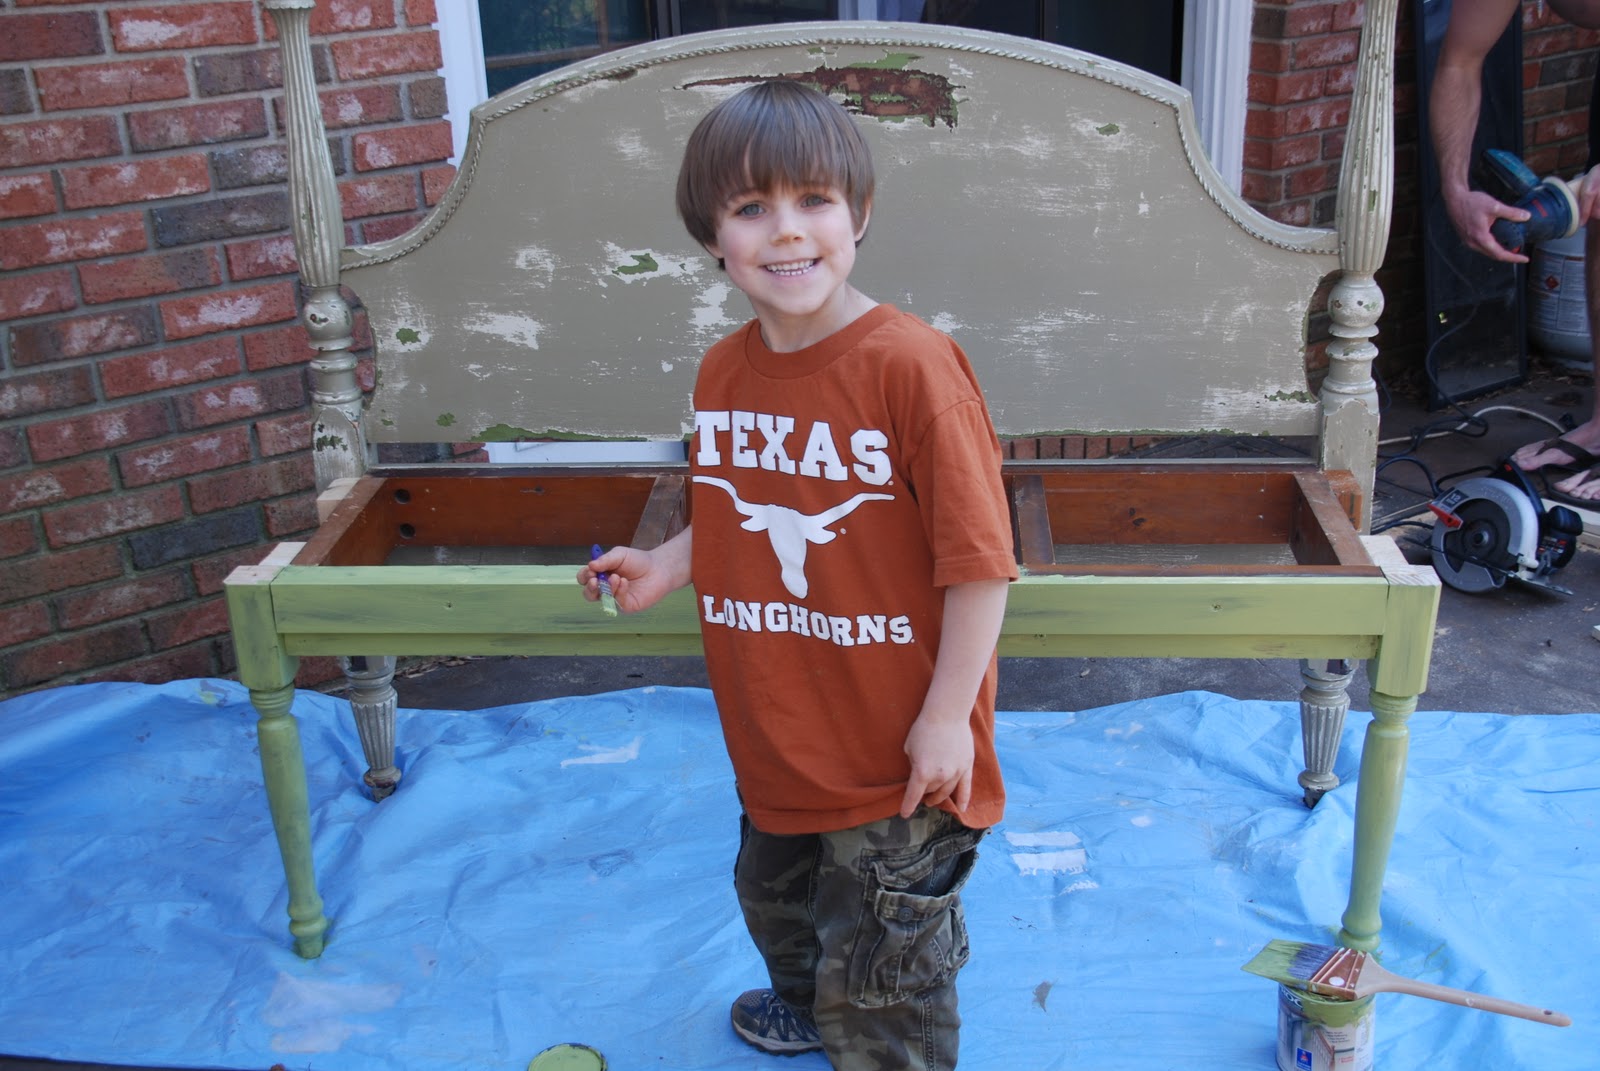
Tid Bit had been wanting to paint this thing for a week, so finally he got his chance.  The headboard had layers of paint, so we had to do our best to replicate that layering.  First we stained the wood, then painted green (Sherwin Williams Tansy Green to be exact), then a coat of cream (don’t know the exact color because it was just $2.50 in the reject section at Lowes, but was perfect), and then finally the taupe-greenish-gray color.  The closest match I could find was Benjamin Moore Sag Harbor Gray, but I didn’t have that.  So… I mixed some Benjamin Moore Nantucket Gray with some yellow, and black, and brown and got a color that was actually an even closer match!  Hooray for a genepool that passed on an ability for precision color mixing!


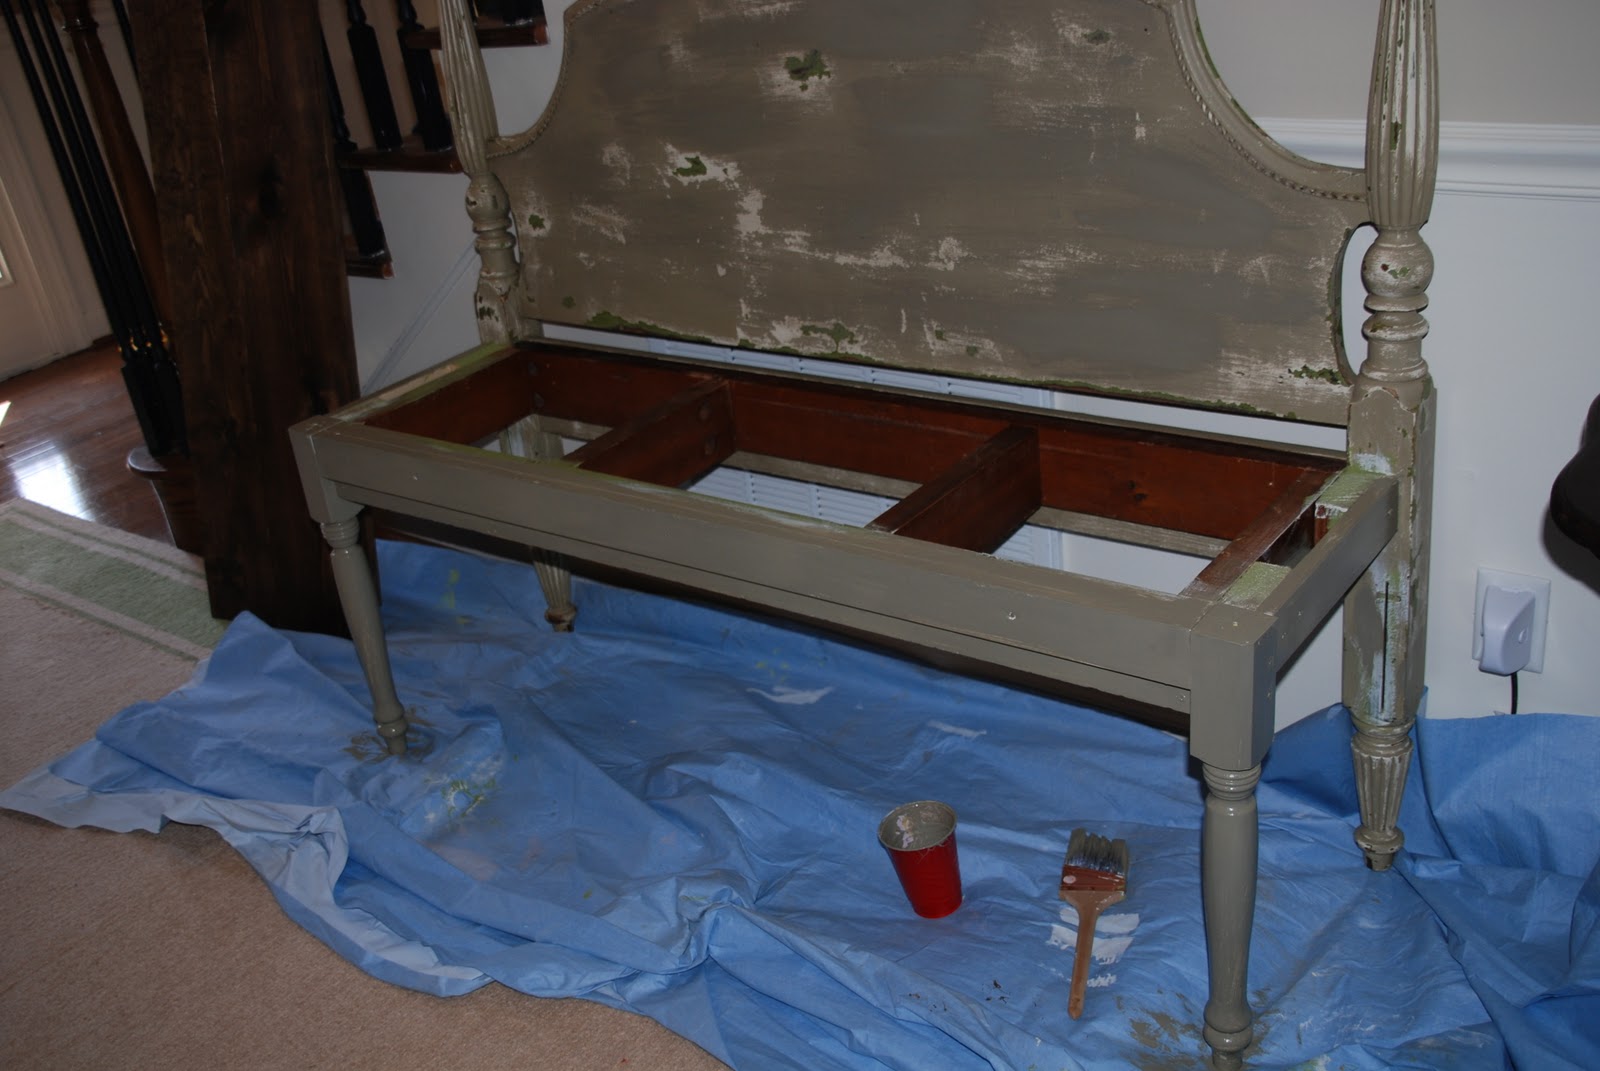
<—-So here it is up close…it was still wet in this picture, so the color does look a little off.  Trust me, it’s just right!  Remember the giant gouge that was in the top of the headboard too…yeah, I painted over that as well!  All it needed now was to dry and then be sanded down to show all those beautiful layers that Tid Bit so carefully painted!

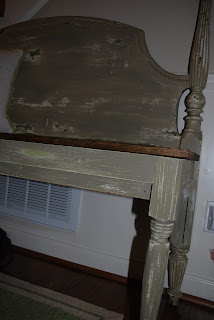
Ok…so see below!  Sanded down a bit to make the new part look old too!  I think it turned out pretty smashingly!

When I started looking at it all done and pretty, I decided that it needed a little something cushy!  The other day I was thinking of upholstering the back, then I thought of upholstering the seat, then I decided I liked it so much just like this, but I now had a dropcloth that I’d washed and dried to do something amazing with…so I made pillows!  And because I didn’t want to spend more on a monogram than I did on a 4×12 length of dropcloth, I decided to create a stencil and paint our initial onto the pillows!

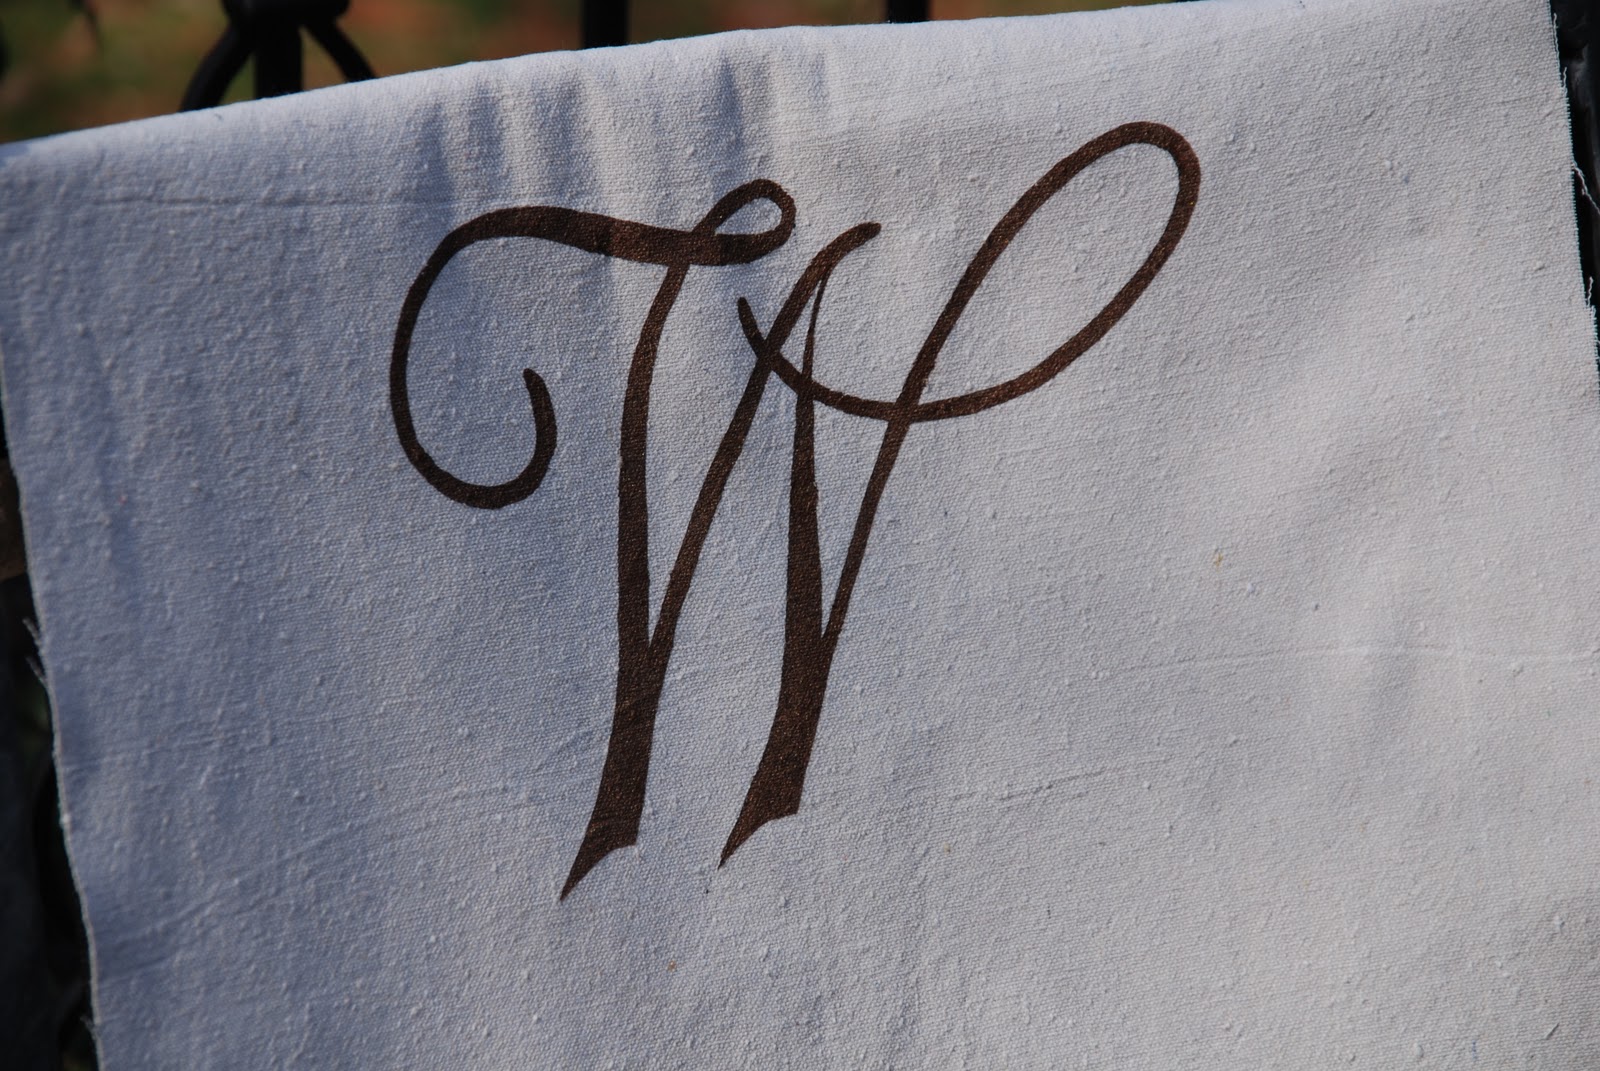
First I found a “W” in a font that I liked and blew it up to be ginormous on a regular sheet of printed paper. Then I traced it onto a sheet of heavy duty stencil paper and cut it out.  I made sure to leave some points of connection for the inner pieces that would have fallen out otherwise.  I used spray on stencil adhesive to get the stencil to adhere to the fabric to make clean lines.  To apply the W,  I used a round paintbrush and dabbed some bronze paint onto the stencil.


See how there are some breaks in the W?  That was from the connection points that I didn’t cut out.  No worries though, I just used a small detail brush to fill those areas in!  And below you can see the finished stencil!

I didn’t do a tutorial on how to make a pillow.  I figured I’d taken enough pictures today and honestly, there are a million pillow tutorials out there!  If you really want me to do one sometime though, I will, but you will have to comment and say so!

So here it is…the bench AND the pillow!  In fact, I actually made 2 pillows, but need an insert for the other one…so hopefully you can get the jist with only one!

So that’s it!  I’m pretty pleased with it!  Now all I have to do is decide where in my house I’m actually going to put this beauty!  Happy Monday!

– Logan

For more fun craft ideas, check out my new friend Beth’s blog here!

Filed Under: Create, Journey

Thinking of revamping my stairs…

February 25, 2011 by Logan Leave a Comment

My stairs still have a runner on them from the previous owner that just isn’t me.  See look….

Not me at all.  I do like how we painted the spindles black though…poor man’s wrought iron I call it.

So here’s more along the lines of what I’m thinking…

Love it!!!   Isn’t it so fun?!  I just have to finish making the bench before I can move on to something else.  But I have a new idea for the bench though.  I think I might upholster the back of it with burlap…and then put a cushion on the seat….what do you think?! (The more I’ve looked at the headboard that will be the back, the more I’m thinking I either need to paint and antique it or do something to it.  The spot that the previous owners gouged is starting to get to me, and I don’t love it like I’ve been trying to convince myself to.  It’s just furniture though, so if you don’t love it….change it!

Anyways…just a random little thing I’ve been thinking about that i thought I’d share!

Time to feed my kiddies dinner!  I have a hot date tonight with a 4 year old to watch Peter Pan here at home.  Got to get to it!

– Logan

Filed Under: Create

Some projects…and I meet a nemesis!!!

February 23, 2011 by Logan 1 Comment

I feel like junk today….some bronchitis sort of junk.  Kept me up late last night coughing like mad.  UGH….tired and gross feeling today.

Anyways…I finally found a picture of the amazing fabric that I’m putting on that chair i told you about before. 

<——-Here is the chair.

And here is the fabric.
                    ———->

UH-Mazing!  And did I mention it has a 3 yd repeat?…so those beauties are massive!

Hang on a second…someone is at my door…

Oh man…you’ll never guess what just came.  Really great neighbor…but she just brought the one thing that will guarantee my stupid jello jog for at least a little while longer.

THIS!!! ——————————->

Dang Girl Scouts!  Messing up my waistline…AGAIN!  Total nemesis!

So i just took a break for a Peanut Butter Patty and while my stomach digests that creamy goodness, I wanted to show you that I did indeed finish the pillow from the other day’s post.

Check it out.

And I’m not apparently a super awesome blogger because I did NOT take pictures to show you how to make a pillow like this yourself.  I started this one ages ago but when I do the next one I’ll document the process.  So for now, I’m sorry.  This is all you get.

I used Wonder Under to iron the butterfly onto the green linen fabric because I wanted to have the butterfly on there alone.  As you can see from the whole piece of the fabric above, you have to actually cut out a specific butterfly to do what I did here.  Otherwise you’d end up with a weevil or part of a grasshopper or some other unwanted bug on your pillow as well.  And I’m not feeling weevils and grasshoppers and unwanted bugs like I am butterflies these days.  Butterflies….me and the dang Pottery Barn.

Anyhow.  Wanted to at least show you that even if I didn’t get the laundry put away the other day, I did get a pillow made.

Oh…and I have to tell you one other super exciting project that I’m working on!

I  bought this headboard and that dresser I showed you yesterday at the same time off of Craigslist ($30 total for both items.)  They both looked pretty much like this when I got them.  I’m sanding this down and then we’re going to turn it into a bench to put I think in the foyer.  So far I’ve gotten it sanded and then I’ve got some work ahead of me to paint several different coats on the legs and lower part of the bench to try to replicate the amazing layering that’s going on naturally on this thing.  I had a sanding helper the other day…he’s a total cutie!  I look like death warmed over here, but who cares, we’re all friends here right?!

The boards above on the right are what I’m using for the seat…I stained them walnut using just basic Minwax stain.  They’re not stain grade wood, but I don’t care.  This was cheaper and I want it to have character anyways.  I think when it’s all done I might just make some pillows out of burlap to put on here anyways. 

So this to the right is how the headboard looks right now cleaned up a bit.  The previous owner had gouged that top part with what I’d guess was a putty knife trying to scrape off the paint, but I don’t care…just gives it a little more character.

Ok I better run. Have a birthday party to go to, and I didn’t want to wake up the baby who missed his nap this morning, but if I don’t I’m afraid we’ll miss the party.  And after Tid Bit spent a good hour making his friend Ruthie a bracelet and ring with my jewelry making supplies, I can’t let him miss out on seeing her anticipated delight when she opens it!

Hope ya’ll are having a good day!

– Logan

Filed Under: Create, Journey

Part 2: Musings of a Master Bedroom Makeover…

February 22, 2011 by Logan 8 Comments

I told you I’d take pictures when I could.  So I did it.  But be forewarned that it’s still messy.

Someone once told me and I’ll tell you…”If you want to see me, come anytime…if you want to see my house, call ahead.”  So today we’re gonna pretend that you’re here reading because you want to have this chat with me about how to beautify my bedroom…not coming with the expectation of seeing something perfectly put together. Ok…now that’s out of the way…moving on.

This is my room.  And all of it’s challenges.  I’ll tell you some of what I like and what I don’t.

I think I like the stripes that we painted.  I say I think that I like them because I really do think that I do, but I’m also not sure if it’s just that it was so laborious to paint them that I have some unknown reluctance to paint over it all.  I kinda think I want the whole room to be gray…..or maybe just the headboard gray? The trim meeds to be painted white also…it’s still antique white (tan-ish) like when we moved in.  I bought the headboard for $75 at a consignment sale and I actually really like the shape…the color however I think is HIDEOUS for what I want this room to be.  I’m thinking of putting a “W” for our last name in the circle….hmmm.

 I also LOVE the little sofa at the end of the bed.  The shape is adorable, the tufting divine, and I love the fabric on it too even though here it’s just looking plain brown.  It has a grayish bluish dot on it and is darling.

We don’t have an overhead light here or even a wired box…which is $250ish to put in…just the wiring…that’s not including the fixture.  SO I rewired the old dining room chandelier (which was too small for the dining room anyways) and hung it in the corner on my side of the bed.

 See what I’m talking about with the dormers.  Not wide enough for drapery and my husband is really almost vehemently opposed to any treatment on them at all.  Mostly because he’s 6’6″ and anything even kinda covering the window seems like an imposition to his ability to look out.  I told him they’d only cover maybe an inch or so under the top of the window moulding, but he’s still not convinced.  And that one spot with the messily covered dresser…well that dresser is the only thing I can think to put there! (and we need the storage of it too!)

 And then there’s this EYESORE!  The TV and it’s messy looking cabinet.  Can’t be too deep though because the dormer is right there too.  I moved a bookshelf into it so that my hubby’s book collection wasn’t immediately viewable as you walked into the room (as it used to be close to his side of the bed and just looked cluttered all the time RIGHT when you walked into the room.

I love THIS piece!
—->

I found it on Craigslist for $30 (along with a headboard that I’m currently making into a bench) and it was hideOus-O!  I was going to sand it down and then paint it, but once I started sanding I realized it had layers of olive paint, and cream paint, and taupe paint….you have to work your tootsie off to achieve patina like that, so I worked with it and love the end result.  The knobs on the top continue to elude me though…can’t seem to find ones that I love (which is why there are 2 different ones now…neither of which is speaking to me.)

<—–I also love this other piece…which serves as my bedside table.  I’ve had it since I was a kid and there’s something about it that I just love.  I even actually like the hardware on it…there’s a light blue ball in the center of each handle…love!

Oh, and PS. I don’t like the rug in here at all.  My mom gave it to me as a loaner and it’s like 10×14, so even if I just put a piece of decent bound carpet, I’m still in for like $300 or more buckaroos. For now though it’s at least something soft to stand on.

Let me show you something I like….

LOVE this—->
That’s how I want my room to feel!  But I still think I might like the walls a lighter gray for me.

SO what do you all think?!

PS. After looking through my paint deck, I think I’ve decided I need to paint, and the color I think I need to paint is this…Benjamin Moore HC-172….Revere Pewter.

– Logan

Filed Under: Create

Musings of a Master Bedroom Makeover…

February 22, 2011 by Logan 2 Comments

My bed isn’t made yet, so I’m not gonna post a picture of my master bedroom right now.  Well, that and the laundry from yesterday is still folded in the basket instead of in all of our drawers.  And… all the flat surfaces seemed to be currently collecting junk…papers yet to be filed, books in the middle of being read, and stuff that I haven’t put back on the walls in our bathroom since I have yet to clean the walls from stripping the wallpaper.  Work in semi-progress I guess….I say “semi” because I can’t seem to convince myself to scrub the wallpaper glue off of the walls because it’s just pure misery to do it.

I think I’m pretty good with color, design, etc in general.  But I tell you what…my master bedroom has been my nemesis since we moved in almost 3 years ago.  It has 2 dormer windows and an angled ceiling on one side, a closet and a door on one wall, and a bathroom door on another.  The furniture is all nice but completely mismatched (I love eclectic, but somehow this has just moved beyond that to mismatched.)  I’m willing to paint anything, but for the life of me I can’t seem to decide what I want to do in there!

I think I want to paint it grayish-bluish.  And maybe antique some furniture white.  Sometimes I think board and batten (since it’s in again and I’ve and  always loved it.)  But then i think grasscloth but I can’t afford that right now.  Sometimes I think whites and blacks and grays.  Sometimes I think lemongrass and aqua and white.  I love antiques old things that tell stories. I have this fab-o little sofa that is chocolate brown with a grayish-bluish little dot on it…but I tell you, I’m stuck!  I’ll take pictures of everything today at naptime and post it all for you to see.  Don’t have time right now though…

I don’t know what I want…there’s too much that I like to narrow it all down.  Indecision is my pet peeve and right now with this room, it is my middle name!

It’s a little frustrating though…this decorator’s block I have.  I can walk into other peoples’ spaces and immediately have vision for them…amazing vision with easy ways to achieve it, but when it comes to my own house I OBSESS and I’m stuck!  The rooms I have done to perfect completion belong to my children.  

I can’t seem to find what I did with a good picture of Tid Bit’s Room, but below is Little Bit’s nursery.  Probably my favorite room in our house.

 
Anywho… My master bedroom needs a makeover.  I’ll post some current pictures later and get you guys to toss out some ideas.  Mostly I need a work crew to likely paint, stain, and transform furniture!!!  Wouldn’t that be handy…my own work crew! LOL!  Wishful thinking! That, and some more nice days outside to do it!
OK. Off to be a good Mommy!  Watching a friend’s little boy today while she has to head out of town for a funeral.  I think I’ll do our usual Wolfram family endearment trick and and make some mid-morning cotton candy!
More pictures of my own anti-oasis to come!
– Logan

Filed Under: Create, Journey

I’ve got a fever!!…. Spring fever that is…

February 16, 2011 by Logan 5 Comments

Spring fever!

Where I live, the last couple of days have been glorious!  People in California enjoy days like this every day…no fair.  If my friends and family wouldn’t be so far away, I might just live in California.  Well, that and I guess I can get more house for my money where I am now…so nevermind. I think I’ll stay put.

Anyways, all to say, the nice weather is such a teaser!  I know we’ll have more cold days ahead, but I’m ready to break out my Rainbows and have a reason to get a pedicure (since my wildly neglected piggies will soon freak both me and my husband out since they’ve been hidden in boots all winter!)

I’m getting distracted by my own thoughts here!  What I really came to tell you today is that spring fever for me means my creative juices get flowing!  Lucky for you huh?  Only problem is that I have a tendency to have projects pile up…like the ones I started before it got cold outside and they’re just waiting in my garage for a little creative TLC.

So between this amazing weather and my friend L’s inspiration to do a “While You Were Out” (WYWO) on her master bedroom while her husband is on a mission trip in Haiti, I’m itching to get something painted, stripped, refinished, recovered…re-done.  And I think I’m going to get some friends in on the action too!  L and I decided yesterday (while I helped her conceptualize the room and pick a paint color for the WYWO re-do) that we’re going to have a re-do party in her garage sometime soon.  Everyone has some piece of furniture that they want to mess with…make better, newer looking (or older looking in my case…antiquing)…just get dirty creating to breathe new life into a room!  So I’m gonna teach some friends how to do it!  Fun fun!

And here’s the gem that I think I’m going to show them on…

I want you to know that I have had this AMAZING butterfly fabric for almost a year…LONG before the Pottery Barn put butterfly pillows on their front cover!  I think I’m just telling you this because I feel annoyed that my inspiration from over a year ago could now appear to be an idea-rip-off…which is great, but it annoys me.  I like to on occasion feel original.  But the truth is, they got their pillows made up faster than I have!  Pottery Barn does not have children running around screaming and crafting all day in their office though…

I digress…again!  Anyways I painted this chair above that fab-o turquoise color and am going to paint some more on it in a different color, and then sand it and rub some stain on it to make it look old.  Then I’m going to pay someone else to upholster it because I spent too much of my birthday money on that amazing fabric to risk crapping it up on an upholstery self-tutorial.

I have to show you this mortifying confession that I found when I was photographing this chair for you…just to make you feel better about your house too.

 OH MY WORD!  Do you see it?!  If this isn’t in the Tales of a Lesser Woman category then I don’t know what is?!  My living room fireplace has the most all-encompassing cobwebs.  And just to make you feel better about yourself, you know what I did about them right then?!  Absolutely NOTHING.  I’ll get to it later (today)…for now I had to tell you about my spring fever and painting inspirations!

I have to show you another thing I’ve been walking by and actually ignoring for a couple of months now…I’m really completely embarrassed to admit this now that I have confessed the length of time I’ve been ignoring it!  See below…awful!

Clothes sorting…sizes in and out for kids.  I can never figure out when to do it with the baby because the times it’s the easiest are when he’s asleep…in his room, where I need to work.  And I’ve really been wanting to move all of our out of season or out of size clothes from the attic over the garage to the attic in this hallway.  I’ll probably do it this week now because this confession is sort of giving me a pit in my neglecting stomach!

Let me show you what I’d SO MUCH rather be doing though (in addition to the chair I pictured above.)

<—–This pillow!  The one I started before Pottery Barn interfered with my dreams of individuality!  It’s taken me ages to do.  Partly because I have a million other projects I’m working on at the same time, partly because I haven’t found the right trim (til this past weekend), and partly because I have a life that happens before, after, and during my efforts to create.
 
Look at that glorious trim!  Ahh….it’s like a box of chocolates for me…but better because it doesn’t make me fatter!  If I remember in my haste to get it done, I’ll try to show you how to sew on trim to a pillow….or at least how I do it (which may not be right, but I don’t care as long as it looks good when I’m done.)  It doesn’t have to be perfect to be beautiful!!!

It will be awesome though when I finish it.  (Don’t worry, I’ll show you when it is!)  But I think I should attend to the hall mess first, don’t you?!

Ok…now to fold the laundry that’s all over my den.  Crafting dreams will have to motivate me to expedite the real life that needs to be dealt with in the meantime!

– Logan

Filed Under: Create, Journey

Bon Bons… I really couldn’t live without them…

February 15, 2011 by Logan Leave a Comment

Have you ever had your husband ask you what you did all day?

You know…in a way that perhaps would put into question if you had in fact done anything all day long?  Because when he comes home, there are toys strewn all over the den, the paper plates from lunch are still on the table, there is half a pile of folded laundry on your bed and the rest in a pile on the floor, and your kids are filthy running around like little gypsies.  You know what I’m talking about right?  And so when the question is asked “WHAT have you done all day?!” you find yourself wanting to say “What do you think?! I sat around watching soaps and eating bon bons all day long…OBVIOUSLY!”

You know how it goes… you go about your day that starts in the kitchen with breakfast, but as you look for a clean fork you realize you have yet to empty the dishwasher, which as you unload it, you then find a bib that didn’t wash as clean as you’d have liked in the dishwasher, so you head to the laundry room to give it some more stain treatment, but first you stop to feed your kids breakfast which was what you came down for anyways… and as you’re feeding your kids breakfast you notice a piece of craft paper that you then proceed to put back in the craft cabinet, only to notice on your way that you left the bib on the counter, which you then pick up and proceed to the laundry room to stain treat, but then on the way you trip on a boot that should be outside in the garage, so you head out there to put it back, only to then notice a box full of stuff that needs to go to Goodwill, so you then put that in your car only to realize that the floor of your car looks like a veritable trail mix, so you then go to get the vacuum to clean it out, but then on your way you realize that the baby is now done with breakfast and so you clean him up, and then forget what you were doing until you see the bib you were cleaning.  You know what I’m talking about right?  And some days, the whole day is like this and by the end of it you’re putting your kids to bed only to realize that the bib has yet to see any stain treatment.  And somewhere round about 5 o’clock your sweetie comes home and says “What on earth have you done all day?!”  And you have no idea really other than your children were fed and you were insanely busy.  So you say “Well honey, isn’t it obvious that I spent the day eating bon bons.”  (just fyi here…I don’t really recommend saying this, it really makes you sound like a jerk.  Not that I’d know from experience or anything. )

BUT NOW ladies…now you can have your bon bons and wear them too!
Goody Goody Bon Bons that is!
 

I don’t know about you, but when I’m home all day, I really see no reason to wear shoes.  Call me the antithesis of the women’s lib movement if you want to, but whatever…so what if I’m barefoot and in the kitchen?!

But in the winter, my hard tile floors are brutal to the little piggies and I just can’t take it.  Which is why I don’t do a day without my Bon Bons!  (See that cute aqua pair above…with the giant pink roses….yeah, I have those.

 But I think next I might like these—>

                             <—- Or these

Really though, with so many fun choices how can a girl decide?!  I’m sure I just don’t know myself!

So this is my footwear of choice at home.  Bon Bons all day long!  They cost about $35-40 a pair and really when you think of how often you wear them, it really makes loads of sense.  Now be aware, that if you wear them like I do to the mailbox outside, and to get a package from the UPS man, and to say hello to your neighbor in the street, and sometimes even to the grocery store (ok…so I don’t actually wear them to the grocery store…I just wanted to give you a moment of horror) then they won’t probably hold up as well as a pair of moc slippers from LL Bean….but these are WAY cuter!

It’s like wrapping your foot in a really fun present.  A comfy, cute, and totally addictive package!

You should totally get some.  Then when your husband asks what you’ve been doing all day, you can honestly say “just wallowing around in bon bons!”

Happy Tuesday friends!


Oh my goodness…I almost forgot to mention that they make them for babies too!  My friend Rebecca just posted a picture of some on her most adorable daughter the other day and that’s what got this on my brain!  She had no idea of all the options out there for everyone.  It’s such a good thing I’m here to enlighten!  Check out these little snacks to the left….makes you just want to nibble a baby foot for sure!

** I would like to add a note here (the day after I originally wrote this) that I in no way want you to read this like I have some sort of difficult husband who questions how I spend my time…I don’t!  He is amazing and really has never walked in the door demanding to know why our house is a mess, so I hope you didn’t read this that way! My intent was really to say that there truly are days when I have no idea how things are the way they are when I know I’ve been running around like a crazy person and sometimes you really do wish you could sit around and eat bon bons!)

Photo Credit:  GoodyGoodyShoes.com

Filed Under: Create, Journey

Happy Valentine’s Day! Fun at our house!

February 14, 2011 by Logan Leave a Comment

First off, Happy Valentine’s Day friends!

I promised you finished pictures from our Valentine projects around here, so here are a few snip-its from our 2 week long soiree into all things lovey dovey (at least for a 4-year old.) For a reminder of our what game plan was, check out the post I did that includes the amazing sugar cookie recipe! HERE

We made the cookies last week, dough on Tuesday and rolled them out and baked them on Thursday.  We froze them over the weekend while we were out of town and then iced and boxed them last night.  Clearly I did the name writing and the more intricate design stuff. We nestled a name cookie and a little heart in some tissue paper in the Chinese boxes and they were accompanied by a Valentine that Tid Bit made himself.  They were all different and I LOVED them!

Above here you can see the one Tid Bit made for Chelsea.  He told me he thinks “she’s really pretty because her hair goes ‘up like this’ (it’s curly at the ends) and she always wears a bow that matches her clothes.”  Oh brother!  I thought I had YEARS before I’d hear commentary like that!  Still, it’s funny.  And hilariously enough, he spent some extra time on her Valentine!

Check out what my Main Man gave me for Valentines…yes, that’s right, Easter Candy.  You know your man loves you when he breaks out the Cadbury Cream eggs and Reeses hearts for you.  Forget flowers…my man knows what I really love! (although, I’d be good with flowers too!) Just had to throw that in there!  Kudos to the Honey you know!

 
Here is the lunch I made for my littlest Valentine’s today.  I rolled out crescent roll dough and cut it into hearts and then made mini pizzas for them. (Yeah, I know the cheese looks weird.  It’s because it is.  Vegan Cheese for Tid Bit, and Little Bit just eats it too since that’s what I was making.)  I also made some chocolate covered strawberries for them too, and a drop of food coloring to make pink soymilk! (oh, for those of your dairy avoiders reading…did you know that Ghiradelli semi-sweet chocolate chips have NO dairy in them at all?!  And all this time you thought you or your kiddos would have to go without chocolate!)


 You guys know I love presents, so above you can see the table that I set up for my kids to enjoy at lunchtime too!  LOVE IT!  And amazingly enough, there’s hardly any candy in there!  Tid Bit got some new Lightening McQueen jammies, and Little Bit scored that adorable stuffed “dog dog” as he calls them!  I think all the extra tissue paper I crammed around makes it look more fun.  And I totally pulled out some leftover balloons from Little Bit’s birthday party and hung them from the chandelier over the table.  It’s the little things you know?!  So, that’s what we’ve been up to today!

Tonight for dinner, I’m making my three Valentine’s some hamburgers for dinner!  The Hubs and I aren’t really into date night ON Valentine’s day.  Too many other people busy publicly loving one another, and we’d rather have less people around and better service at a restaurant that isn’t slammed.  In a few minutes, before our friends next door come over to join us for Valentine cupcakes on the lawn, I’ll post the recipe for the best burger I’ve ever had…EVER.  And it’s the one the Hubs and I will be having tonight.  Do you trust me yet when it comes to recipes?  Hope so, because this one will change the way you eat burgers!

More in a few!

– Logan

Filed Under: Create, Eat, Journey

The Man Party

February 7, 2011 by Logan Leave a Comment

Ever since my husband and a band of his buddies decided to have their own “Man Party” for the Super Bowl last night, I’ve been salivating over a blog post idea.  I can’t imagine that I’ll do my idea justice because as is often the case with ideas, the execution can fall short indeed.  Like re-telling a funny story where mid-way through you already feel stupid because you’ve ruined it…I worry that this will be the same.  So if mid-way through I feel like a dolt, you’ll understand why I may sound incomplete….just stop while you’re ahead you know?!

So the Man party was the first idea thrown out there.  Then another friend sent out an invite for a couples party…to the same group of people.

None of us wanted to reply to either because who wants to pick between awesome people?!  Not us!  I think the overlap was a total case of the accidents, but still….several of us caught in the in between and noone wanting to decide for sure.

Party number 2 conceded to party # Man, and thus the Woman party was birthed.

I think I don’t even need to delve into all the reasons that God made Eve.  Seriously, Adam needed some help.  God himself said so…”it is not good for man to be alone.”  And I have been giggling inside for a couple of weeks now over what it looks like at a man party where wives make ZERO effort to help out….we had our own party to plan after all.

And check out the spread at our party…I really should have taken more pictures, because this only shows a little bit of it all.  There were 2 tables, and the counter taken up by goodies.  We had bacon and cheddar potato skins, spinach pastry puffs, fried mozarella sticks, veggie trays, fruit trays, hot cheese dip, hummus, chicken salad croissants, boneless hot wings, jalapeno pimento cheese, homemade fruit pizza, cheesecake, homemade brownies, real Spanish sangria, sodas, herbed pita chips…and that’s not even all of it.  And notice the lovely serving dishes too?!  It was quite the effort made by about 10 women.  But that’s all…just about 10 of us.  This picture really doesn’t even do the spread justice.  I promise.

Here’s a taste of the men’s party below. Yeah…that’s what MY man took.  I know you wish you had an airbrushed cookie cake at your Super Bowl party!  Maybe you did…maybe you had a Man Party too.


So when The Hubs got home and I asked him about the Man party, of course they had fun.  They always have fun.  But when I asked him about the food, he laughed and said “there were a lot of chips and salsa.”

One guy brought some pizza.  Another brought some frozen wings that they then had to cook there.  (My girlfriend who’s husband hosted the party, told me today that the mess she’s cleaning up from the wing cooking is unbelievable!)  And there was this amazing cookie cake of course.

The Hubs told me he was getting hungry when I was describing our spread and even conceded a little jealousy.  Apparently the goal for the next man party would be that there is NOT a counter party for the women at the same time so that we can make sure their party is well fed.

HA!

I guess God knows what he’s talking about huh?  Not good for man to be alone.  And I think the men will all have the diarrhea over the next couple of days to remind them.

Happy Monday friends!

– Logan

Filed Under: Create, Eat, Journey

How to Make Homemade Chicken Stock

February 4, 2011 by Logan 1 Comment

I wrote “How to Make Homemade Chicken Stock” in a post a couple of weeks ago, but decided it’s important enough to deserve it’s own post.  Yesterday, I needed to make some more and had just bought a rotisserie chicken, so I thought I’d document the process for you in photos.  My friend Amy tried this for the first time the other day (Woo Hoo Ames!) and had some questions along the way…so in an effort to serve you all better, I hope all these pictures help!

PS. I just copied below what I’d written in the post before.  But now, I’m adding pictures!!!

First I’m going to tell you how to make homemade chicken stock…the cheater’s way!  Step 1. Go to Sams or Costco or the grocery store and get a rotisserie chicken. Step 2. Eat the chicken for lunch or dinner with simple sides. Step 3. SAVE every single piece of that carcass and the juice in the bottom of the pan. Even fill the bottom dish from the chicken with water to add to your pot and get every last flavorful dripping you can out of that thing!

 Step 4. Put all of that in a stockpot. (The one I’ve used here is an 8qt pot.) Quarter an onion. Cut some celery into about 3 inch lengths (I’d say maybe 3 stalks, and yes, the leaves can stay on the celery…they’re flavorful!) Put some carrots in too…maybe a cup or so. These can be cut big as well, or you can really cheat and use baby carrots. Put a couple Tbsp minced garlic, salt, pepper, I put some Lawry’s seasoned salt, maybe a tsp of thyme, and a Tbsp parsley flakes..

 Fill the pot up with lots of water, a  Bring to a boil and then reduce heat and simmer a long time UNCOVERED…at least 3 hours, and up to about 8 makes it really great!

 This is how my pot looked when I started at about noon. I even measured the water line so you can see what will happen over time.

This was after about 3 hours.  The stock had evaporated over an inch worth of liquid.

And then below after 6 hours it’d lost another inch!  The longer you cook it, the more concentrated it gets!

Concentration = loads of flavor!

The darker the color, the richer the broth.  When you’re done, strain out all the bones and veggies and store the stock.  I normally just freeze mine in about 6 cup (that’s 1 1/2 qts) containers, so I can use it whenever I want. Also if you’ve made it really concentrated, then when you make soup or something with it, you can usually add as much water as you have stock to make more.  So if you have 4c. stock, then add 4 c. water and your broth will still taste super rich.

This is what my finished product looked like after about 7 hours simmering once I ran it through a strainer to get all the bones and things out.

Make sure that you say things like “oui, oui” and “bon appetit” when you make this, you’ll be very European now making your own stock and all.

Filed Under: Create, Eat

  • « Previous Page
  • 1
  • …
  • 10
  • 11
  • 12
  • 13
  • Next Page »
  • 
  • 
  • 
  • 
  • 
  • 

Subscribe by Email

Oldies but Goodies

Copyright © 2025 · Logan Wolfram · Logo by Annie Barnett · Site by Design by Insight