Logan Wolfram

Enjoying Life for Dessert

  • Home
  • About
    • Meet Logan
    • Meet My Family
  • Blog
  • Eat
  • Journey
  • Create
  • Connect

Little Bit’s Nursery…one of the few finished rooms in our house!

March 14, 2011 by Logan Leave a Comment

So, pretty much Little Bit is about to have his name revealed when I show you pictures from his nursery.  I figured that it’s high time I show you a picture of something in my house that is actually finished.

EXACTLY how I want it to be….

I go into this room and feel happy, calm, inspired, loved….it’s just a good good room.  And it’s my most favorite nursery that I’ve ever designed.  One day though I really hope I have a girl because I have the best idea for a girly nursery ever….I’m not telling that though because for now it’s this super fun dream just swirling around in my head.  So cross your fingers that the next time we have a baby (no idea when that is…just sayin’) it’ll be a girl…just so I can do this fun project.  But…shocker…I digress.

So…here it is.  My favorite room in our house.  Little Bit (ahem…Hudson’s) nursery.  Hope you enjoy!

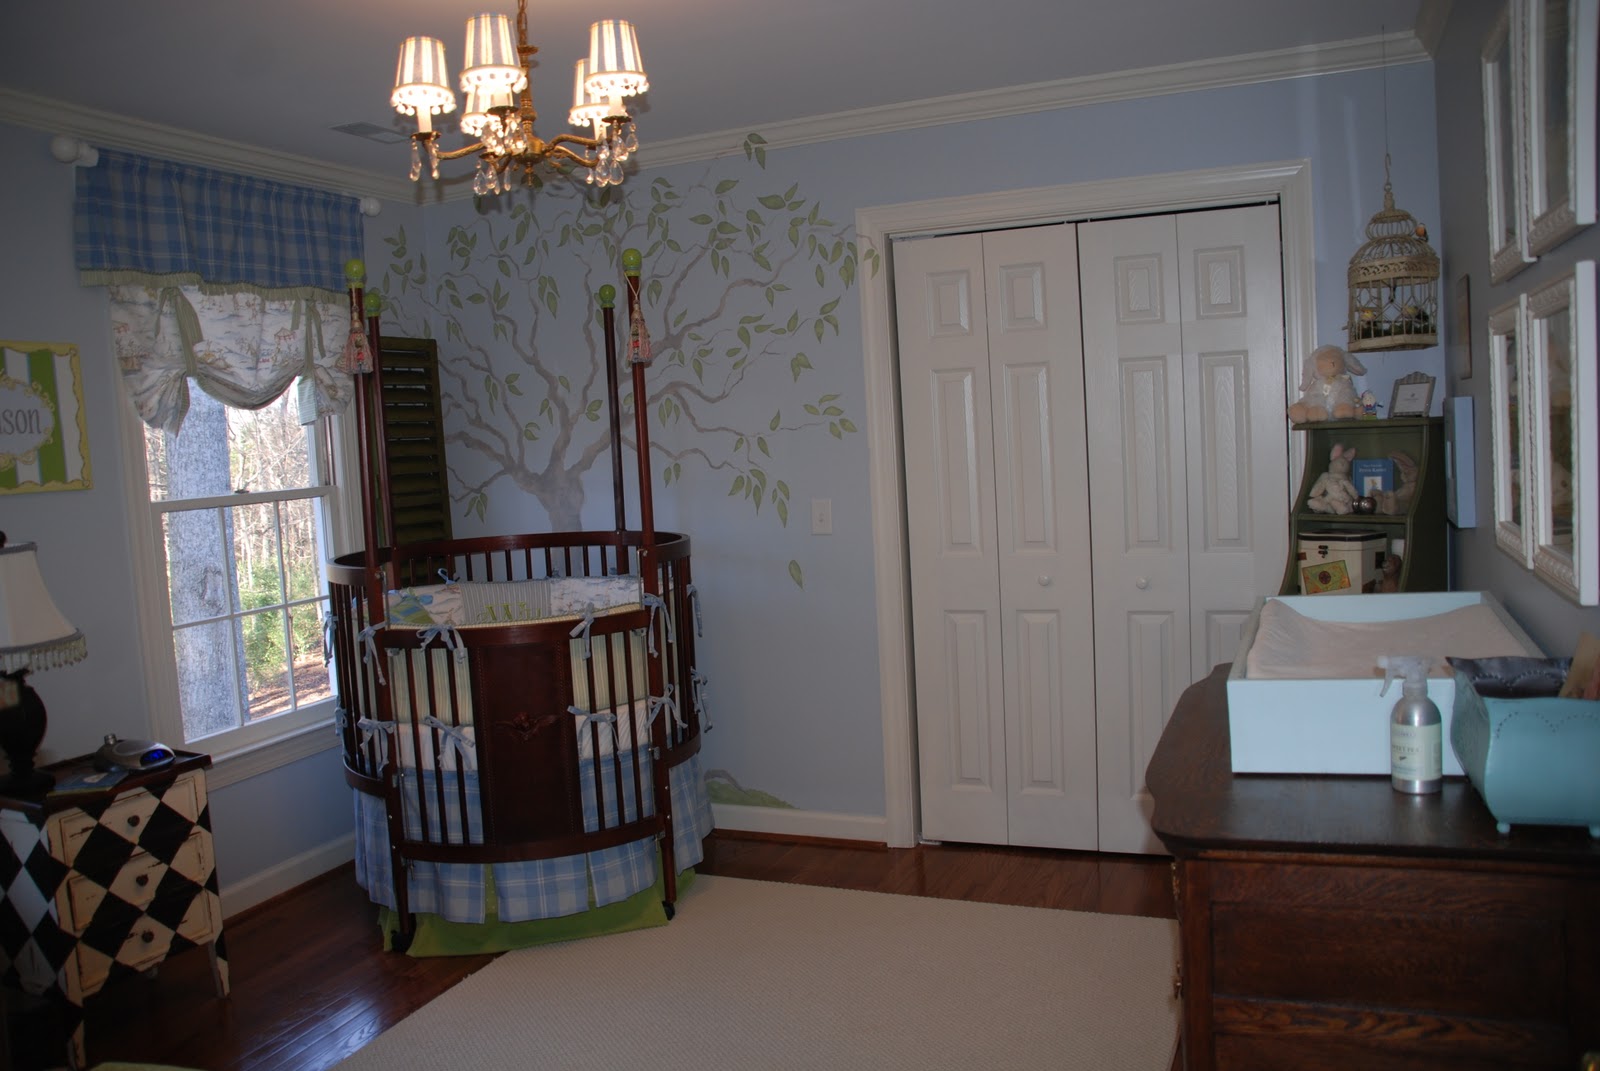
My very talented sister painted that most gorgeous tree on the wall as a gift. I wanted it to look painterly and soft… like something Beatrix Potter might have done.  I do have little bunnies in this room, and while I take some inspiration from a theme sometimes, I will NEVER go all out with one.  I think there should be hints of ideas around, not look like a particular idea vomited all over a room and took it over.

Oh, and because I’m sure you all want to know what the paint color is…it’s Sherwin Williams North Star.  (Which you might like to know looks very gray on the swatch…it does in fact translate on the wall to the most perfect soft blue.)

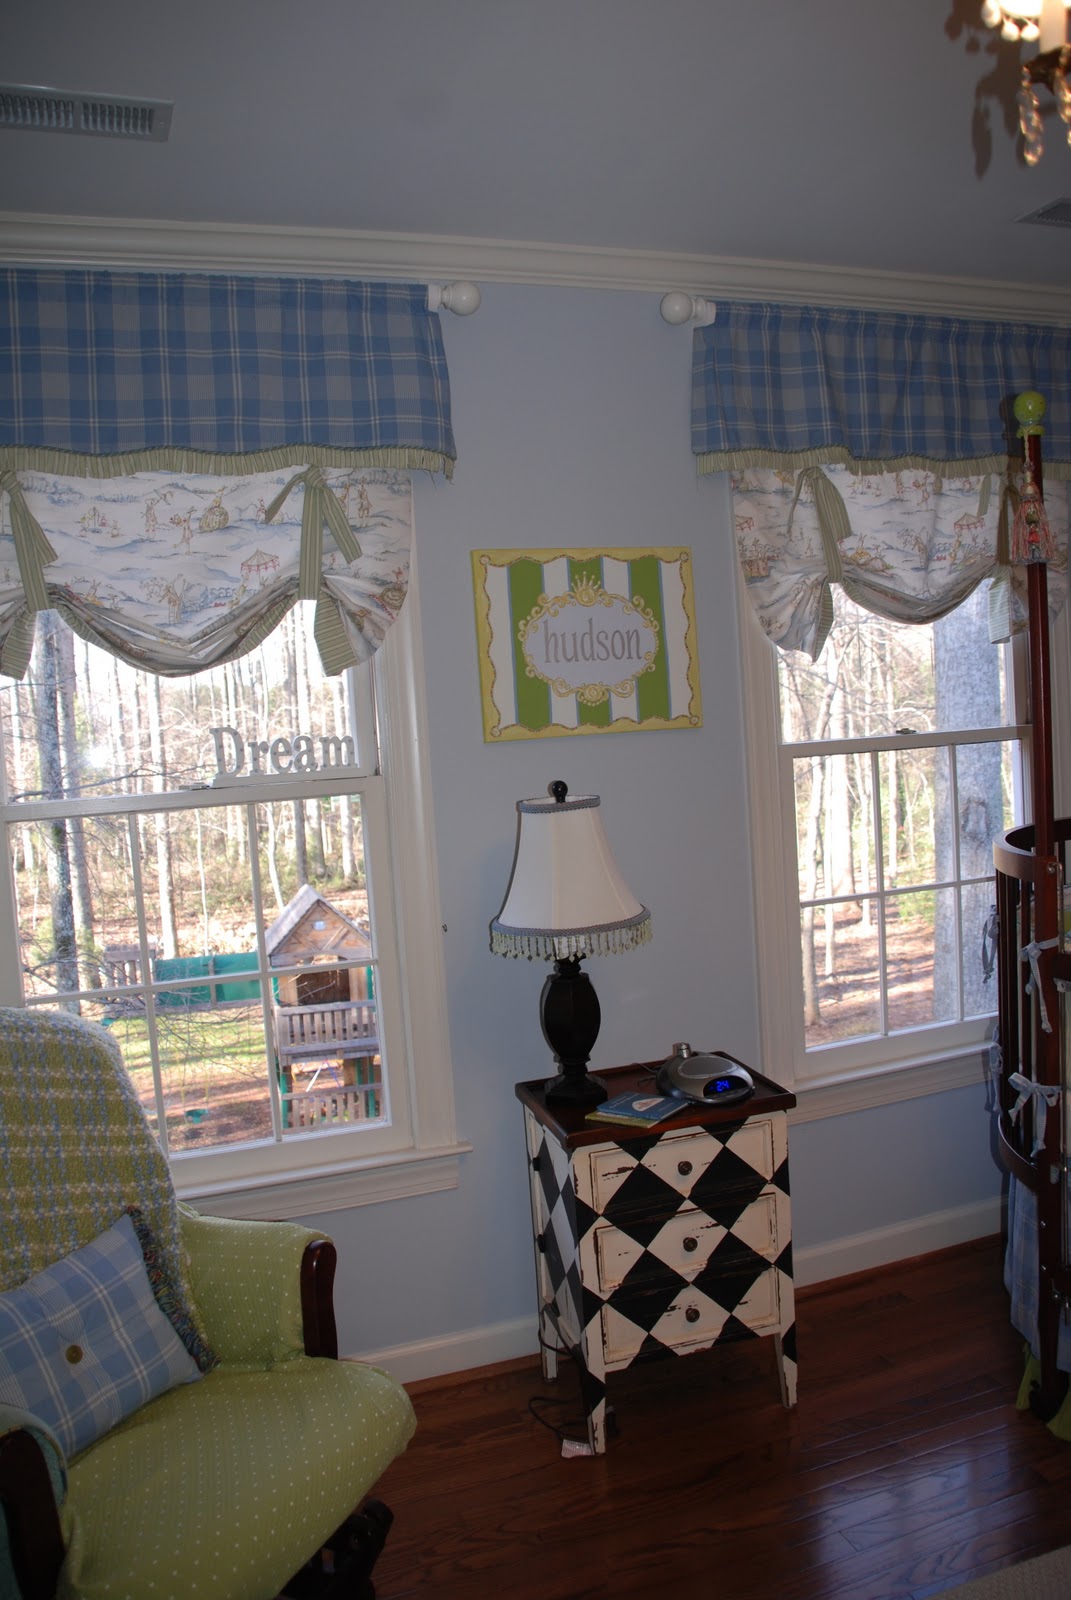
The reverse side of this bumper pad is like that blue tattersall stripe that you see on the monogrammed panel, except that it’s green.  I wish I could take credit for all the amazing sewing work done here, but alas, I cannot.  My dear dear friend Mary is an amazing seamstress and she did all this fabulous stitchery!  I designed what I wanted and she executed it.  In fact, she’s very very talented and just came up with all these fun pillows and the awesome trim on the window treatments and that bolster pillow (she folded the fabric over and cut it in 1/2 inch sections…leaving it a little stringy and frayed which I just LOVE for trim in a boy’s room!)

This little harlequin chest was one The Hubs and I found on a weekend away a few months before Hudson was born.  I LOVE it and will always always find somewhere fabulous to put it!  I think it adds just the right amount of drama to what could suddenly become an otherwise super soft looking room. (Not that there’s anything wrong with super soft, I just like to add a little flair somewhere in every room!)

There’s a different lamp in the room now…but I can’t take a picture just this minute because Hudson is napping and I’m surrounded by mounds of laundry that I let get away from me lately.  I should really follow my own advice about laundry!

This darling little chandelier below was $70.  I bought the shades for just $3 each and painted stripes on them and hot glued the trim on.  I love it!

I should also add that there are in fact books on the shelves of that great primitive bookshelf that I found while antiquing.  And the chair and ottoman are actually covered in that fabric…I took these awhile back.  One of my favorite things in the room are the antique french shutters that are on the outsides of the windows.  The hubs gave them to me for my birthday and again…they’re another thing I’ll always find something fabulous to do with them!

Below you can see the changing table which was actually my childhood dresser .  It was sort of a honey oak color that I didn’t love, so when Tid Bit (my other son who’s 4) came along, we stripped it and stained it with Minwax Walnut stain. Then the Hubs built a box to hold the changing pad to keep it from slipping around with a wriggly baby! (there is a panel along the backside that’s screwed into the back of the dresser)  So this piece, the corner green shelf you can see, the crib, and the rocker (recovered) were all used in Tid Bit’s nursery.  I’ll show you pictures of that one another time.

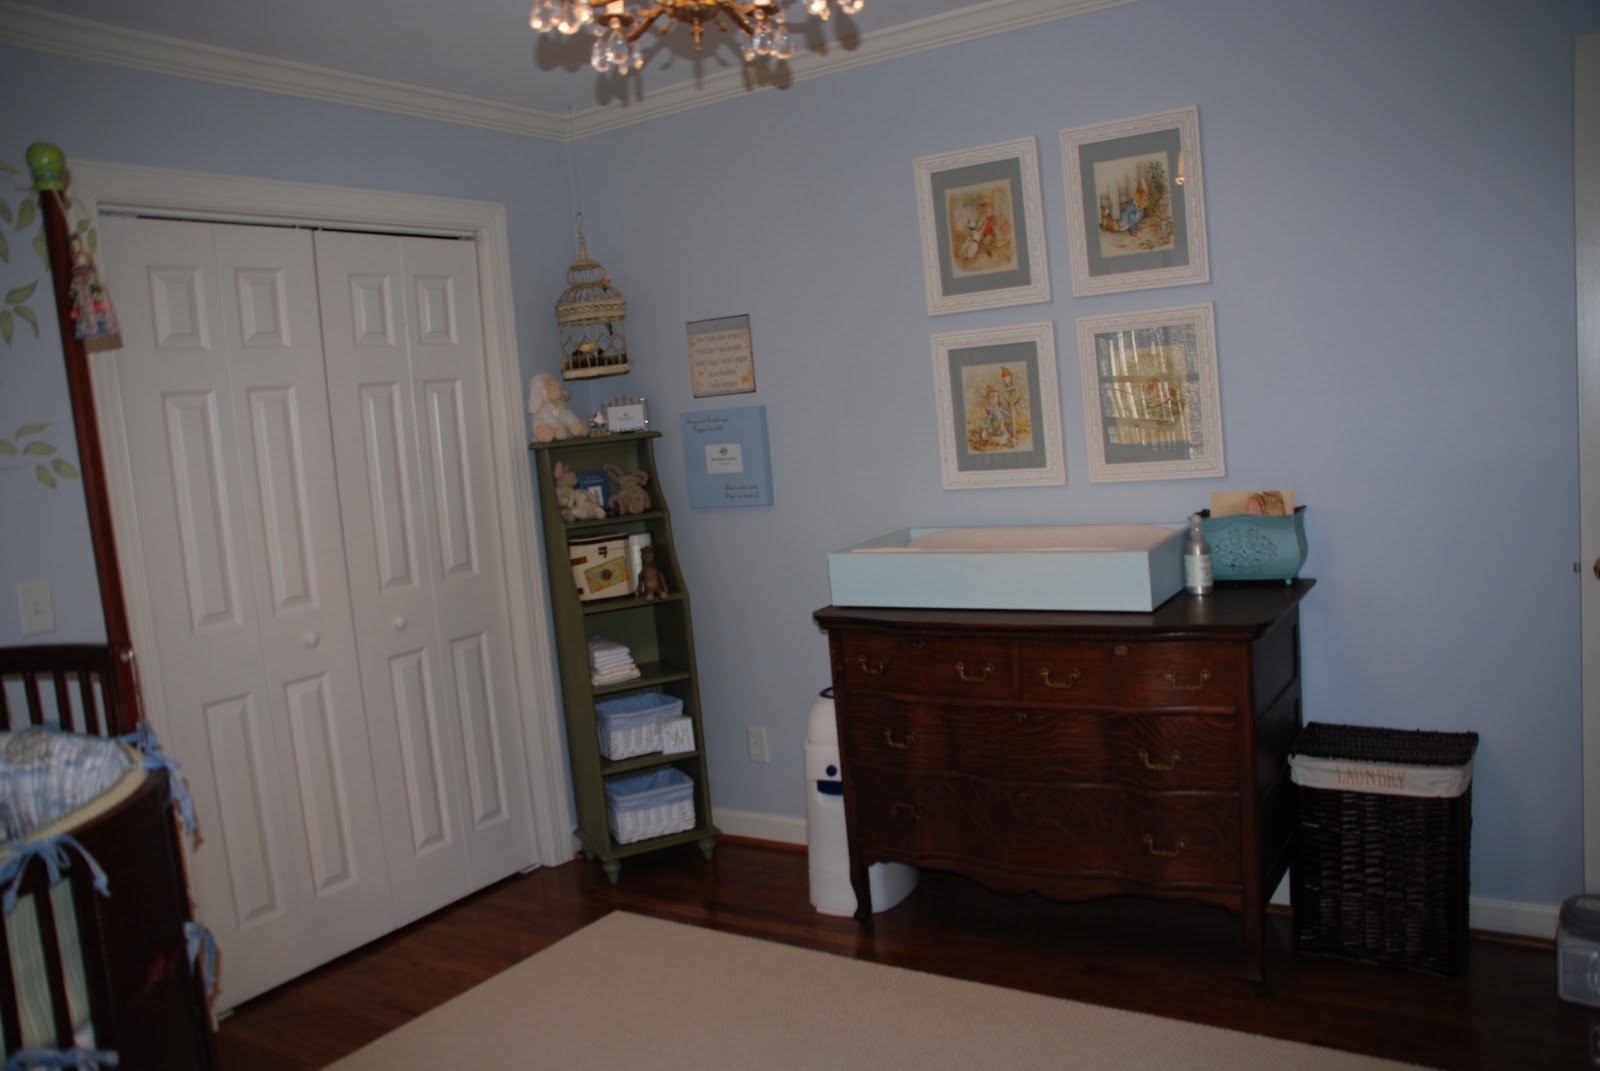
This birdcage was something I’d used as a centerpiece from some baby showers I helped throw.  I wired the little birds into it to look like they are perched and put moss in the bottom.  I just LOVE it hung in the corner here!

The picture frames actually have real pictures in them now as well…but I do appreciate that Hobby Lobby carried such cute frames!

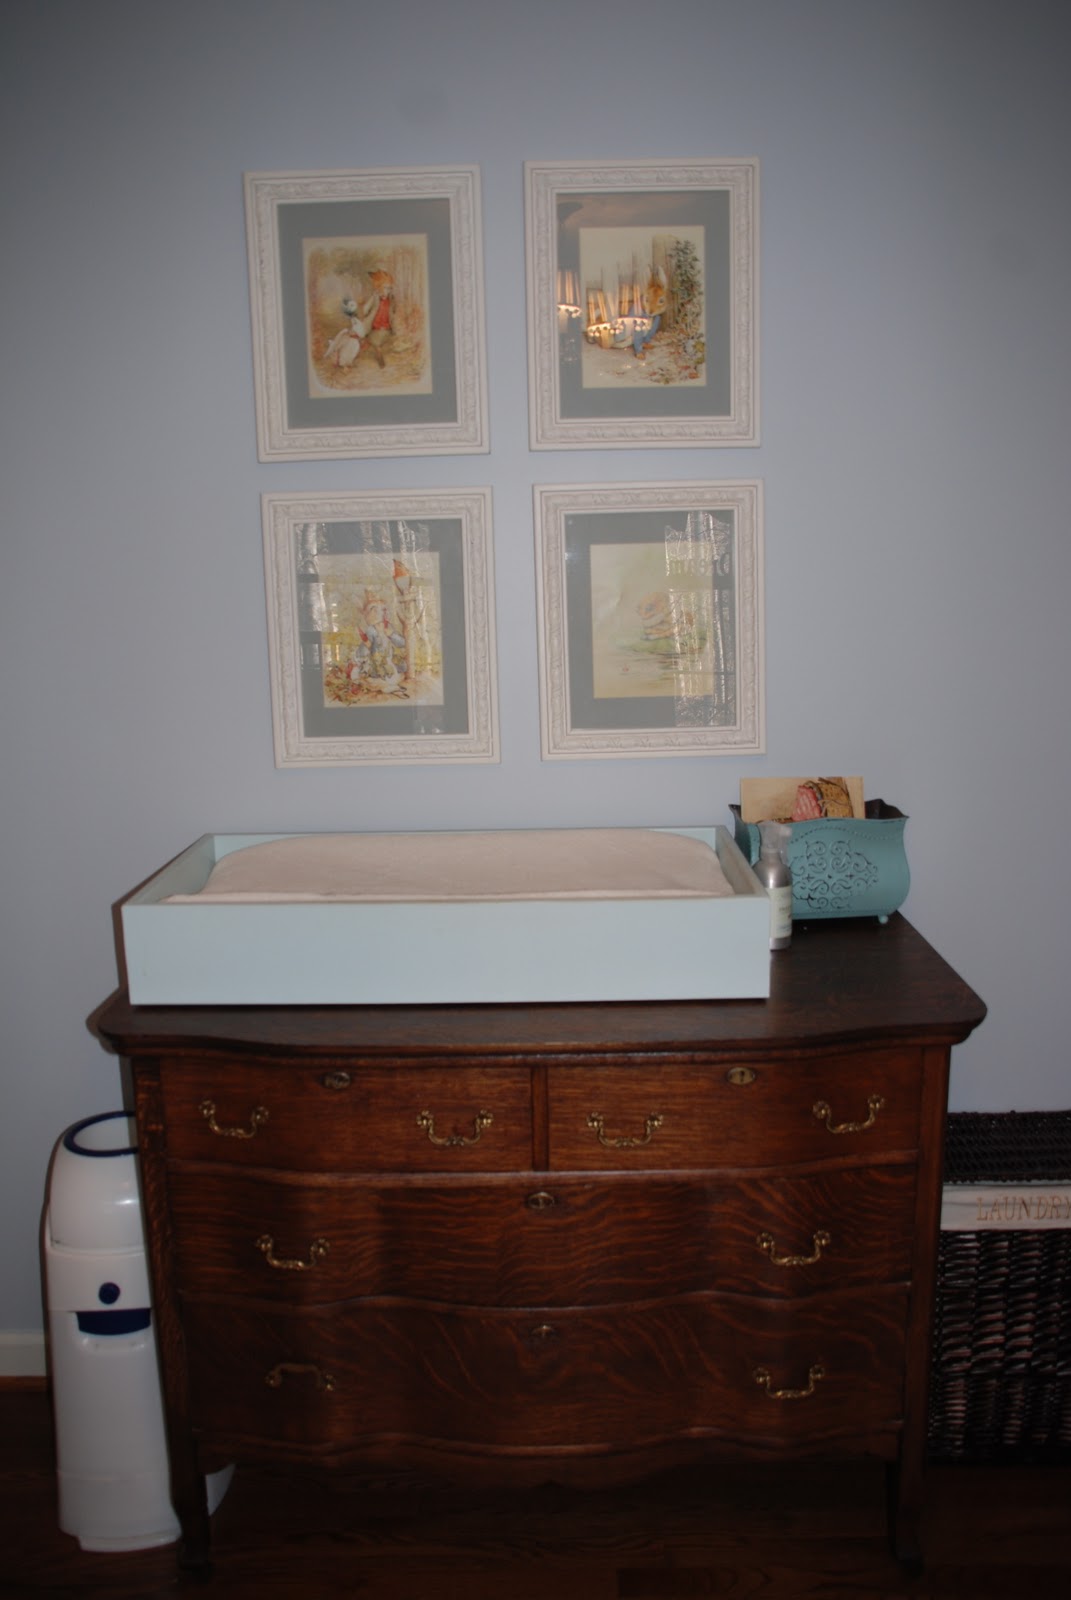
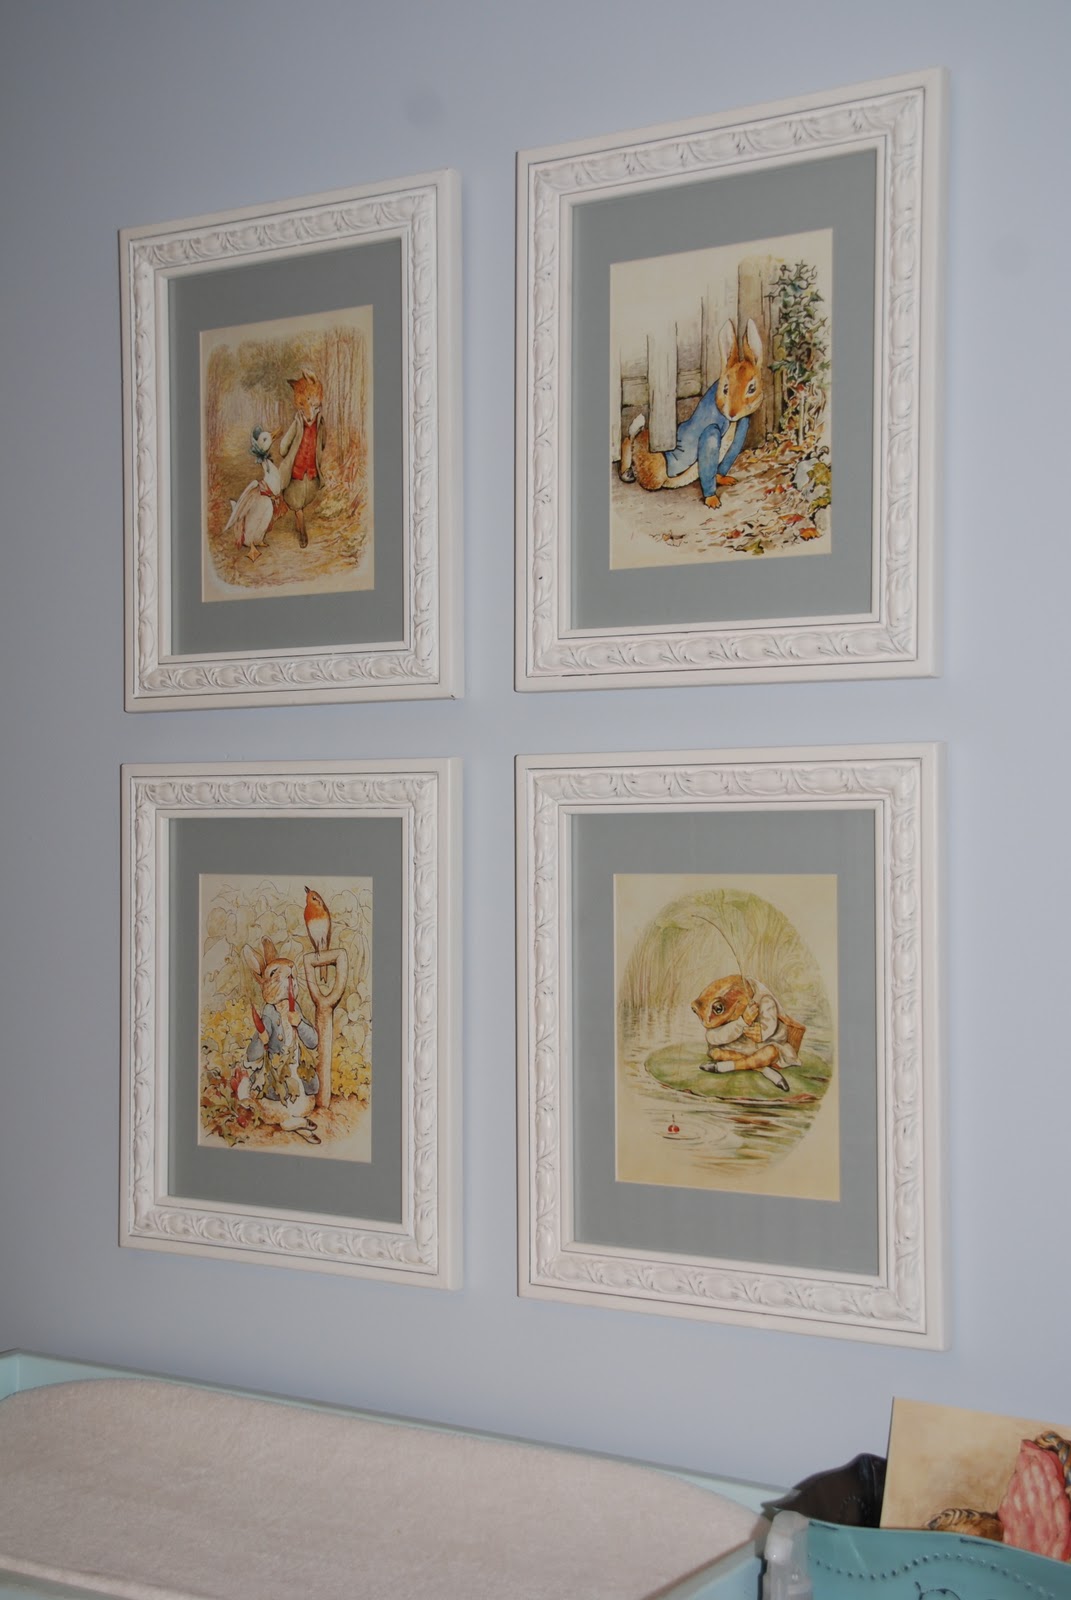
I bid on these prints on Ebay and got all four of them for $3.26!  Check out 99centprints.com for more great finds!  Then I waited til Hobby Lobby had openback ready-made frames on sale 50% off and had them all matted and framed.  So the grand total for all 4 pictures was a hair over $80.  I’m sure some of you amazing women out there could have done it for cheaper, but I’m still pleased with the result!

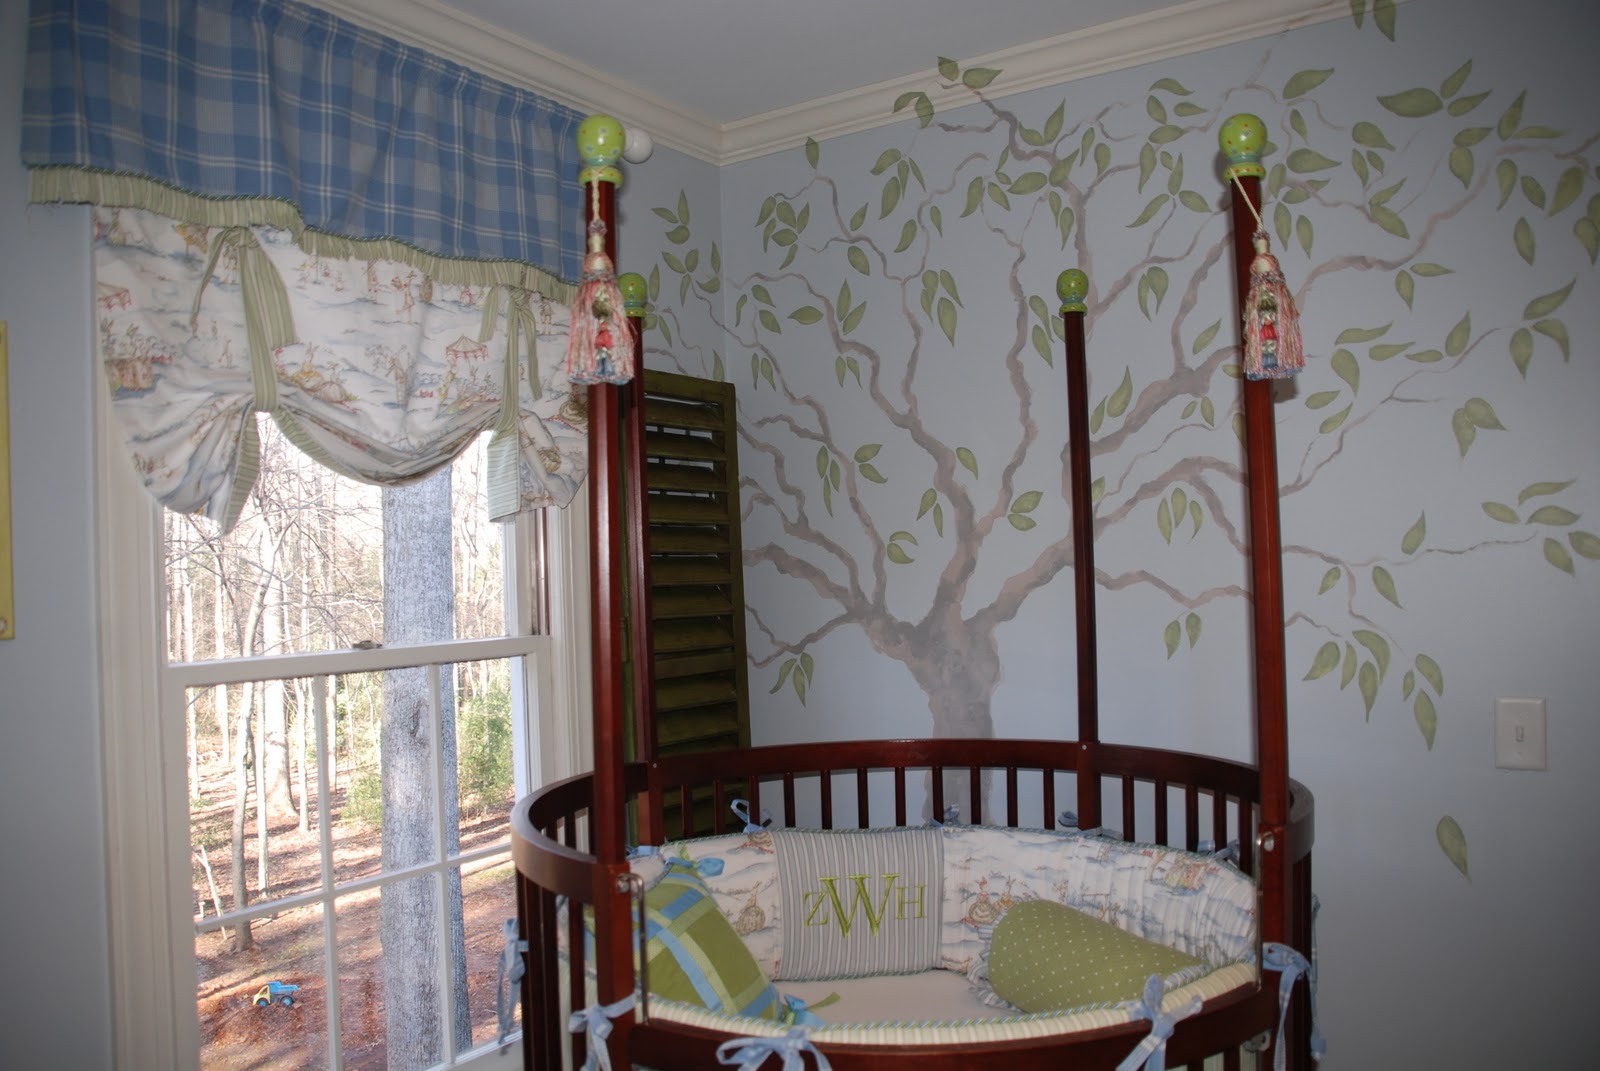
You can see the tree and shutter a little better here.  I specifically asked my sister to paint a few leaves extending onto the crown moulding so that it would feel more whimsical and less confined.  I love the effect!

And finally, a canvas that I painted for Hudson…I did one for Tid Bit when he was born, and I guess I’ll reveal that when I show you his room sometime too! (Then you’ll learn his name as well!)

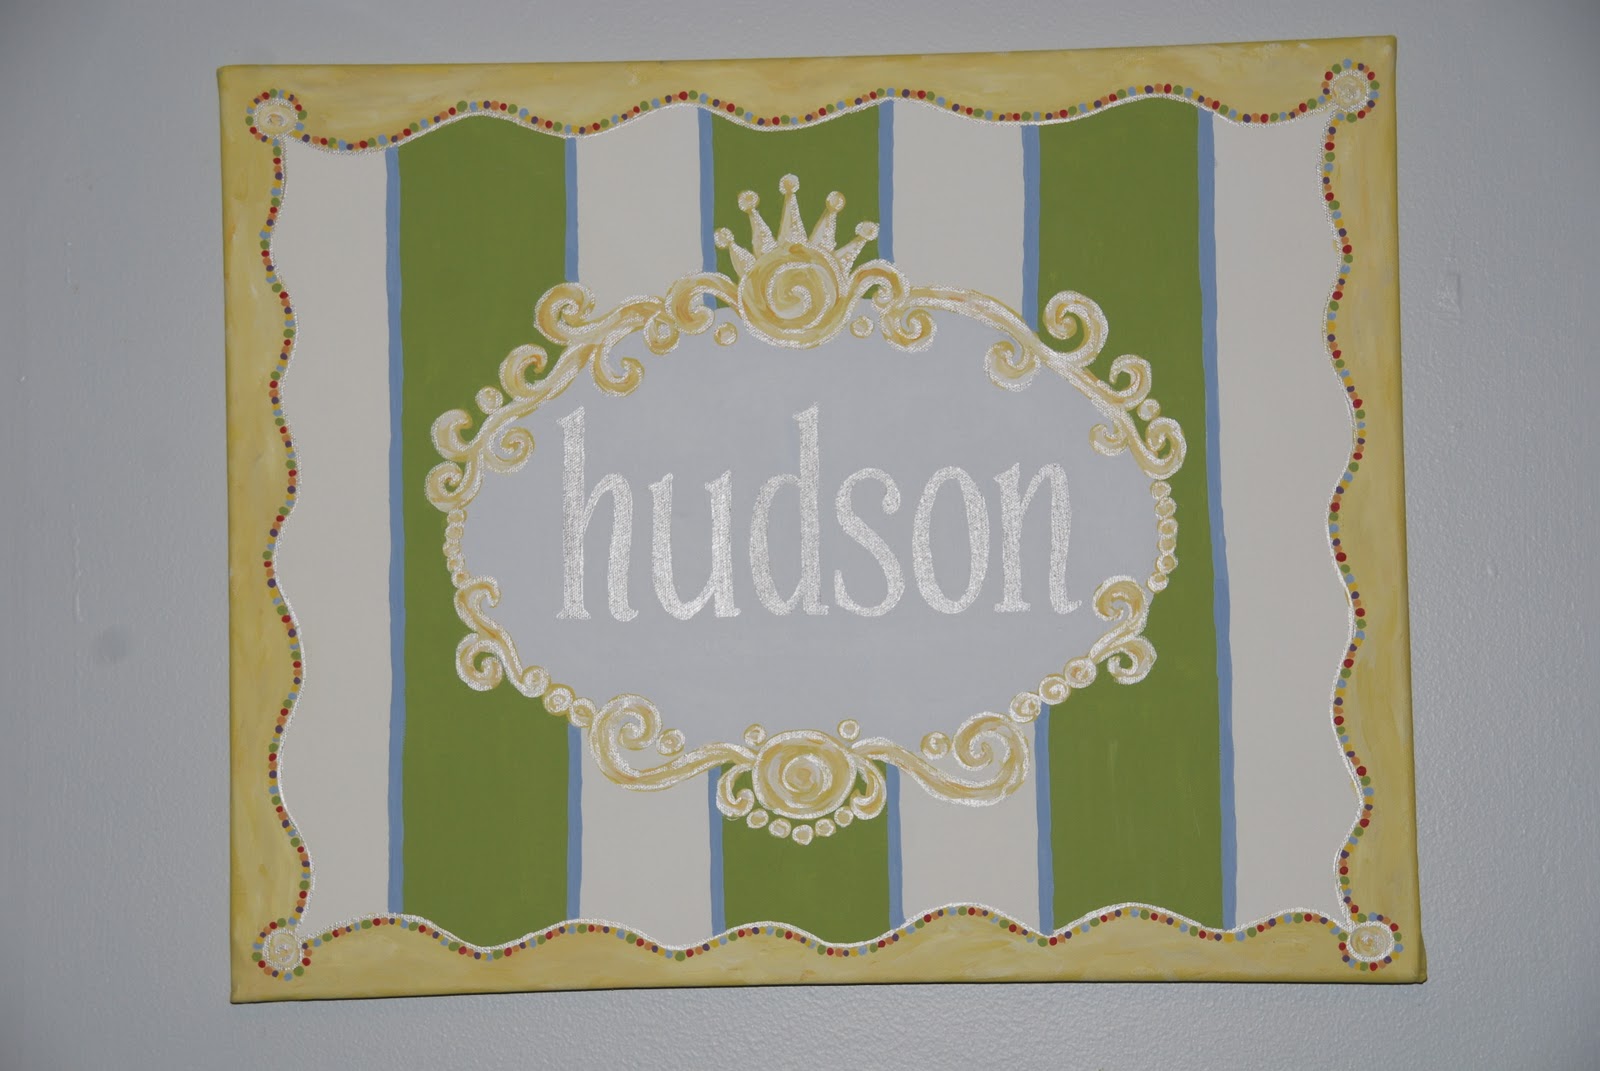
One trick to when I painted this canvas…to get the lettering of the name done really clearly, I printed it like I wanted it to be on a piece of paper, taped it to the back of the canvas and traced it in front of a window so the light would shine through.  This way was much easier than freehanding the one for Tidbit which took forever!!!

Well, thanks for stopping by today!  Hope you enjoy the pictures of our nursery as much as I enjoyed creating and now being in it!

– Logan

Filed Under: Create, Journey

Food for Thought: Impossible Possibilities…. prayers for Japan.

March 13, 2011 by Logan 1 Comment

I have a new piece of furniture I’m going to start working on here in a minute, but I just had to do a bit of writing first.  Sorry I didn’t write yesterday…it was way too beautiful in SC to be inside typing.  We took our kiddos to the zoo, had a picnic, and the Hubs and I went on a date last night even.  It was a good day. 
This morning at church, I have to tell you…the part that I got to be in there for, it was good. (Side note here…I get called out EVERY single week…Little Bit misses his nap and just isn’t happy back in the nursery.  Eventually, this too shall pass.)  Anyhow, my favorite part of the entire service was when our pastor and friend Rich led our entire church family in a time of prayer for Japan and all the victims of the earthquake and subsequent tsunami..
And some words that stood out to me were “Lord, we do not ascribe to you, the works of the enemy, because you are GOOD.”
<—- This painting is by Katsushika Hokusai of a tsunami.  I think it looks like the break of the waves are evil hands reaching down.  And that’s what I believe this was…evil hands reaching in.
Our world is a mess…natural disasters sure throw things into turmoil really fast, but I believe that God…the God who created the earth, will redeem this!  He will somehow make something that the enemy has used for destruction into good.  And I wish I could venture to guess how he will do that in the face of tens of thousands dead or missing, but I can’t…and that’s probably good, because my mind is limited…my thoughts are finite…God thinks in different terms than me.  What a relief, huh?!

Last night on our date, I saw and took a picture of this magnet.  I love what it says…..
To me, the best part about this quote isn’t something that I thought of necessarily last night when I first read it.  And as I think more on it today, I find myself reminded that I’ve seen similar words before…and I find comfort in spending time thinking about things that seem impossible
because….

Matthew 19:26 – “with God all things are possible.”
Mark 10:27 – “With man this is impossible, but not with God; all things are possible with God.” 
Luke 18:27 – “What is impossible with man is possible with God.” 
And suddenly for Japan, I find myself thinking and praying that the 
possibilities are limitless.
– Logan 
 

Filed Under: Journey

Castle on a Cloud….Dreaming in Whites.

March 11, 2011 by Logan 1 Comment

I once told someone that I thought that the color white was

“Completely void of personality” and should basically be avoided….pure white that is.

But now, I have changed my mind…and I think I was wrong!  Because I love this…

And these….

And this….

And this….

Seriously…GOR-geous!

But I’m just gonna tell you….I’m not good with void of color!

Now if you want color….Begonia or Aqua, Periwinkle or Apple green, or a colored polka dot couch….well, I’m your girl!  I do pretty well picking paint colors and 99% of the time, they turn out just like I expected them to turn out.  I am not afraid of color…in fact, I love it…and that is reflected pretty much everyhwere in my house.

But when it comes to creating a cloudy white oasis…we’ll the good Lord just didn’t seem to wire my brain naturally that way.  But I’ll tell you one thing….for a person who’s too prideful to post a mediocre recipe, I’m sure not too prideful to admit when someone else is better at something than I am.  And my gal pal Emily….well, the girl can dream in white….

ALL. DAY. LONG!

And I have to confess…I’m just a tid bit jealous.

So the best thing to do when you don’t know how to do something, but would like to learn….well friends, enlist the help of a professional….who knows better than you!

So that’s what I’m gonna do here.  Next Friday the 18th, Emily is going to teach us how to love us some white.  And while she’s doing that, I’m gonna to add a punch of color to the Crisp she’s used to over on her site!

I could not be more excited!  And the next time I see her…I’m gonna pick that brain of hers in person for what to do to make my own little castle in the clouds out of my master bedroom!

Filed Under: Create

What’s Cooking?! Chocolate Whoppers…aka. my newest downfall!

March 10, 2011 by Logan 6 Comments

This morning when I woke up it was still raining…and my house smelled like poop from our septic tank issues. 

UN-Awesome.

Since I really didn’t do much of anything productive yesterday with the rain, I thought I’d kill 2 birds with one stone today…make something to show for and abolish the literal crappy smell in my house.

Baking time!!!

Little did I know the problem these cookies would cause for me today.  I’m so glad I gave most of the pie that I made the other day away…or all of this yummy goodness around would be seriously problematic!  I took an entire tin of these cookies to lunch at McDonalds with friends today…I have to get them out of my house.  I mean it…it’s like having Cadbury Cream Eggs around….not a redeemable thing about them for my waistline!  My friends all agreed….these things are so good they’re bad!

If you’ve never heard of Sara Foster, then you should look her up.  She has a couple of restaurants called Foster’s Market in the Raleigh/Chapel Hill, NC area and a couple of cookbooks to her name that never disappoint. I promise! 

<————– This recipe for Chocolate Whoppers is from this cookbook which you can get for a good deal HERE.

You will love me for this…but you will also hate me for this.  They are just ridiculously good…and I’ve never really considered myself a chocolate chocolate chip cookie kind of person.  I stand completely….

reformed!

Without further ado…. I introduce you to the newest nemesis to hit my kitchen this week…

The Chocolate Whopper!

Makes about 1 dozen 2½ inch- to 3-inch cookies

6 ounces semisweet chocolate (preferably high-quality baking chocolate, such as Valrhona or Callebaut), chopped into large chunks
2 ounces unsweetened chocolate, chopped into large chunks
6 tablespoons (¾ stick) unsalted butter
2 large eggs
1 tablespoon plus 2 teaspoons instant espresso powder (I didn’t have this so I just ground some coffee super fine….they are still TO DIE FOR!)
2 teaspoons pure vanilla extract
¾ cup sugar
⅓ cup all-purpose flour (yes you read this right!)
1 teaspoon baking powder
½ teaspoon salt
2 cups coarsely chopped walnuts
1 cup (6 ounces) semisweet chocolate chips

1. Preheat the oven to 325 degrees.

2. Lightly grease 2 baking sheets and set aside. (I just lined sheets with parchment paper)

3. Melt together the semisweet chocolate, unsweetened chocolate chunks, and butter in a double boiler over low heat until just melted, stirring occasionally. (Note: Do not overheat; remove from the heat as soon as chocolate has melted.) Stir to blend the chocolate and butter, and set aside. (I cheat…and do not use a double boiler…I just stir constantly and do this over low heat on the stove.)

4. Cream together the eggs, espresso powder, and vanilla in a large bowl with an electric mixer. Add the sugar and mix until thick and creamy.

5. Sift together the flour, baking powder, and salt in a separate bowl and stir to mix. Set aside.

6. Add the chocolate mixture to the egg mixture and blend until well combined. Add the flour mixture and stir just until the dry ingredients are moist.

7. Fold in the walnuts and chocolate chips. (Note: The batter will be very moist—similar to the consistency of cake batter.)

8. Scoop the batter with a ¼-cup (2-ounce) ice cream scoop or by the heaping tablespoon and drop onto the prepared baking sheets about 3 inches apart. (Note: Bake right away, before the chocolate begins to cool and harden.) (I didn’t make them this big, so I got a little over 2 dozen total)

9. Bake 10 to 12 minutes, turning the baking sheets once during the cooking time. The cookies will still be very gooey inside and soft, but do not overcook or the cooled cookies will be dry. Cool about 10 minutes on the baking sheets before gently removing the whoppers to a baking rack to cool completely.

Don’t hate me because these are beautiful!
Much love,

Logan

Filed Under: Eat

How to…antique a table!

March 9, 2011 by Logan 8 Comments

Oh my words…it’s raining here again, which is good for the earth, but bad for my septic tank.

UGH!  Everytime we have a “soaking rain,” our septic drain fields get overloaded and then the toilet in MY bathroom doesn’t flush til it’s dry for several days again.  Awful.  I guess it’d all be fine if we wanted to fork over $2K to add more drainfields…but do you know how much house beautifying I could do with $2K!?!

ALOT!

But, in the meantime I do have some projects that have been happening around here lately…rain or shine!

<—–Like this table. It has the most beautiful lines that just got kinda lost with plain wood stain. So, you know I painted it!

Lately I’ve been dying to figure out how to create a room that looks more subdued…mellow, cozy, worn, fresh…you know, all of that!  Anyhow, my friend Emily at Crisp Interiors is amazing at doing just that!  We’re going to do guest postings next week on one another’s sites….I’m doing one on using color for her, and she’s gonna teach us all how to make something fabulous with whites and neutrals!  I’m so excited.  You should be too…

For now though, here’s how I’m transforming this lovely table!

Make sure to give it a light sanding just to rough it up a bit to help the paint adhere.  I wanted some wood to show through this, so I didn’t prime it at all.  I dont’ know if that’s the right way to do it, but it’s how I did it this time…and this for now is working just fine for me. (I do prime some pieces that I care more about though.) Then I painted it a creamy white color…who knows what color it was… was the same one I used on the headboard bench that I found in the Lowes reject bin of mis-tinted paint colors!

 I  let that dry overnight.  The the next day i strategically sanded it in the places I thought would see a little wear and tear in real life use.  If you notice how the table looked before, you could tell all of that, so I kinda just went back over those places with a sanding sponge to take off some of the cream paint that I’d just done the day before. See below….

I sanded along the lines of the top of the table, and also a little here and there on the edges of the higher carved areas… you know, the spots that would actually get bumped and worn over time.

Then, using antiquing glaze (This time I used Valspar antiquing glaze which had a grayish tint to it, but often I use Minwax Walnut stain) I rubbed it on and off sort of at the same time using a staining sponge.   Can you see the difference here from the just plain cream finish above?  I did the same thing on the sides, base, and feet of the table as well.  With this, you’ll have the glaze soaking into the lower areas as well as “roughing up” the higher sections.  It also gives an overall darker feeling to the entire piece which I really like.  
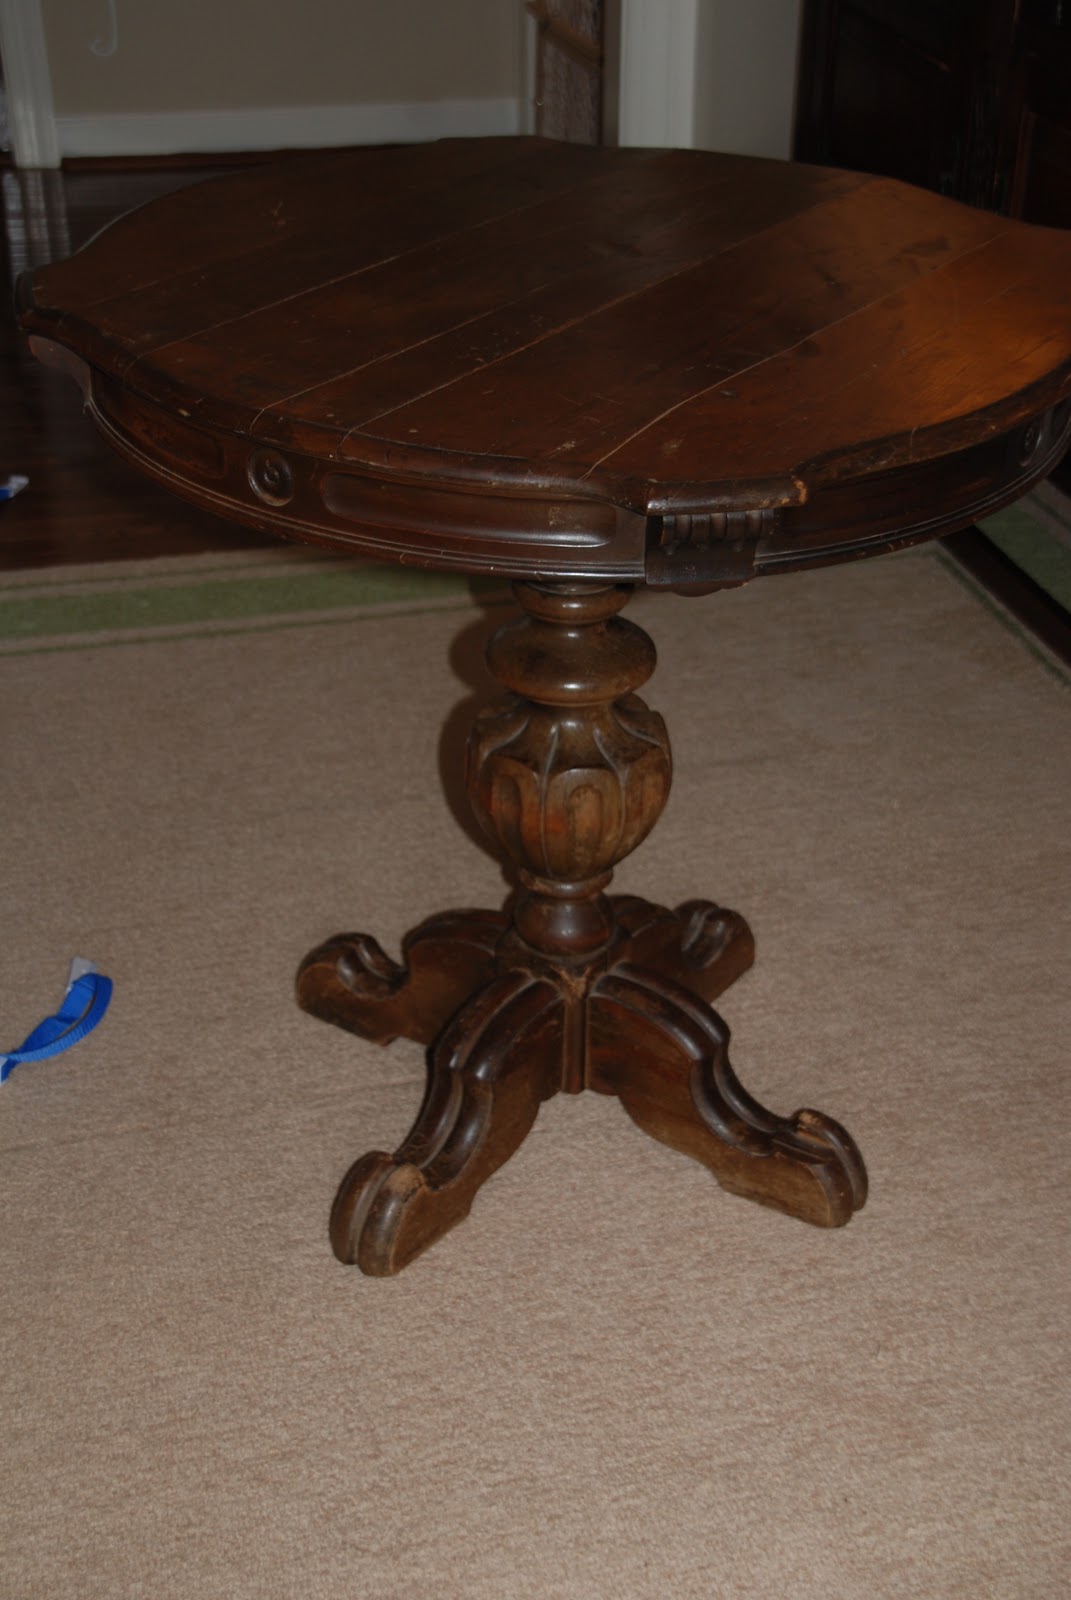
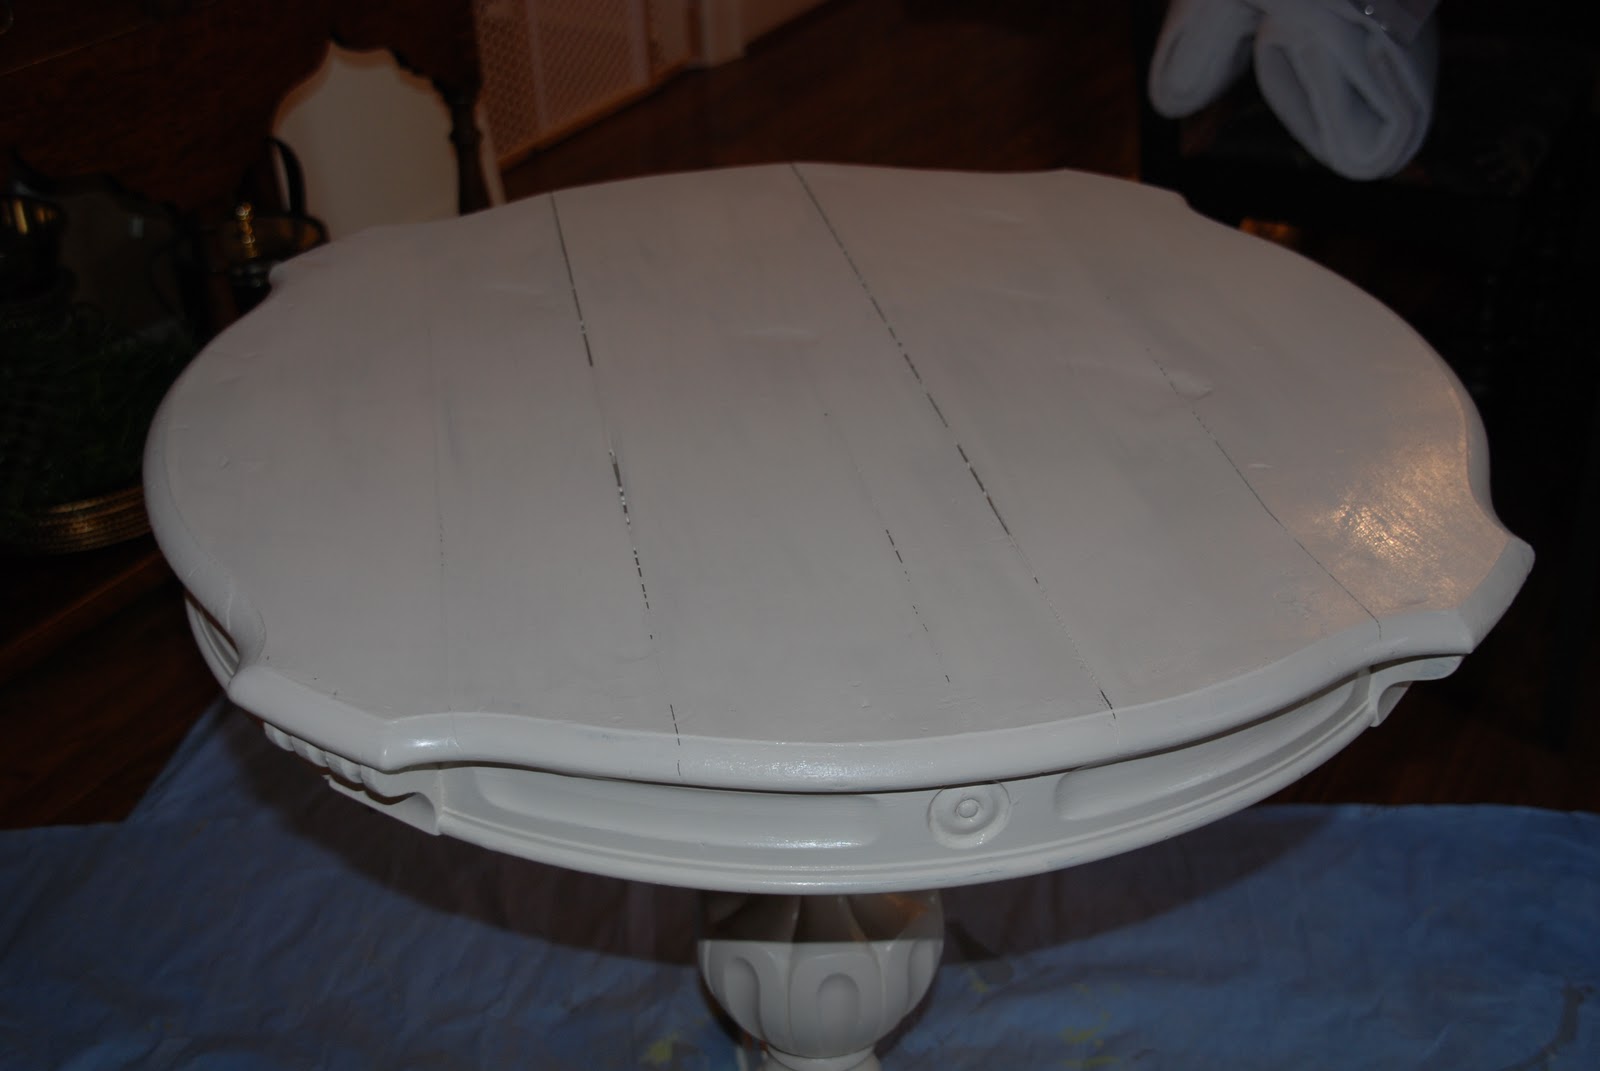
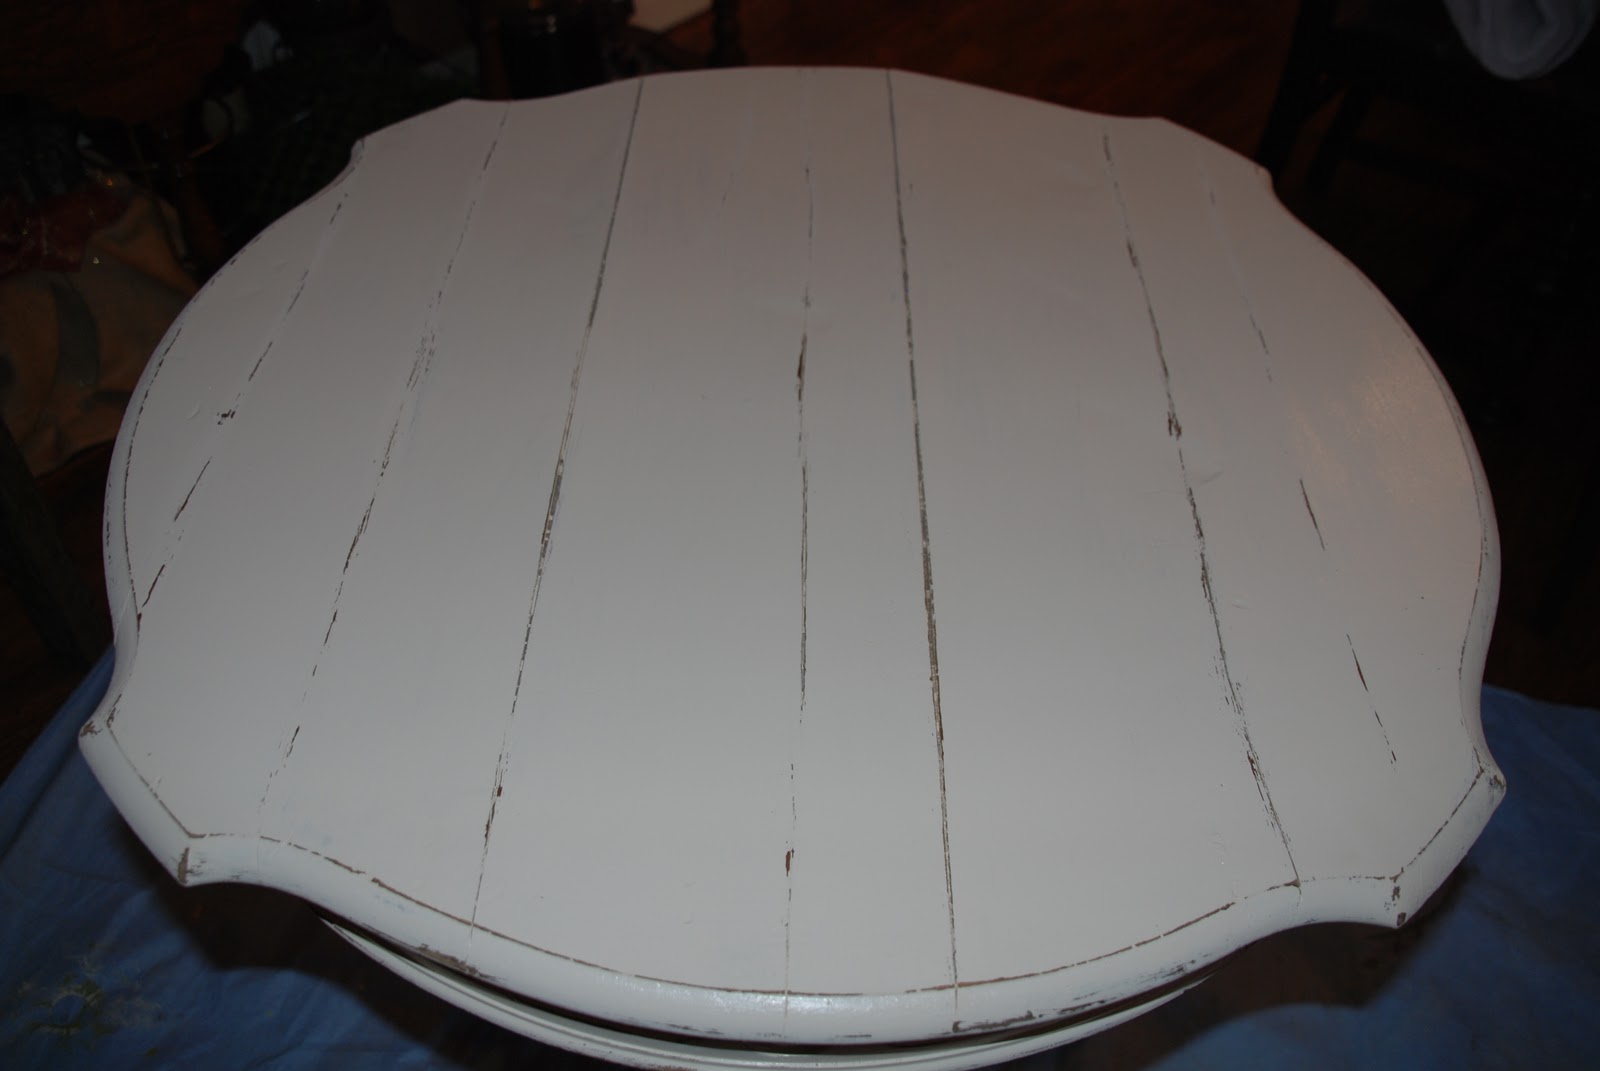
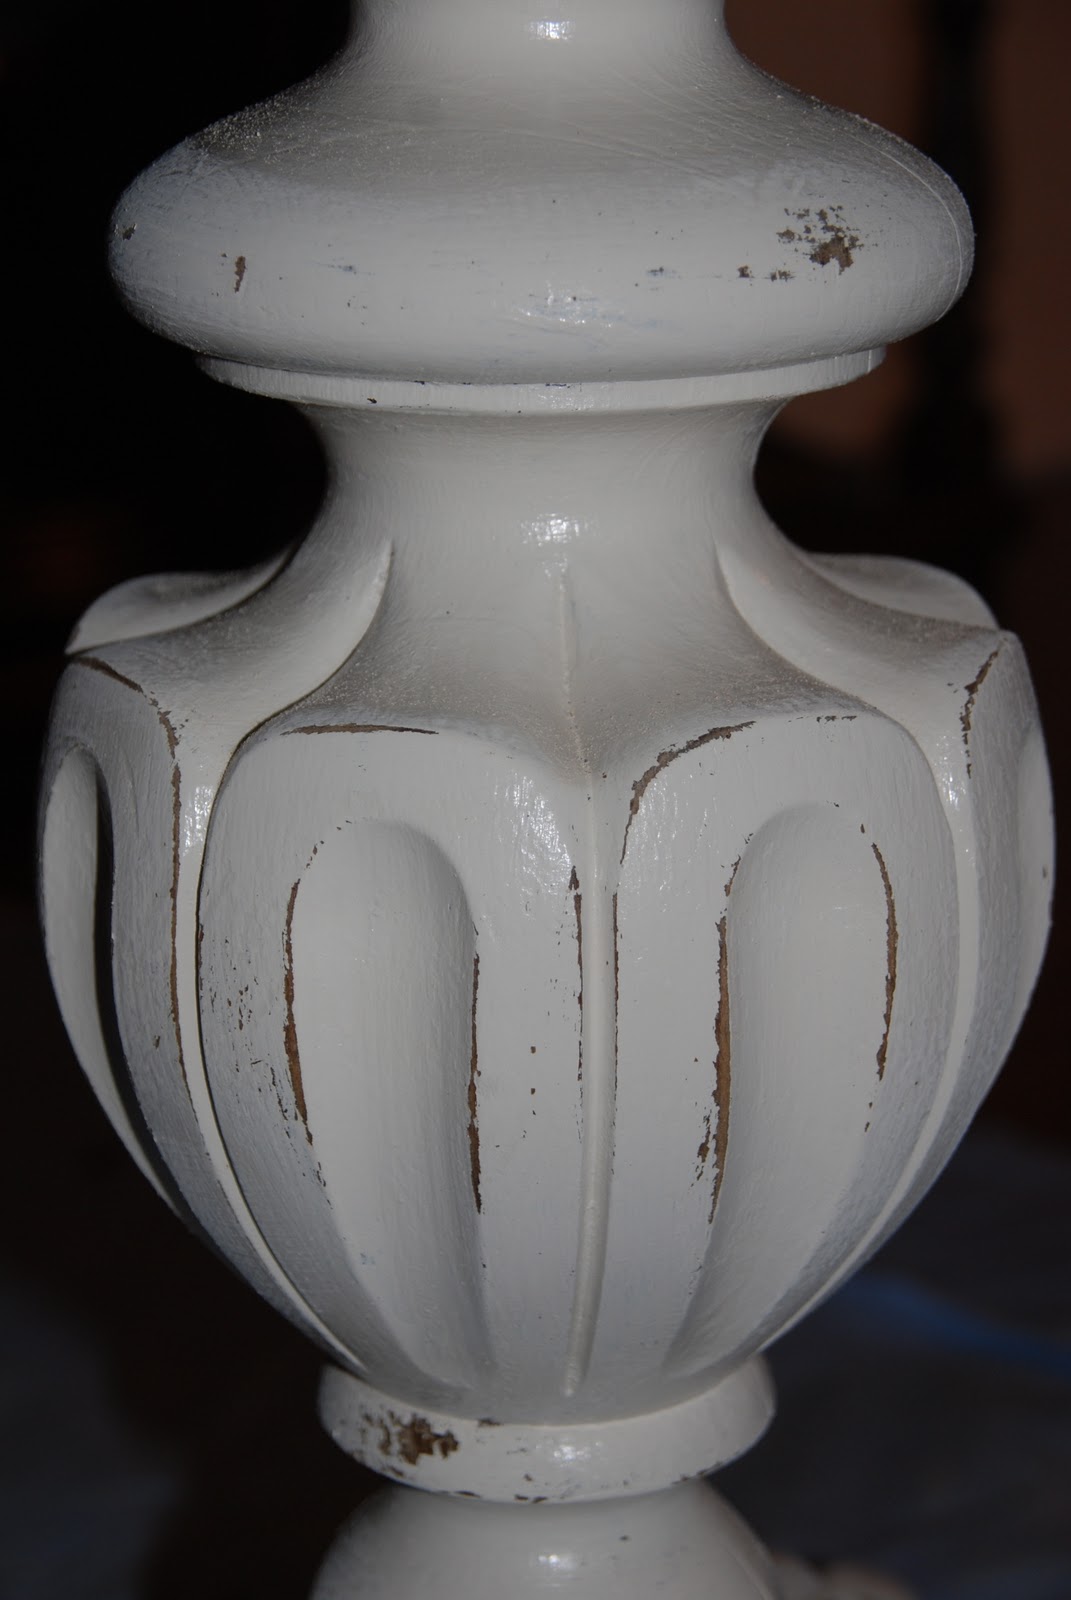
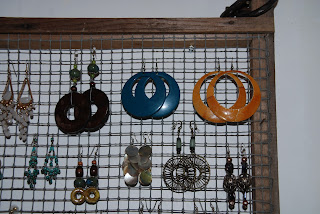
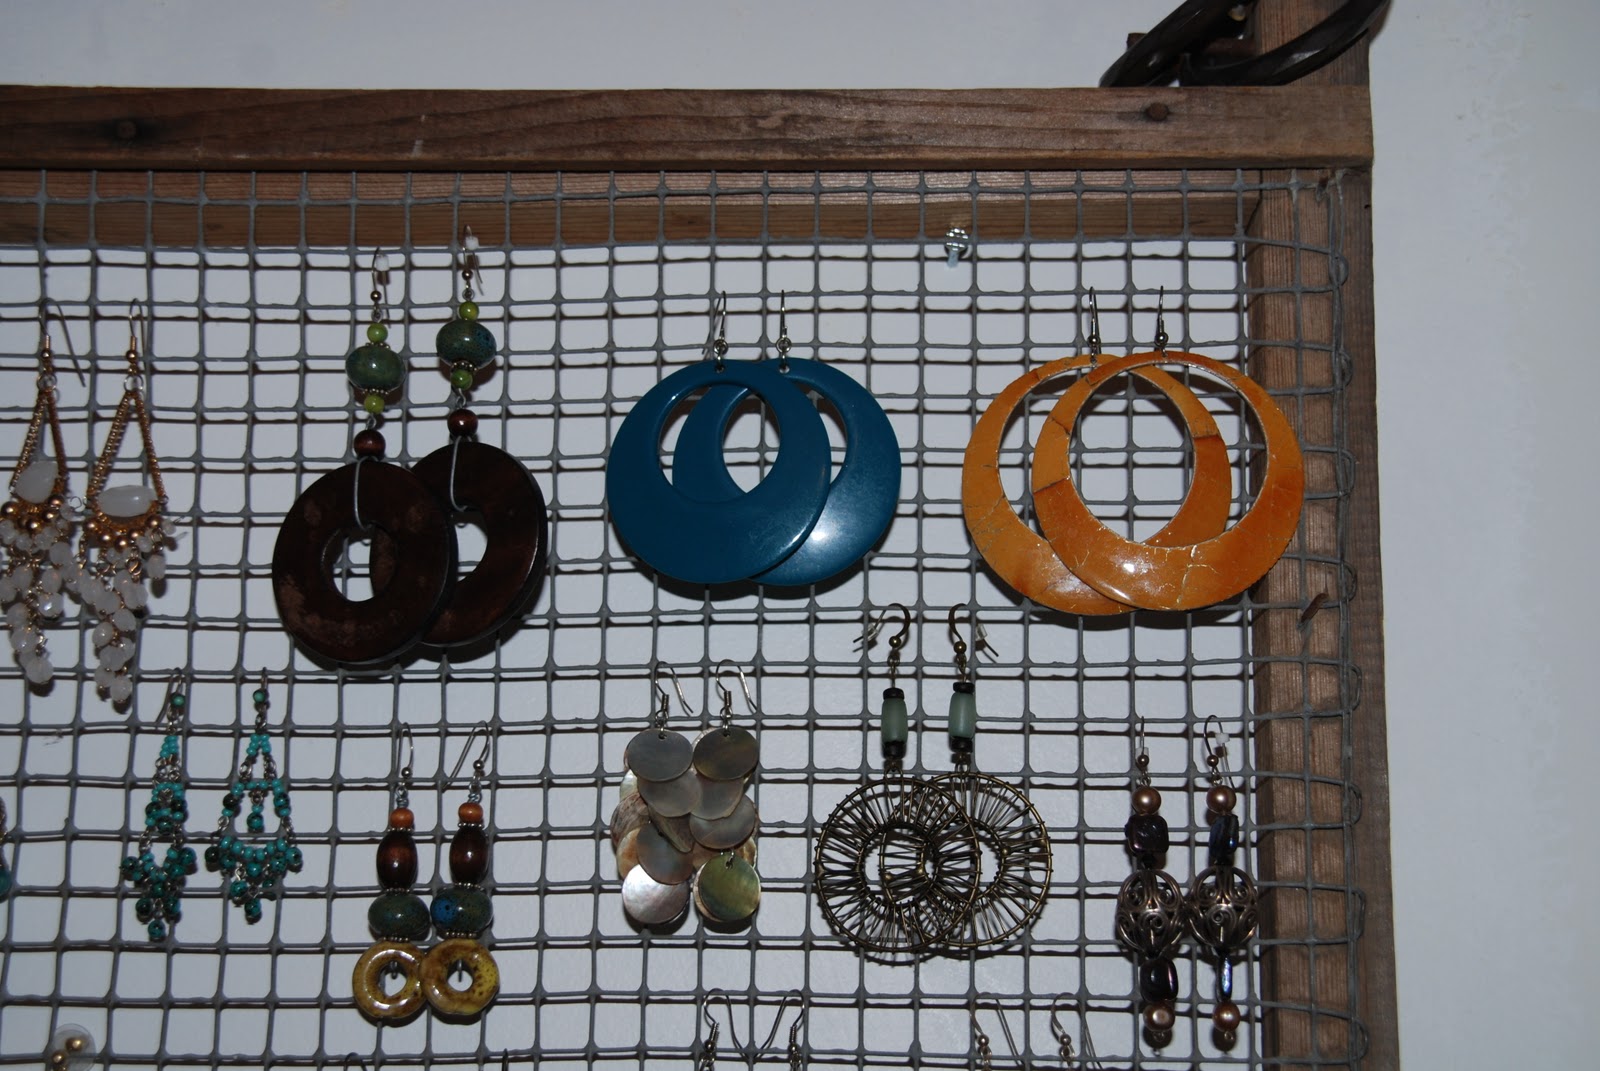
There’s something almost funny about how much I want my newer things to look old these days.  I’m actually adding glazes and stains to replicate the look of basically leaving something unattended in a barn for a couple of years!  Love it though!
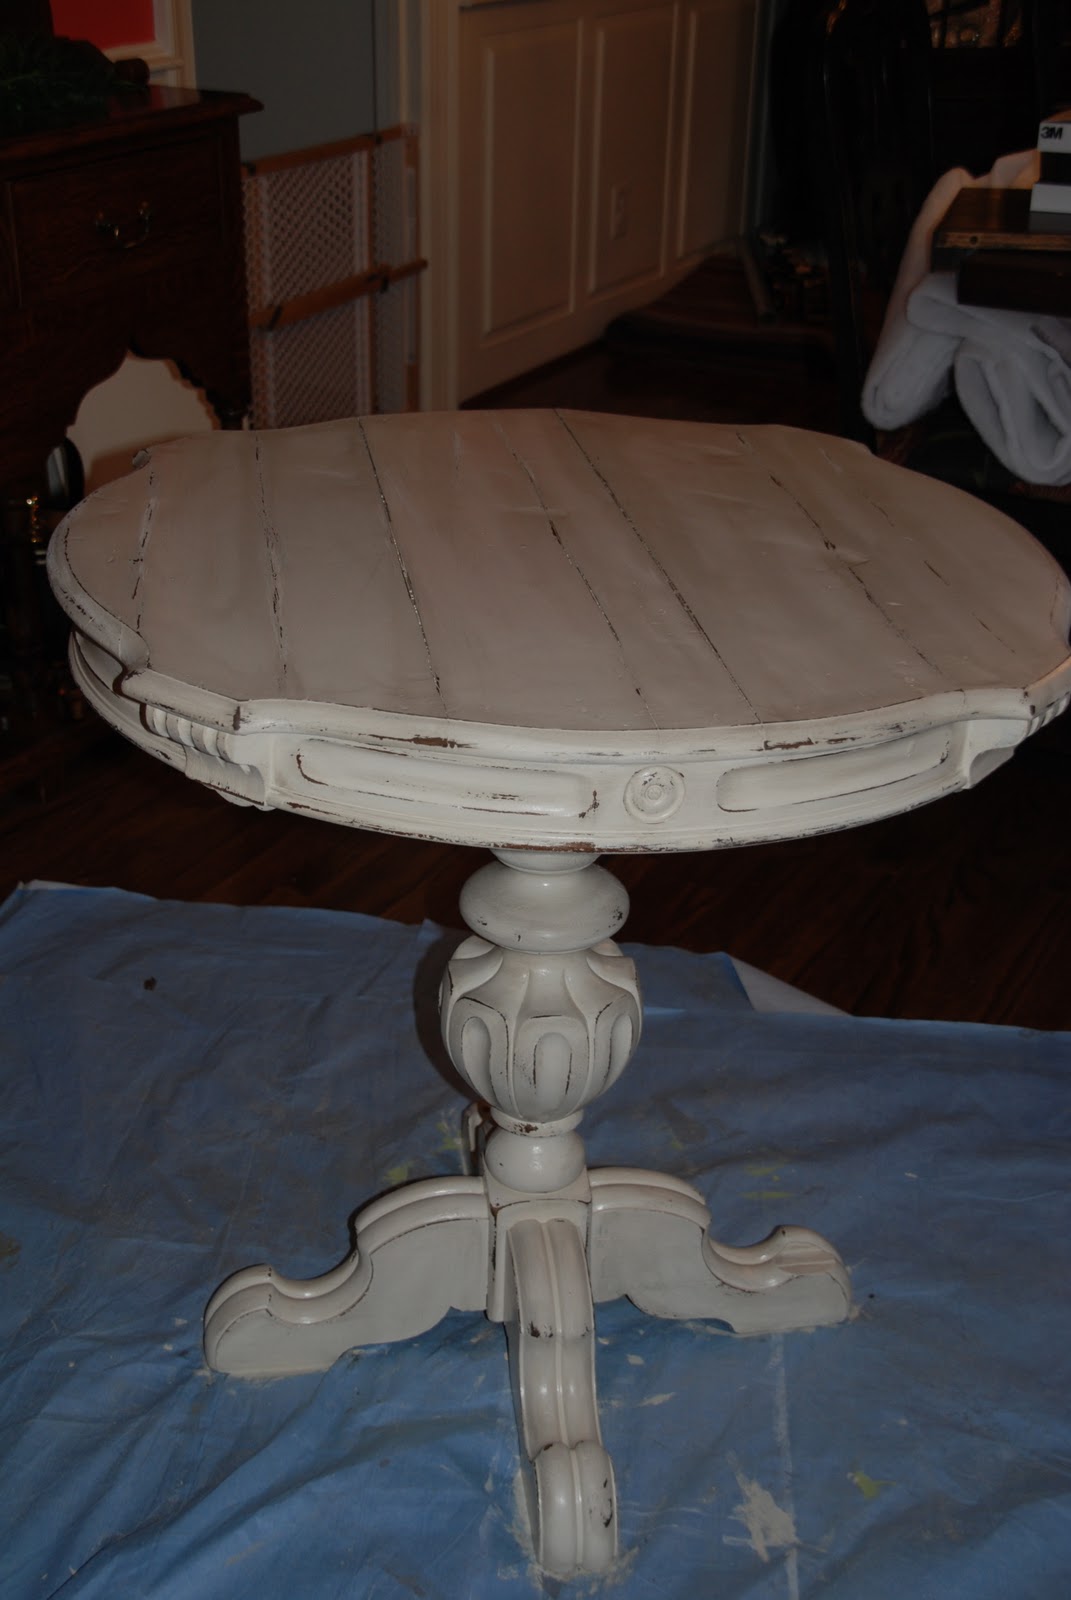
And the final product….well here she is!  You’ll have to excuse the dropcloth…I was just trying to get it done and take pictures for you quickly!  I’m pretty pleased with how it turned out.  I’d say it’s quite a nice transformation!  What do you think?

Happy hump day!

– Logan

Filed Under: Create

What’s Cooking?! Toasted Coconut Caramel Cream Pies

March 8, 2011 by Logan 1 Comment

Before I tell you this recipe, I have to apologize in advance that this pie will ruin your quest to be thin.  It will insure your jello jog, make you feel self conscious in your hanky pankys, and all in all destroy any shred of will power you might be trying to advance for Lent.

That being said…you will bite into a mouthful of this stuff and enjoy what I think a little slice of heaven must really be like.  I feel confident God will have this available for me in heaven.

Truth is though, I am not on a quest to be your Jillian Michaels. (Although I wouldn’t mind looking like her!)  I am not your Paula Deen either.  But, I am just your friend who will on occasion share a recipe that will make your worst days better….and this recipe is just that!

I took a gazillion pictures today, which frankly I think is a little annoying, so you have to tell me yourselves if you like the picture thing or if you’d prefer I ditch it in favor of just a written recipe.  I do know that for many of you though, the pictures are what put a recipe within your reach and if that’s the case, then it’s worth it to me to keep taking pictures to make you know that gourmet-like cooking is completely within your reach!

So before I introduce you to this decadent treat, I have to tell you why I made it.

This may come as no surprise to you, but I am my neighborhood’s official Welcome and Care Coordinator.  Basically when someone new moves in, I take them flowers, or pie, or dinner, or coordinate others to do it too!  I am the Welcome Wagon for our neighborhood and I am so excited about it!  And after a year of not having a single person to welcome around here, I have 2 in one week!  Oh joy!  So one of them I’m taking flowers to, and the other one I’m taking this pie.  And then I’ll flip flop in a few days and do it again!  This is so up my alley I can’t even tell you!

Anywho….here’s the pie!

Toasted Coconut Caramel Cream Pies 
(makes 2)

1 can sweetened condensed milk                        1 bag coconut
1 8 oz pkg cream cheese                                     1 c. chopped pecans
1 16oz pkg Cool Whip                                        1 stick butter (1/2 c.)
2 deep dish pie crusts                                          Caramel Ice Cream Topping

Bake crusts as directed by package and set aside to cool.  Toast coconut on baking sheet in the oven…at about 350 degrees.  Takes about 20 minutes, but you need to check it and stir it around about every 4 minutes til browned.  Melt butter in large saucepan and brown pecans for about 5 minutes or so.  Add toasted coconut to nut/butter mixture and continue to brown some more…over about medium heat.  You will need to be almost constantly stirring this to make sure it doesn’t burn. Set aside to cool.  Mix cream cheese and sweetened condensed milk well in electric beater til smooth.  Fold in cool whip.  Once everything is completely cooled, layer fluff mixture, coconut mix, and drizzle caramel topping 3 times in pie shells.  Refrigerate to set a few hours before serving.

I use these frozen crusts, but see how on the right I re-pinched the sides to keep it from looking so storebought.  So if I’ve given you these pies before know that I do love you enough to make homemade crust, but just don’t do it here!

Above you can see the difference from plain coconut to toasted. Also, here’s the butter and nuts to brown in a large saucepan!  This one is my favorite and it’s by All-Clad.  A good all purpose pan is something every cook should have in my opinion!

Once the nuts begin to brown, add the coconut and continue to brown all together.  Keep stirring so you don’t burn this yummy, crunchy mixture!  See the way it looks different from when you add it to when it’s done?


Blend the cream cheese and condensed milk til smooth, and hand fold in the Cool Whip.

Make sure you don’t forget to prick the pie crust with a fork or this giant bubble effect will happen! Oops!

Onc everything is cool, begin layering everything.  Do this 3 times til you’re done!  Then Voila!  Yumminess after chilling!

Bon Appetit!!!

– Logan

Linking up to Tidy Mom’s Best Pie recipes.  “Come join Love the Pie with TidyMom  sponsored by Cherokee USA, Le Creuset, Wilton, Bags by Bloom and  Harvard Common Press”

Filed Under: Eat

Tales of a Lesser Woman: I botched up my own recipe!

March 8, 2011 by Logan 2 Comments

You know the pizza recipe I shared the other day?  The fig and sausage one.

Well, I made it last night and even though I’ve made it LOTS of times before, I changed a couple of things this go round.  A couple of changes worked just fine, but a couple turned out to be the most ridiculous nightmarish cooking debauchles that will go down in my mind forever!

The good news is that it still tasted really good!

First, I will tell you that reconstititing dried figs worked just fine and I’ll definitely do it again.  To reconstitute dry figs you need to put them in a bowl and pour boiling water over them til they start to puff up.  I had to do this twice…pour out the first water when it starts to cool and pour another batch of boiling water over them.  They puffed up just fine, but they looked so disgusting.  My mom says I’m not allowed to tell you what we thought they looked like, but sufficed to say it was a very gross looking thing.  So when you serve these up, I recommend slicing them to put on your pizza so you don’t gross yourself or any guest out completely!  See what I mean?

Pretty bad huh?!

Well now that I’ve started your day out with something entirely inappropriate, I apologize.

Ok, for the rest of the pizza, I have to tell you…whole wheat dough made a mess!  It wasn’t as elastic as regular dough and it probably didn’t help at all that for some unknown reason I made each dough portion into one giant pizza instead of 2 smaller ones.  Since you have to put this on the grill, it works a whole lot easier to make smaller pizzas.  The big one stretched so ridiculously and made a mess.  My mom was here and we were laughing so hard over it that we were crying!  The first one was just enormous, but the second one tore into about 6 different pieces and was just a joke!

<—–Look!  This is the second one…once we put the onions and sausage on it.

<—– Even though this dough was a complete mess, you can’t tell by the time we put everything on it!  The whole wheat dough took a bit longer to cook as well.  Next time I’ll be using regular dough again.  Also, instead of arugula I typically use spinach because I always have it around.

<—— This is actually how many pieces that dough tore into!  The most important thing though was that it still tasted every bit as wonderful as it should!

 My mom said “Oh wow honey, this recipe is so easy and lovely I just can’t wait to rush right home and make it!”  But truly, it is actually easy…and definitely delish!  Just divide your dough, use regular pizza dough instead of whole wheat, and make sure you slice up the reconstituted scrotum-looking figs to put on the pizza so it looks nice!

So really…make this one. You will love it!

And I promised a recipe for a great pie today, so I’ll try to do that this afternoon.  Or I can post how to antique a table today?  What do you prefer?  Either way, it’ll all get posted soon enough!

– Logan

Filed Under: Eat, Journey

Recipes for life…Pie!

March 7, 2011 by Logan 9 Comments

Ok, so the pie I’m talking about here isn’t exactly a real recipe per say.

I probably just lost half of you after reading that statement, huh?  So I’ll make you a deal.  If you read this today, then tomorrow I’ll post a recipe for a killer real pie, alright?!

The pie I’m talking about isn’t usually as sweet, and I sure as heck don’t look forward to it like I do to dessert at the end of a good meal.  The pie I’m talking about is none other than…

Humble Pie.

And i ate a big fat slice of it today and felt like I was going to throw up the whole time.  Then afterwards I cried…because the reality is that I should have stuffed piece that down my throat a long time ago.

You know they say that first impressions make lasting impressions….well they do.  But if every first impression I ever made was the one people went to the bank with, I’m POSITIVE that some of my most amazing friends wouldn’t have ever come around to actually end up being my friend.

Several years back…and I do mean like 10, I remember meeting a girl at a restaurant after church one day with a big group of people.  I didn’t remember her name, or even that I’d met her really til she reminded me much later on.  But apparently the first impression I made was horriffic!  I’m so embarrassed to tell you this, but before I tell you about the particular piece of pie I ate today, I wanted to let you know that in no way do I consider myself above this particular tragedy of a destroyed first impression.  Anyways, this friend (notice she is a friend now) seriously had to be convinced by multiple mutual aquaintances to give me another shot.  She thought I was awful!  And now we laugh about it, and when I think about myself 10 years ago, in a lot of ways I’m sure I can see how she may have thought that I was awful given impressions of only a few things about me, but boy am I glad she let me have another chance.  Because I can’t tell you the ways this friend has changed my life…and one day I’ll interview her on here because her story will change yours too.  All to say….I’m glad she didn’t take my wretchedness of one encounter to the eternal bank with her….I’d have missed out big time!

Now about today…

Well over a year ago, I had a business encounter with a person that rubbed me so horribly wrong, I somehow just flat decided there was really nothing redeemable about the person.  (Mistake #1…and yes, I’m a big fat jerk.)  So for all this time since then, I’ve totally found something in me tense up even seeing the person, hearing other people say something relatively nice about the person and finding myself in complete doubt that the nicety could be true. (I know…I’m a jerk….but if we’re being honest here, surely this has happened to you too.)  But I’ve just ignored it…and had no reason to really encounter or interact with this person at all since then.  So I pushed it to the back burner….which by the way will still boil over if you leave it long enough.

So lately we’ve found ourselves in a conundrum…the Hubs and I.  See, the very business need from before came up again.  And this time, there’s a person the Hubs really likes working for this business that I was so offended by before.  But still, we’d like for said friend to benefit financially from a service we have no choice but to use someone to accomplish.  You see the conundrum?

Maybe you don’t.  But it has been a conundrum for us.

But here’s the deal about finding yourself in a conundrum.  You have to ask why you’re in it, and sometimes you’ll maybe realize you need to eat some humble pie… and then you have to actually admit that you may have been wrong.

GASP!

I will grant myself that it was a horriffic first meeting by multiple counts, but I have taken that encounter to the life bank about that person.  And I let it color how I view him/her, how I view the thoughts of others, how I feel in general.  That’s a lot of coloring of a really ugly color.  And here’s where I have been wrong.  I judged someone so severely because of one meeting.  Judgement isn’t mine anyways…I’m just as sinful as the next person. And I’m thankful as all get-out that God is in the business of second chances…and thirds, and fourths…and more.  Because heaven knows I use those up for sure!

So today….I walked up to the person and introduced myself.  (I’m so horrified to even confess that I had to introduce myself…person didn’t remember meeting me and here I’ve been harboring resentment.)  So I said “Hey, I’m Logan Wolfram.  And I need to ask for your forgiveness.” 

Literally…that’s exactly how I started out.  How’s that for an intro?!

I can’t imagine what the person must have been thinking at that moment, as I freaking introduced myself and in the same breath asked for forgiveness.  But, where I’d expected there to be something harsh about the person, I saw geunine concern and sorrow.  The person asked what they’d done and I shared a tad, but mostly just absorbed the blame because it really doesn’t matter what they inadvertently did a year and a half ago.  It doesnt matter….and I let it matter so much for so long, that the problem became mine, not theirs. 

Get that…the problem became …. Mine.

And mostly then I wrapped it up, awkwardly hugged this person who’s clearly not “a hugger” like I am, and then I walked back to where I’d been and sat down.

I cried then.  I cried because I felt free from bitterness.  I cried because I was mortified at my own wretchedness to hang on to something and make a mountain out of a mole hill.  And mind you that was a mountain that I had to climb….not the other person.

But you know what, that 3 minute interchange….it freed me up.  It freed the other person up too.  And in the time it took to do that, I wouldn’t have even finished eating a real slice of pie.  This pie…it made room in my soul for something better.  And while it was definitely a harder pie to order, it’s one that will leave me feeling much more satisfied with myself and my life in the long run.

– Logan

**Anyone or anything in your life maybe beckoning you to eat a slice of humble pie?  Once you order it, I promise you’ll be glad you did.  So do it…and make room in your life for something much sweeter!

Filed Under: Journey

Apples to Earrings….a fantastic repurpose!

March 6, 2011 by Logan 1 Comment

Meant to post yesterday but the Hubs actually got to spend the whole day at home with us, so we were soaking that up as much as we could.  Also, my internet was down for some reason and I didn’t want to bother him with fixing it since our time all together has been pretty short here lately.

I will tell you though, I got my project on while he took a nap for a little while yesterday afternoon!  I guess being uninspired the other day gave way to inspiration overload and now I just don’t have enough hours to finish all that I want to do!  I’m so excited!

So yesterday, I refinished a table that I’d started painting Thursday, refinished a huge picture frame, recovered a lampshade, and did a little bit of antiquing…all during the nap!

Fortunately for me, the Hubs likes to go antiquing, so that was a fun little outing we took all together yesterday….there is just something about finding a really great treasure and getting a good deal on it!

So for right now, I’m going to show you a super fun find that I didn’t have to do anything to in order to use it.  Just a little creative brilliance on the spot and VOILA…a really fun re-purpose that I keep walking past just to look at it!  LOVING this new idea!

Meet…the old apple drying rack that I picked up at my favorite antique emporium for $12.  Probably could have talked the price down some but didn’t care that much because I was so pleased with my re-purpose idea that it’s absolutely positively worth it to me to pay the full $12.

I hung it on the wall so that I could do THIS!

I am so excited about this that all I need to do now is get more fun earrings to  fill it up!  I can see them all at once and there’s plenty of space for new creations and acquisitions!

PS. You’ll have to excuse the wallpaper glue as well as the unattractively colored trim and walls in my bathroom.  I stripped the wallpaper awhile ago and haven’t settled on what I want to do in there (beyond not wanting the previous owners wallpaper.)  And since it appears that the tile surround of our shower/tub was mounted directly to the drywall, we’ll be replacing it unexpectedly and I don’t want to do something only to have it undone in the near future.

I have loads more fun projects to share with you this week.  How to antique a table and a picture frame, re-cover a lampshade, and a completely fab find from our antique outing that I’ll be refinishing in the near future too!

Just had to share this little visual snack for now though!

– Logan

Filed Under: Create

What’s for Dinner?!…Fig and Sausage Pizza

March 4, 2011 by Logan Leave a Comment

This morning I’m not feeling it.  I’m not sure what “it” is, but I just know I’m stinking worn out and not up for anything.

I did go to Whole Foods this morning after I dropped Tid Bit off at school…my little grocery oasis.  You know you’ve come a long way from the days of driving a convertible and playing til all hours when your “oasis” is a specialty grocery store.  But it is.  I even bought flowers to make me feel happy…they’re kinda working.

I’ve told you before that the Hubs is working like a dog here lately.  It is REALLY starting to catch up with the boys and me.  And it’s not like the days are that bad, it’s the nights…or rather, from 4pm-bedtime.  I miss my honey.  My boys miss him.  And we’re all pretty weary of not seeing one another.

So if you’re wondering why I haven’t posted a fabulous recipe here for a bit…it’s because we’ve been living on Tyson Chicken nuggets and Kashi microwave meals.  Really…I should buy stock in Kashi.  Their sales have increased significantly in the past month…I promise.  Me telling you that is probably a bit like insider trading….here’s to hoping it doesn’t go for me like it did for Martha.

But for real.  I have ZERO motivation to cook when my honey isn’t around to appreciate it.

The one thing I’ve been craving for months now won’t be ridiculously amazing again til it’s fig season in the summer, but I bought some dried figs today and am going to try reconstituting them (that’s done by soaking them in boiling water til they plump up again) to make this most amazing recipe.  I’ll go ahead and post it for you now, but know that I’m going to post it again this summer so that you don’t miss it when figs are in high season.

Here’s the really fun part.  Make salad one night from this and make the pizzas the next night for dinner.  So you get 2 amazing dinners from one time of real prep work…there’s a winner for the uninspired for sure!

Grilled Sausages with Figs and Mixed Greens

Ingredients
•6 fresh lamb sausages, spicy Italian sausages, or garlic sausages (i used mild Italian sausages that i crumbled and sauteed)
•4 1/2-inch-thick red onion slices
•10 tablespoons Pomegranate-Cumin Dressing, divided
•12 cups mixed greens ( i mixed spinach and arugula)
•3/4 cup crumbled soft fresh goat cheese
•6 fresh figs, halved
•1/4 cup (packed) sliced fresh mint leaves

Preparation
•There are 2 ways to do this.
Way 1) Prepare grill (medium-high heat). Brush sausages and onions with 3 tablespoons dressing; grill sausages until cooked, 15 minutes, and onions until charred, 10 minutes.
Way 2) Here’s where I did it differently.  The first time I made this I did it this way above that was suggested, but I honestly thought it harder and not as tasty.  The next time I made it and how I do it now, is to crumble and brown the sausage and caramelize the onions inside over the stove earlier in the day.  So by dinner time all I’m doing is rolling out the dough and assembling the pizza.  I think it tastes better this way too because it’s easier to bite and each bite is tastier with the crumbled sausage b/c it spreads around more easily.

Toss greens with remaining dressing; mound on plates. Slice 4 sausages (reserve 2 for pizza). Top greens with sausages, cheese, figs, and mint.

Dressing recipe

Pomegranate-Cumin Dressing
Makes about 1 cup 
Ingredients
•7 1/2 tablespoons extra-virgin olive oil
•4 1/2 tablespoons white balsamic vinegar
•3 tablespoons sliced fresh mint leaves
•1 1/2 tablespoons pomegranate molasses
•1 tablespoon ground cumin
•6 tablespoons minced shallots

•INGREDIENT INFO
If you can’t find pomegranate molasses at the supermarket or a Middle Eastern store, make your own by boiling 1 cup pomegranate juice until reduced to 3 tablespoons syrup, about 15 minutes. (this is what i did and it was really easy.) And I made extra and froze it in 2 Tbsp portions in a silicone ice cube tray so I’d have the pomegranate molasses any time I wanted it.

Preparation
•Whisk first 5 ingredients in bowl. Mix in shallots; season with salt and pepper.

Fig and Sausage Pizza

Ingredients
•1 pound purchased fresh pizza dough
•5 tablespoons Pomegranate-Cumin Dressing, divided
•1 cup coarsely grated Fontina cheese
•Fresh arugula
•2 italian sausages, I actually remove the casing and crumble and brown them on the stove…easier and then there is sausage in every bite.
•6 fresh figs, quartered
•2 thin red onion slices, rings separated – I also caramelize onions on the stove too
•1 cup crumbled soft fresh goat cheese
Preparation
•Prepare barbecue (medium-high heat). Halve dough; roll to 10-inch rounds. Brush tops with some of dressing.
•Grill pizzas, seasoned side down, until golden on bottom, about 4 minutes. Turn pizzas over. Top with Fontina, arugula, sausages, figs, and onions. Drizzle with more dressing. Cover; grill until Fontina melts and pizza is cooked through, about 4 minutes. Top with goat cheese. Grill until goat cheese softens, about 1 minute.

I’ll take step by step photos when I do this this summer again, but for now you must see what you can do to try it.  I’ll let you know how reconstituting the figs goes too.

Ok…hope that whets some appetites out there.  Did mine for sure!

I’d say “thank goodness it’s Friday” here, but since it’s likely the Hubs will have to work tomorrow (making today another regular weekday for us,)  I’ll just say “happy Friday” to you instead.

– Logan

Filed Under: Eat, Journey

  • « Previous Page
  • 1
  • …
  • 36
  • 37
  • 38
  • 39
  • 40
  • …
  • 43
  • Next Page »
  • 
  • 
  • 
  • 
  • 
  • 

Subscribe by Email

Oldies but Goodies

Copyright © 2025 · Logan Wolfram · Logo by Annie Barnett · Site by Design by Insight