 I’m up to my eyeballs in Christmas decorations around here.
This is the first year EVER that I have even gotten my Christmas stuff down before Thanksgiving. If I don’t get a jump on it though, there’s no way I’ll get it done in time for the Lily Pottery Jewelry show that I’m having here the Tuesday after Thanksgiving. (Which by the way, if you’re local and want to come, you’re invited…email me for directions.)
And since I’m going to have a Christmas party this year too…I just have a lot that I want to get done.
My living room has been the most fun to do so far since I’ve been crafting up a storm with those hymnals I bought about a week ago. Today I thought I’d give you a tutorial for this fabulous wreath made from hymnal pages. The first time I saw one was on Miss Mustard Seed and I didn’t realize until just now that she’d done a tutorial. So for all my intents and purposes, I was doing it blindly….turns out my ingenuity was pretty much the same as her method in the end. So here’s what you’ll need to make one.
- An old hymnal, book, or sheet music
- glue gun
- sturdy cardboard
That’s it. I’ll show you the pictures of how I did it and then explain along the way.
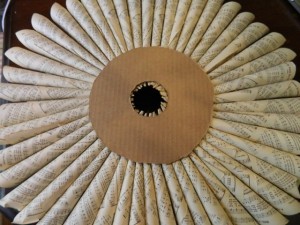
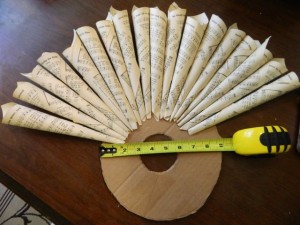 From a sturdy piece of cardboard, cut a circle. I used a very specific circle cutting guide called a “salad plate.” As you can see mine is about 9 inches across. Then cut another circle in the center…this time I used a specific circle guide called “the lid of my sugar bowl.”
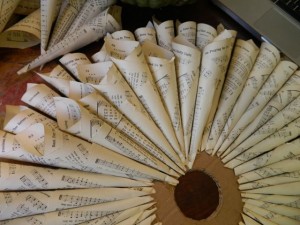
Next you’ll begin to make cone shapes from the pages. Since I wanted my wreath to be 3 cones deep, I rolled each section of pages slightly differently. I’ll show you.
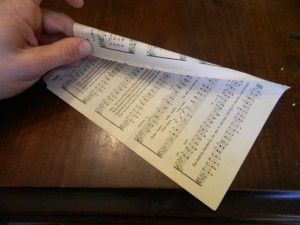 For the outer grouping, make sure that the point of the cone is at the very bottom corner of your page. Roll at an angle, and then secure the page at the final corner with a small bead of hot glue. Make a ton of these until you fill all the way around your cardboard. My finished wreath is about 2ft across (if you want it smaller than that, I suggest you adjust your circle size.) Begin gluing the cones onto the cardboard. Since I wanted my wreath 3 cones deep, I made sure to leave room on the cardboard for a couple more rows of cones to glue on.

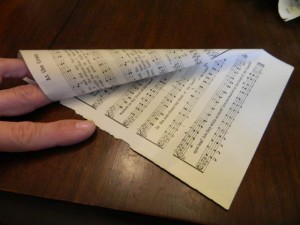
For the second layer of cones, I wanted them to be a bit shorter so that they wouldn’t completely cover the back row. To do this, you’ll use the same rolling method above, but when you begin your cone, the bottom point should be maybe 3/4 up the side of the page. See how I did it here? Then roll it the rest of the way and secure the end with glue again.
Make a bunch of these too and you’ll begin to glue them onto the cardboard guide as well. I made my second row points touch the edge of the center circle. Fill this all the way around. I found it necessary to run a line of glue along the length of the cone at the back to secure it to the cones behind it.
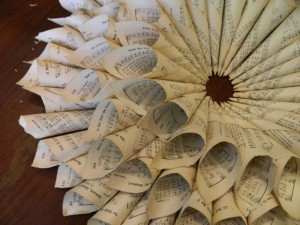
For the final center row, you’re going to make more cones again, but this time the point of the bottom will be about halfway up the page like this. Again, my reasoning for shortening the lengths of the cones with each layer was because I wanted the cones of each layer behind to show.
You’ll run a bead of glue along the length of these cones too and secure them to the cones behind as well. When you secure these center cones, you will completely cover your cardboard circle’s center so that you don’t see the cardboard at all.
When you’re done, the front and back of the wreath will look like this…
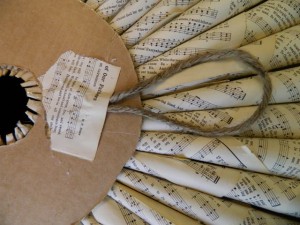 In order to hang the wreath, I used a piece of jute rope, hot glued it on to the back and then covered it with a scrap piece of paper…just to be able to mash the glue into the rope well.
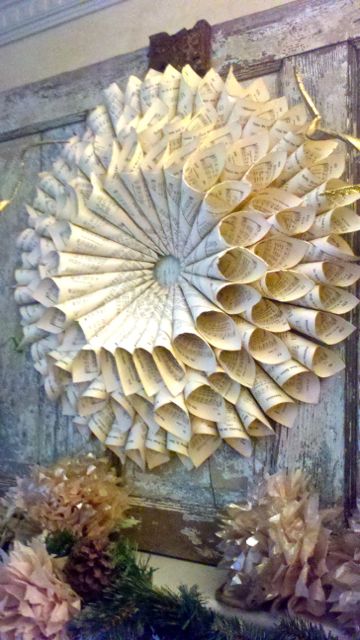
I’m pretty pleased with the results, and my mantle decor is taking a real turn towards awesomeness with this beauty hung onto a chippy looking old door that I put over the mantle. I’ve been making ornaments and even hymnal flowers as well that are turning out great. I’ll show you about those later this week too!
Sorry for the blurry photo below too. We left our camera at a friend’s house the other night and I’m having to use my phone!
 All total, this wreath cost me maybe $1 to make since I didn’t use even 1/2 of my 75 cent hymnal, cut my cardboard from an old box, and I already had loads of hot glue. It’s maximum impact for minimum dollar value, and I think it’ll look great all year as I change the mantle decor around it! Once I get the mantle decorations finished for Christmas, I’ll show you the full view!
Happy Crafting!
